Porting a NexGen Model to VR Chat
A Tutorial by DandyBouquet. Last Updated 2024/6/5
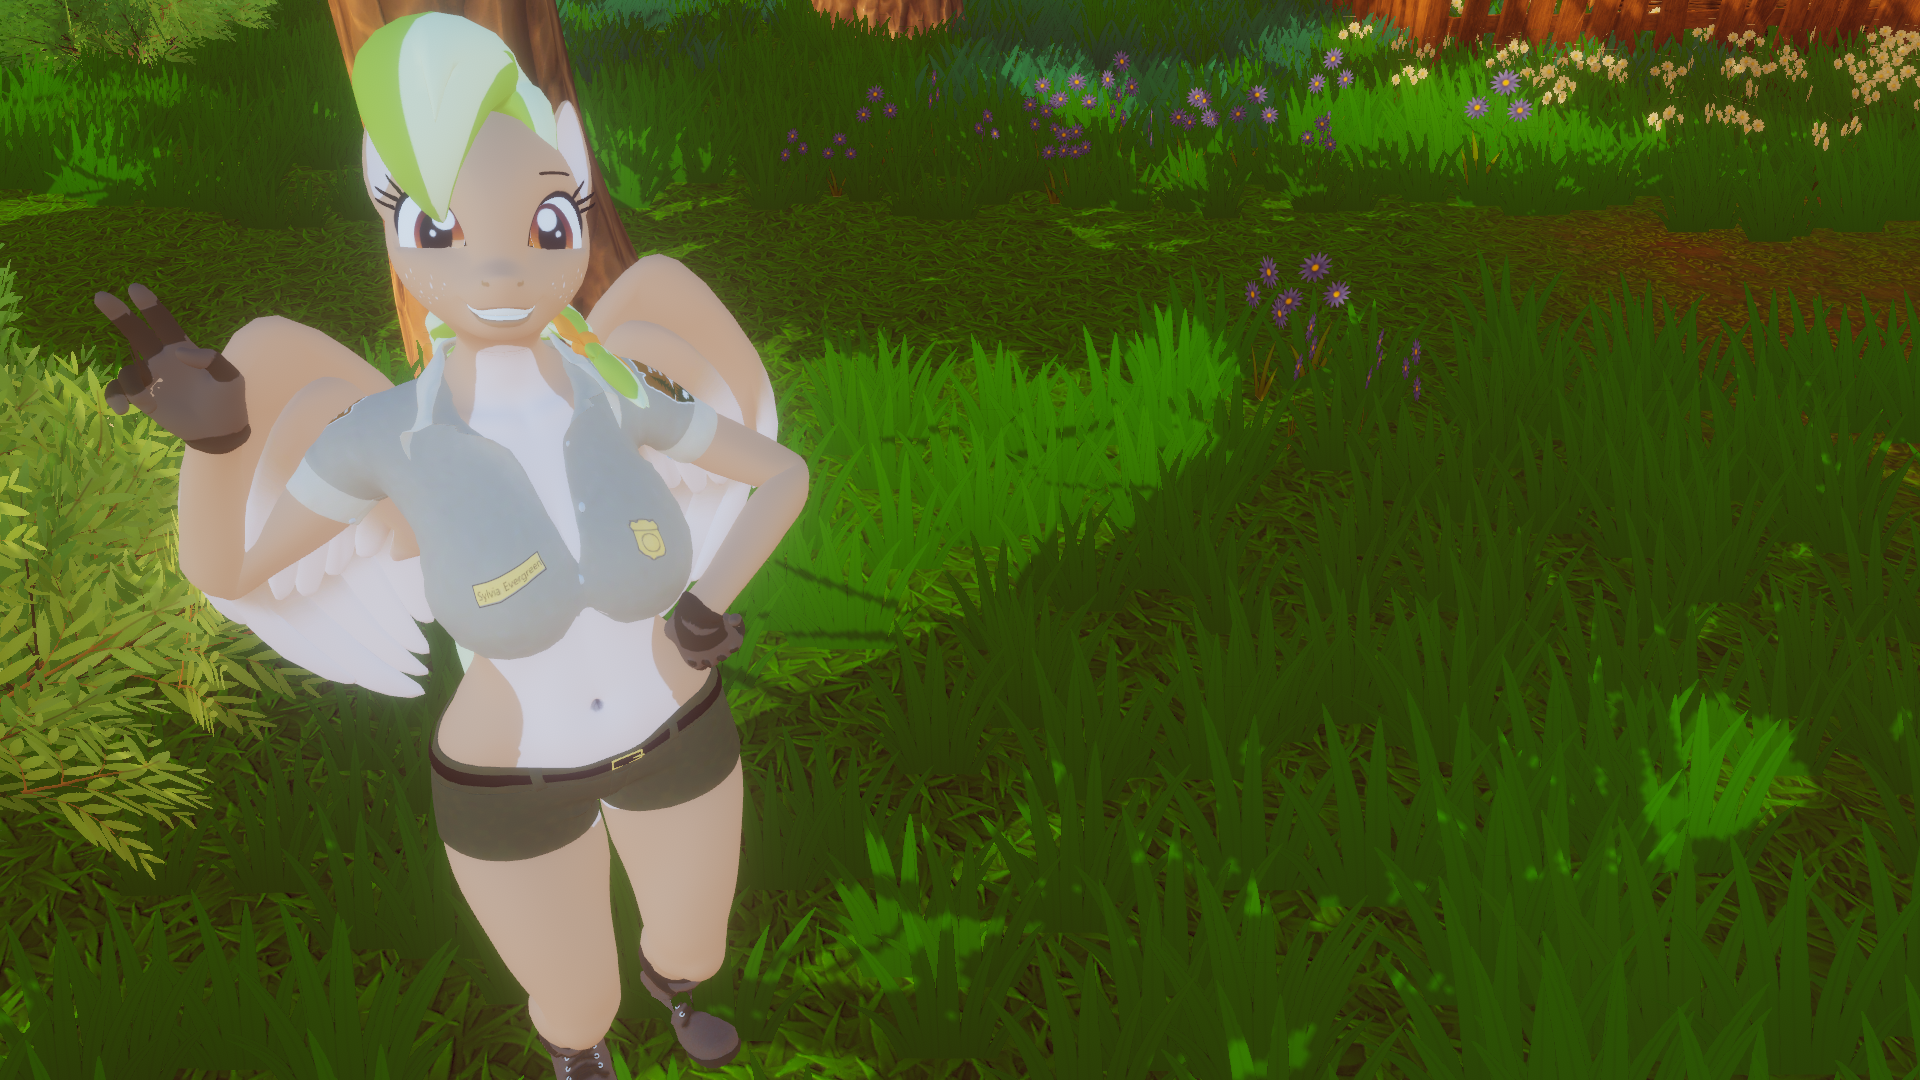
Table of Contents
- Introduction
- Installation
- Preparing the Model
- Unity Initial Setup
- Adding Jaw Movement
- Adding Eye Blinking
- Customizing Body Proportions
- Adding Facial Expressions
- Adding Phys Bones
- Adding Outfits
- Publishing your Avatar
- Conclusion
- Credits
Introduction
This tutorial describes how to create a basic VRChat avatar from a NexGen SFM model.
The avatar will have:
- Facial expressions
- Customizable body proportions
- Eye blinking
- Jaw movement
- Phys bones
- Toggleable outfits
Before you begin, ensure you have your NexGen model files, which should include, at a minimum: a .mdl file for the meshes and .vtf files for the textures.
Installation
Here are the tools you will need to create your avatar.
 Blender
Blender is a 3D modeling software. This will be used to set up your model’s geometry and textures before turning it into an avatar. I used Blender 3.4 for this tutorial, but newer versions should work too.
Mesh Data Transfer Add-on
This Blender add-on is needed for creating outfits, so that shape keys can be copied from your body to the outfit.
Source Tools Add-on
This Blender add-on is needed to import Source Engine model files (.smd and .dmx) into Blender.
 NexGen Sources
These include model files for NexGen models, which you will likely need for its base bodies and head models. Your custom NexGen model may not come with a body, so it needs to be grabbed from the NexGen sources.
Download Links:
 Crowbar
Crowbar is a standalone tool used to decompile your model (/mdl file) into a usable format for Blender (.smd).
 VTFEdit
VTFEdit is a standalone tool used to convert your texture files from a Valve texture format into a standard format like png or tga.
 VR Chat Creator Companion
The VR Chat Creator Companion is used to set up Unity projects for creating VRChat avatars.
 Unity
Unity
Unity is the main tool used to configure and upload your avatar.
 VRC Fury
VRC Fury is a Unity plugin used mainly for adding outfits to your avatar.
Preparing the Model
Some steps are needed to gather your model files and set them up in Blender before you can jump into Unity and configure them as an avatar.
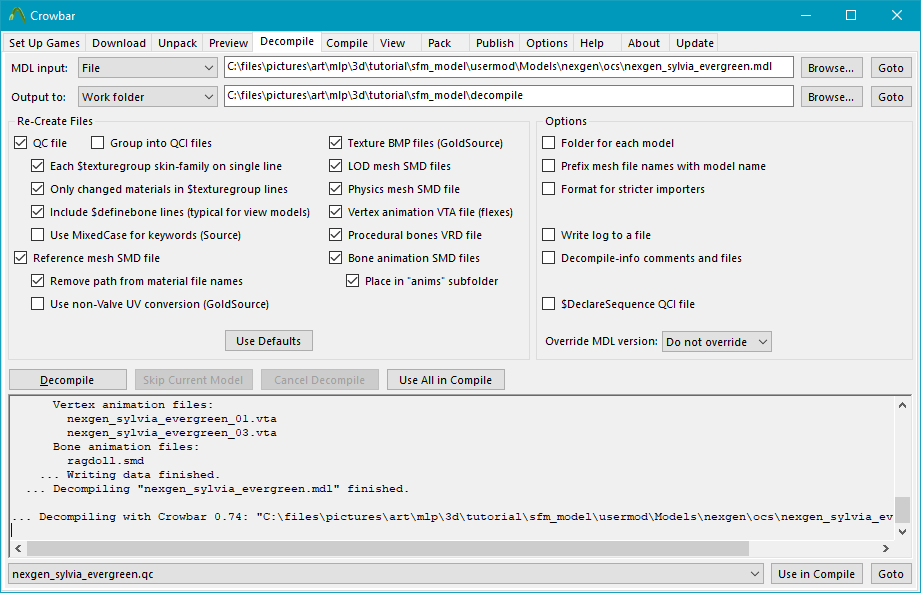
Decompile Model Files
This step is for converting your model and texture files into a format that can be imported into blender. If you are starting with an SFM model, then your files will be in a binary format used by the Source engine. Crowbar is used to decompile these files back into usable formats.
Open Crowbar. Switch to the Decompile tab. At the top, next to MDL Input, locate the path to your SFM model’s .mdl file. Then specify an output directory that the decompiled model will go to. For this purpose, I’ve created a folder called ‘decompile’ in my SFM model’s root folder. You can leave all the other options as the defaults. Click Decompile, then wait for it to complete. It will create .smd files in the output directory which contains all the mesh data. It creates other files too, but we won’t need them.
Decompile Texture Files
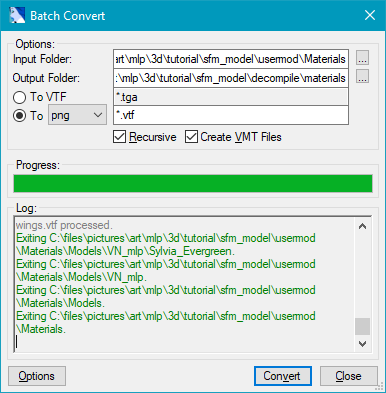
Same as with the models, the textures need to be converted to a more usable format. Open VTF Edit. Set the Input folder to your model’s Materials folder, and set the output folder for where you want the converted files to go. Select the “To” radio button and change the file type to your desired format (I used png). Now click Convert and wait for it to complete.
Import Models into Blender
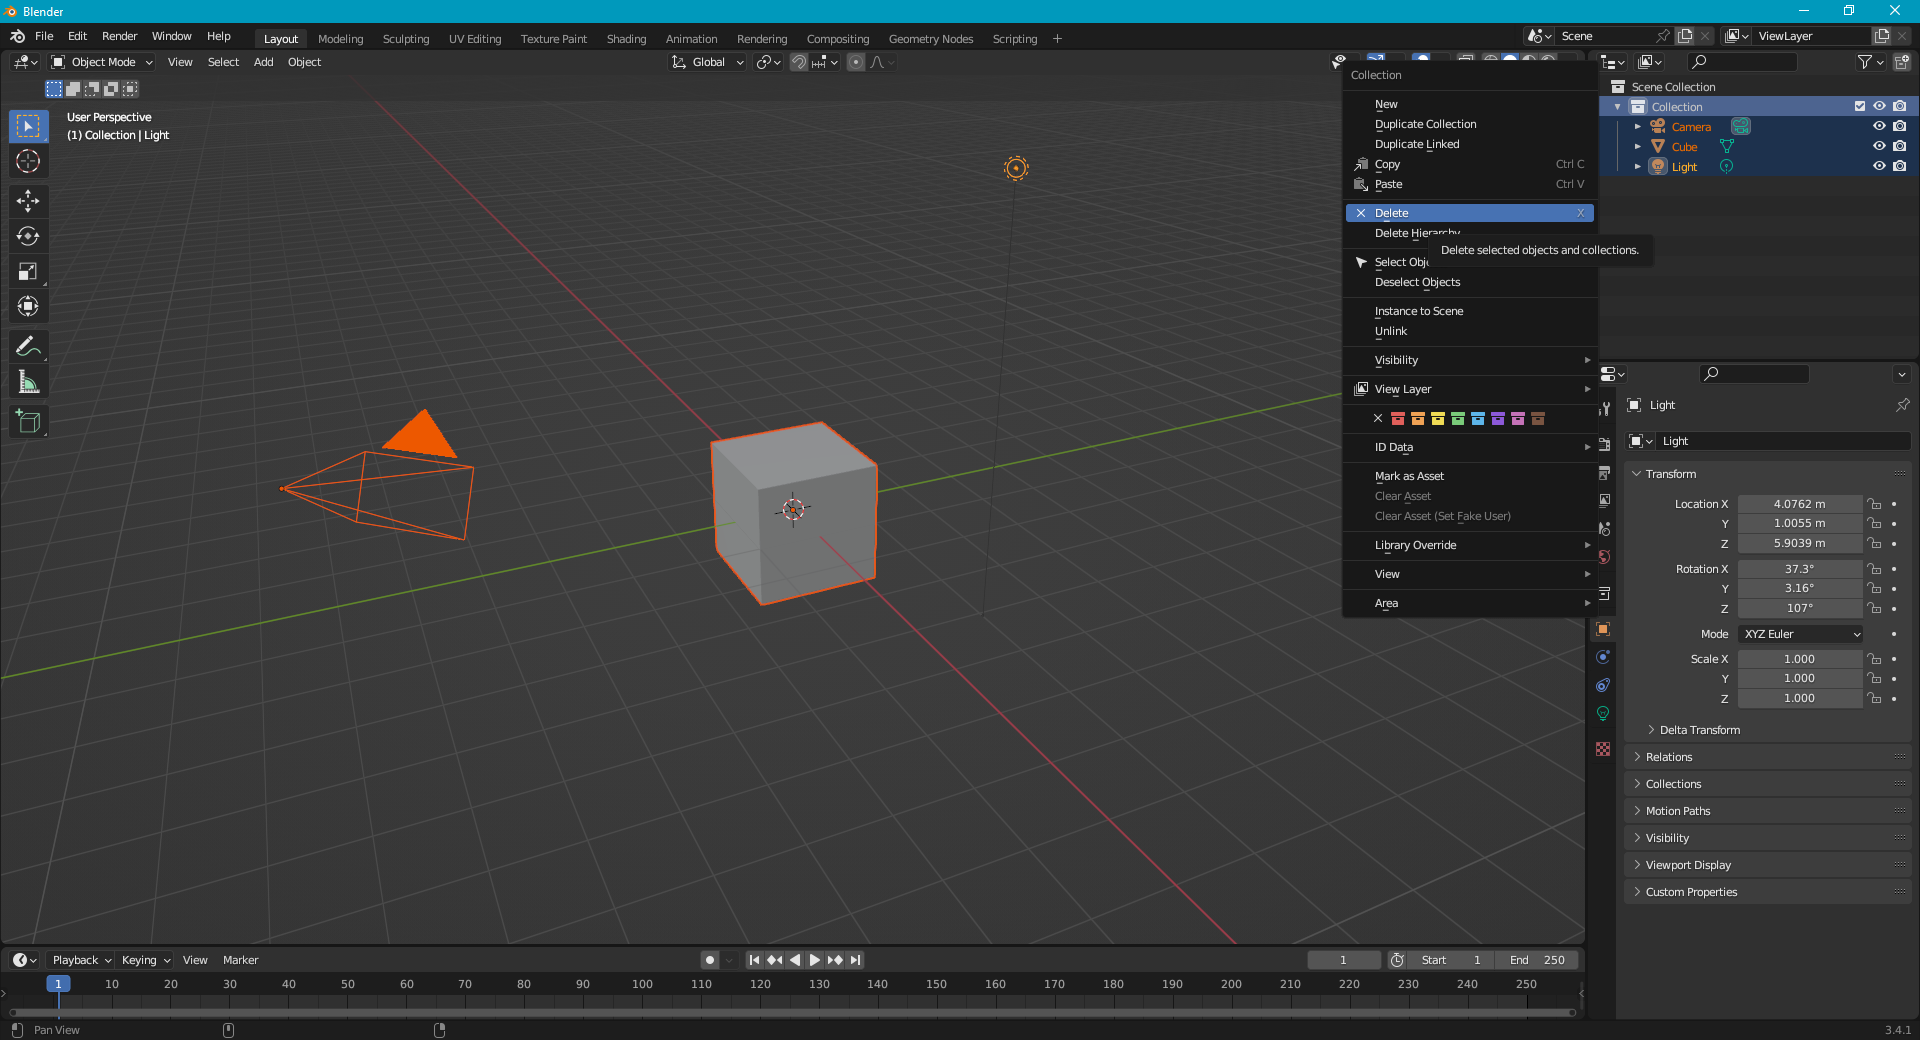
Open Blender. It will create a new project for you. Start by deleting the Collection in the hierarchy along with the Camera, Cube, and Light. This way, they won’t accidentally get added to your avatar. Then, save your Blender file.
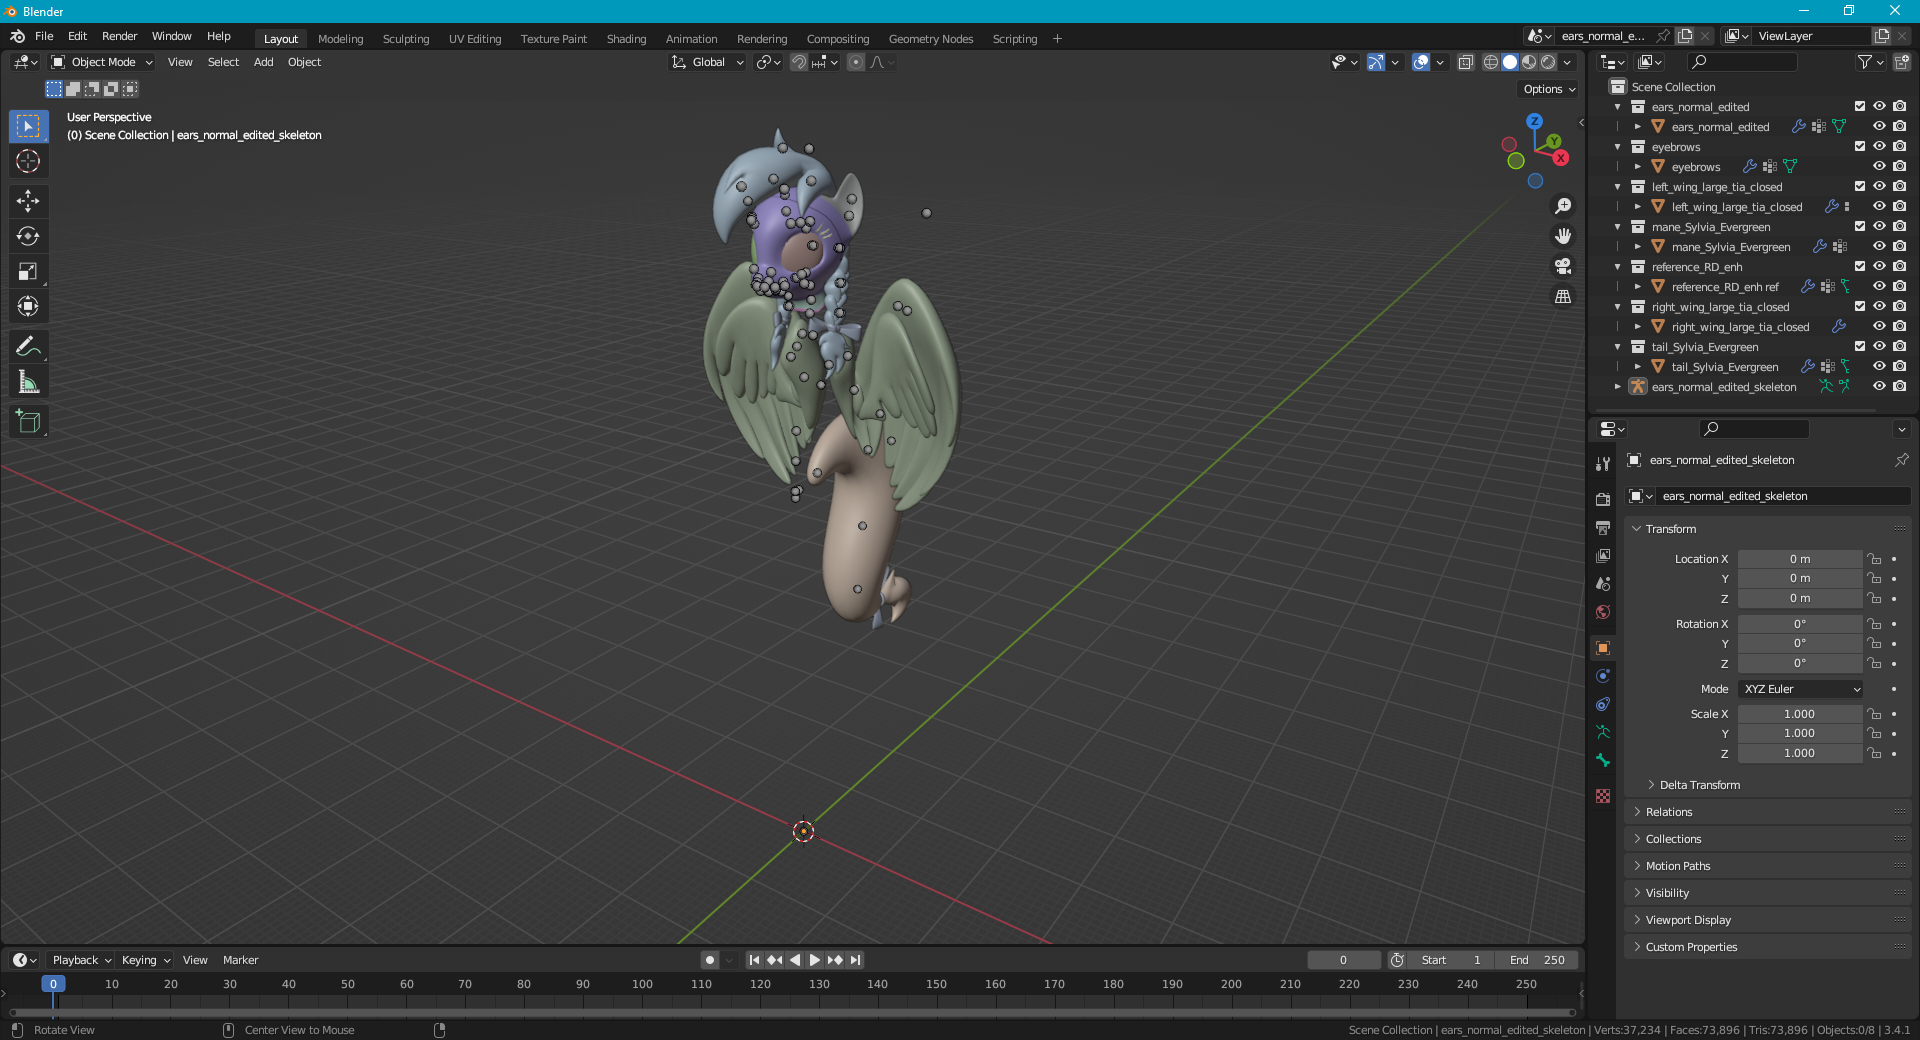
Now, import your character’s models. Select File > Import > Source Engine. Navigate to your decompiled model files. Select all the .smd model files that you want to use for your avatar. You can ignore the Reflection_envmap.smd and Reflection_EyeRefract.smd. If your mane has a mirrored version, you can ignore that as well. It may be unclear what file is what body part (for my model, the head was called reference_RD_enh), but you can always try importing things and deleting them after if you don’t need them. My pony is a pegasus, with model files for both open and closed wings. I am only going to include only the closed wings for my avatar. With all the files selected, click Import. The models will be added to your blender scene, along with a skeleton/armature.
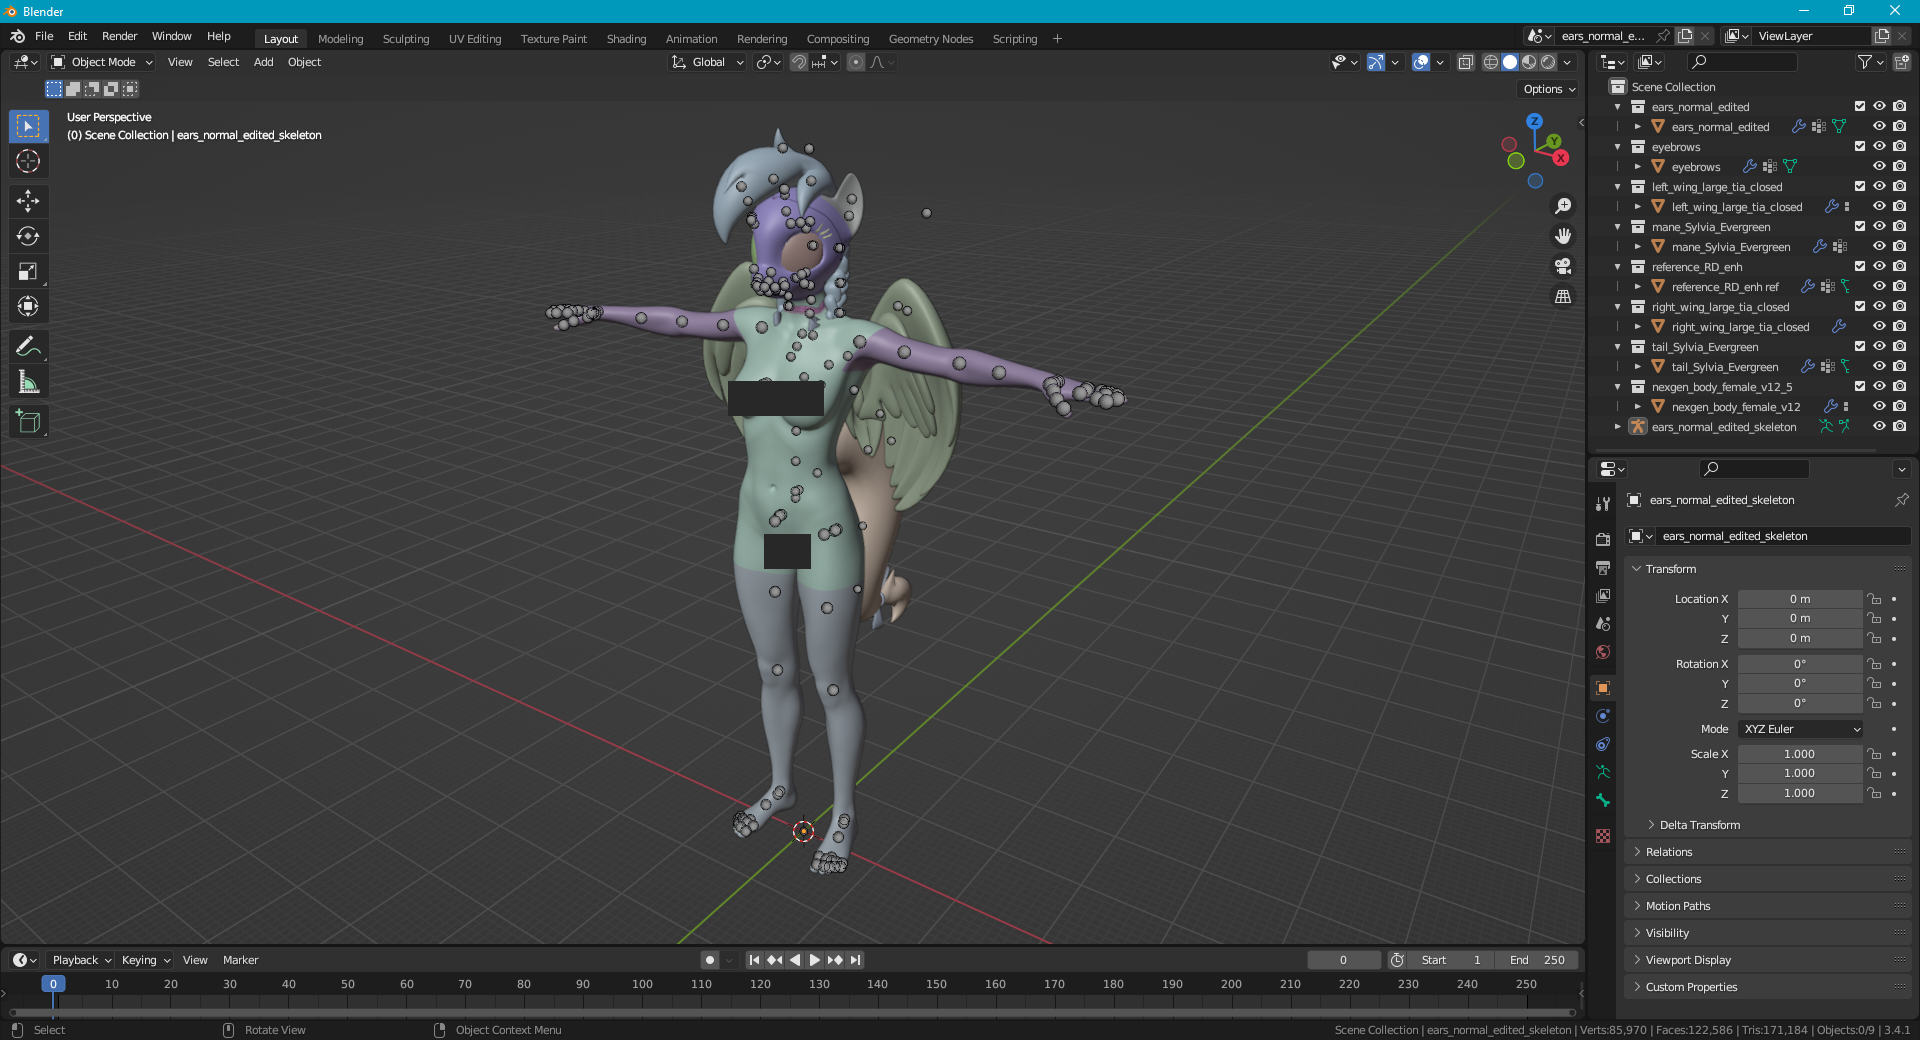
Zoom out a bit until you see your models, they should all be in the correct positions, but you may notice one important thing missing. Where’s the body? Well, you will need to import your preferred body from the NexGen sources. It has dmx files for the body, with female/male variants, hooves/feet/paws, etc.. For my model, I am using “nexgen_body_female_v12_5.dmx”. In Blender, File > Import > Source Engine, then find the body model’s dmx file in the NexGen sources. Now you should have all the geometry for your character in the scene.
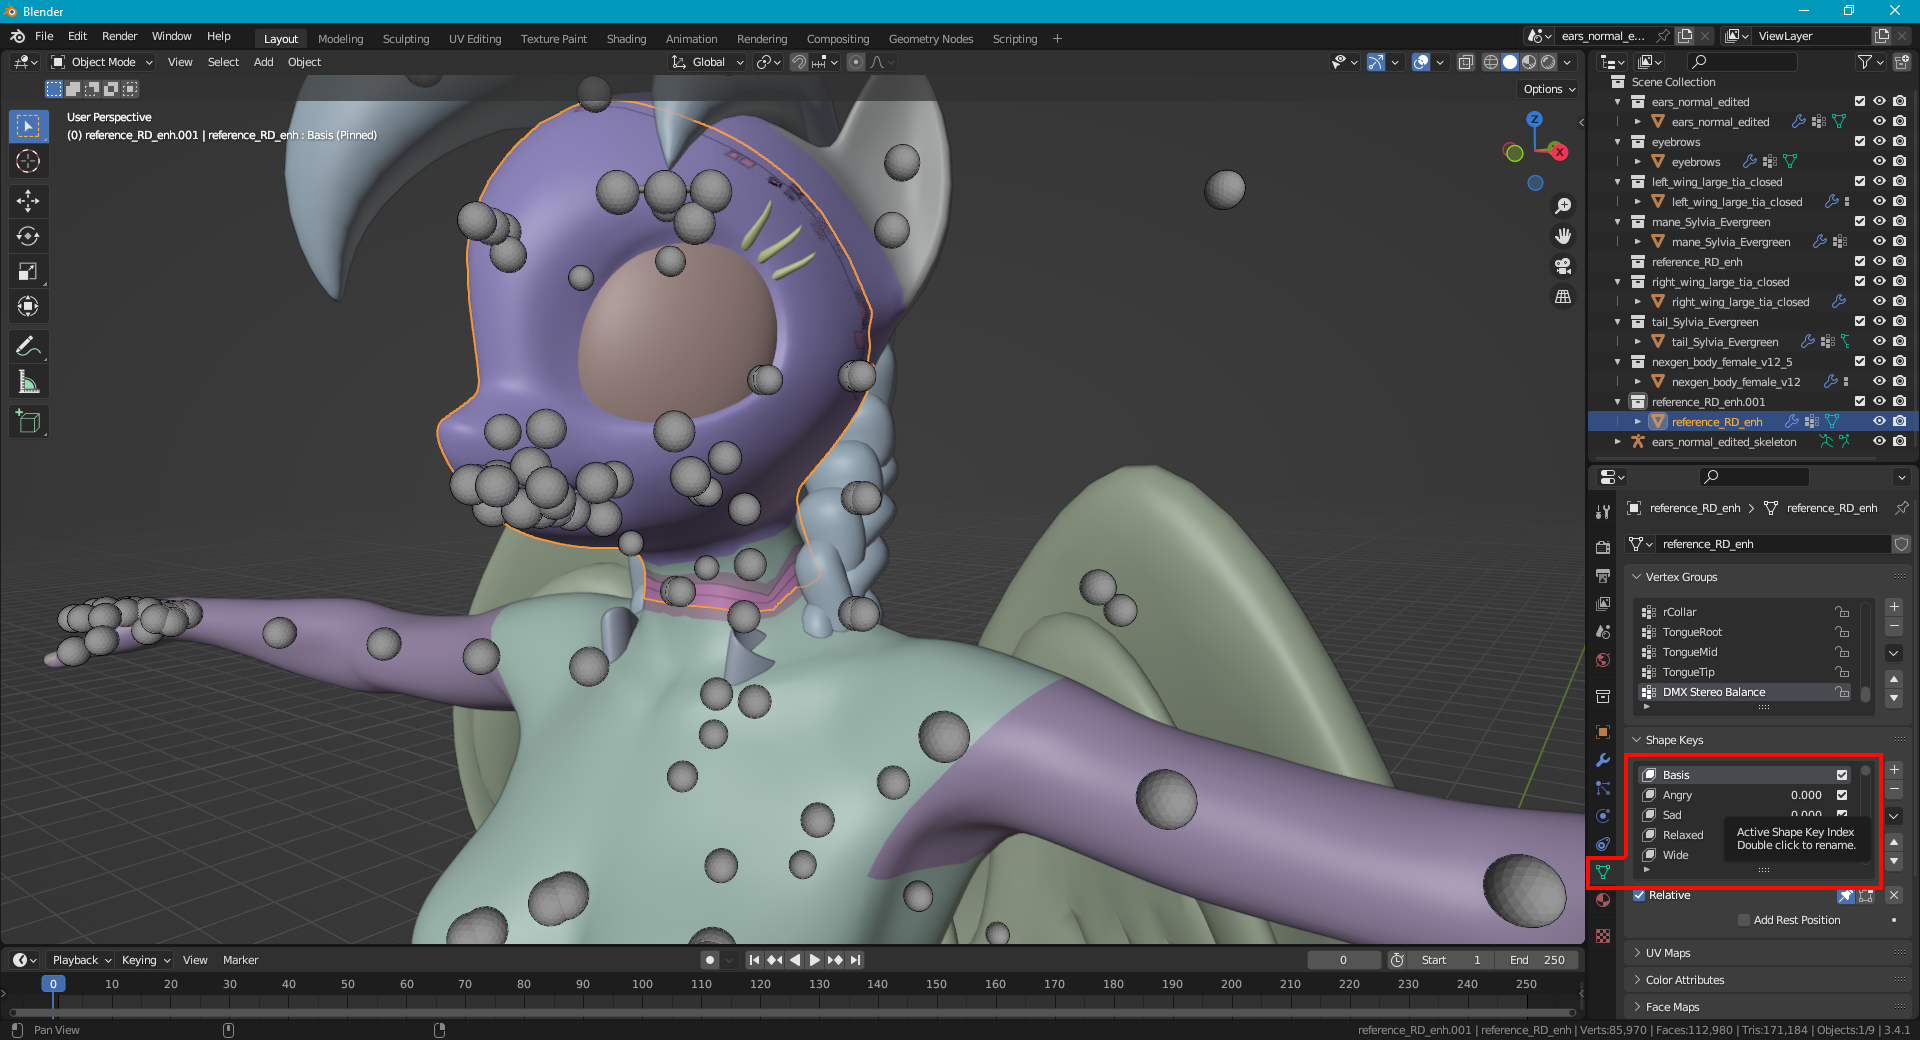
Click on your head mesh. Go to its Mesh tab and double check it has Shape Keys listed. If there are none, then you will need to import a head model from the NexGen sources. Also, when testing Shape Keys, make sure you always select the Basis shape key afterward, otherwise things will break later.
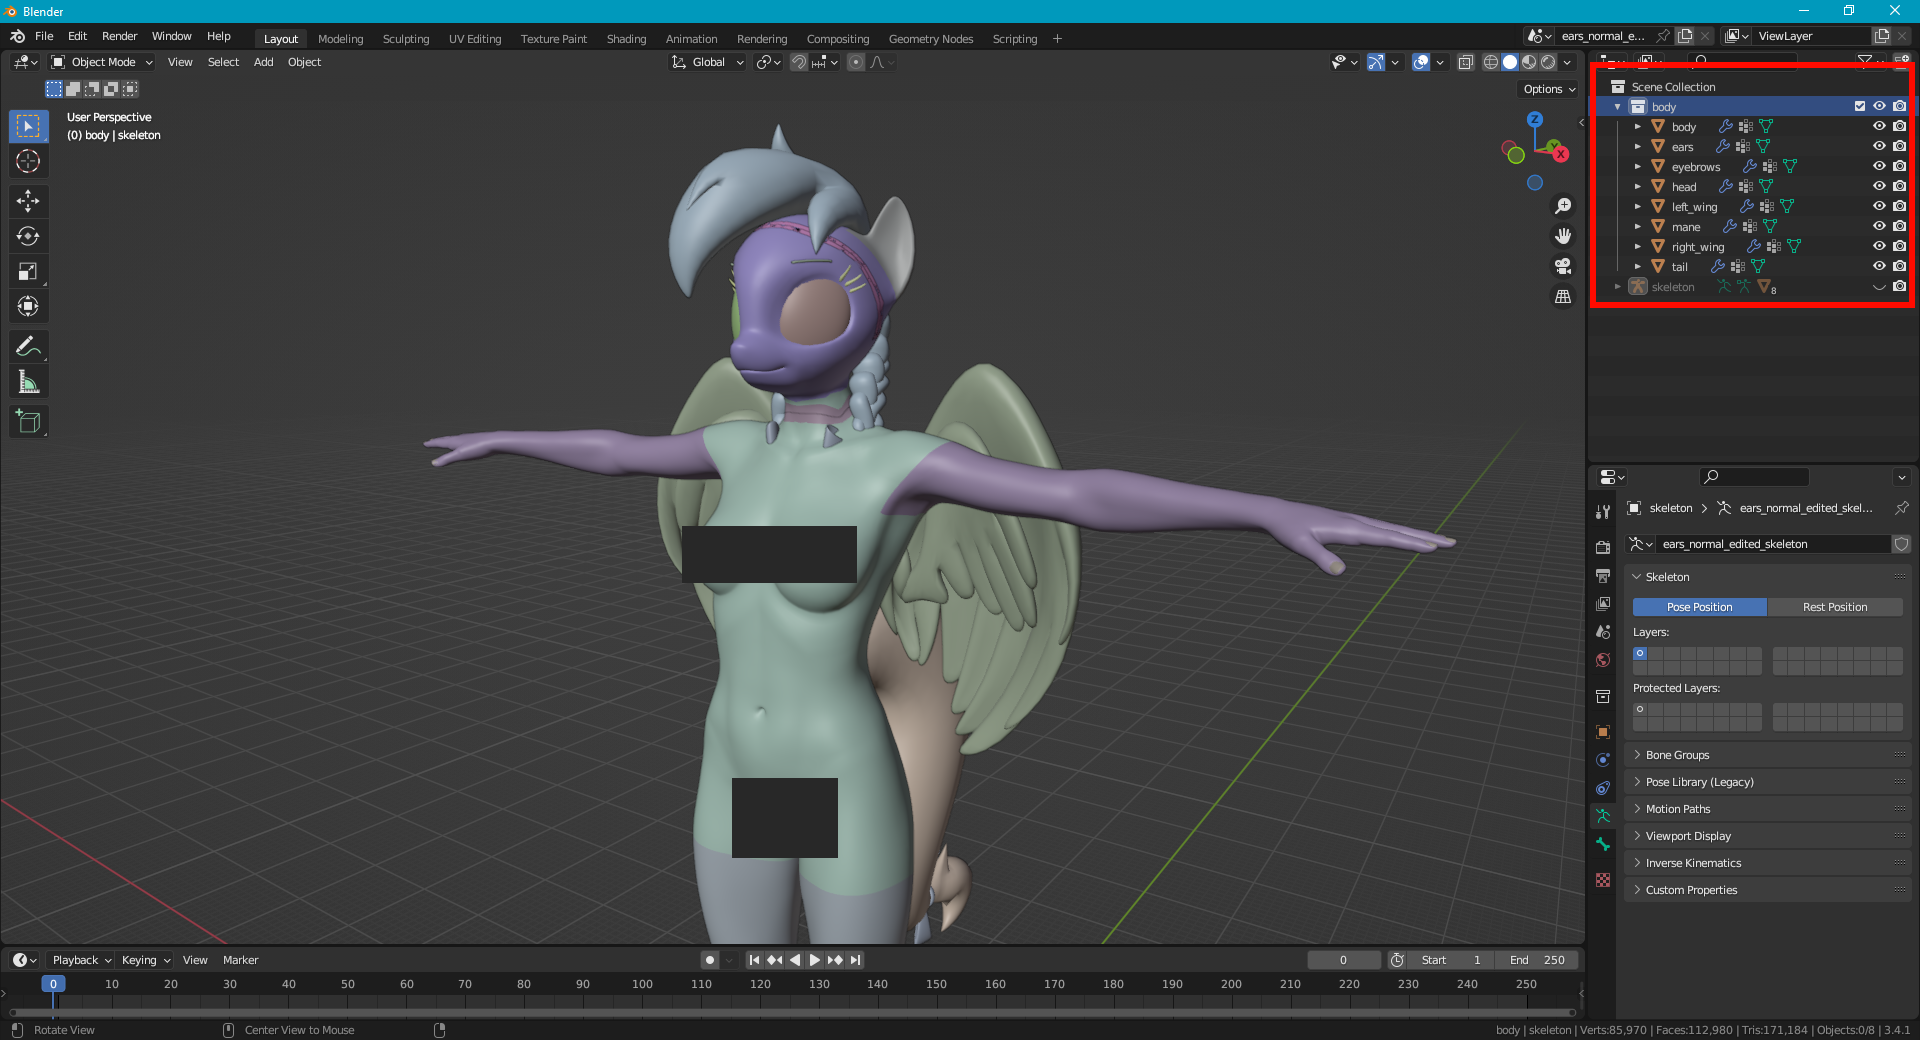
Time for some needed cleanup. I like to rename each part in the scene to something simple, like “body”, “head”, “skeleton”, etc. It is much easier to rename these now, before getting into Unity. For each object, make sure to rename anything underneath it as well. I also like to hide the skeleton in the scene, since I don’t need to change it.
Assign Textures
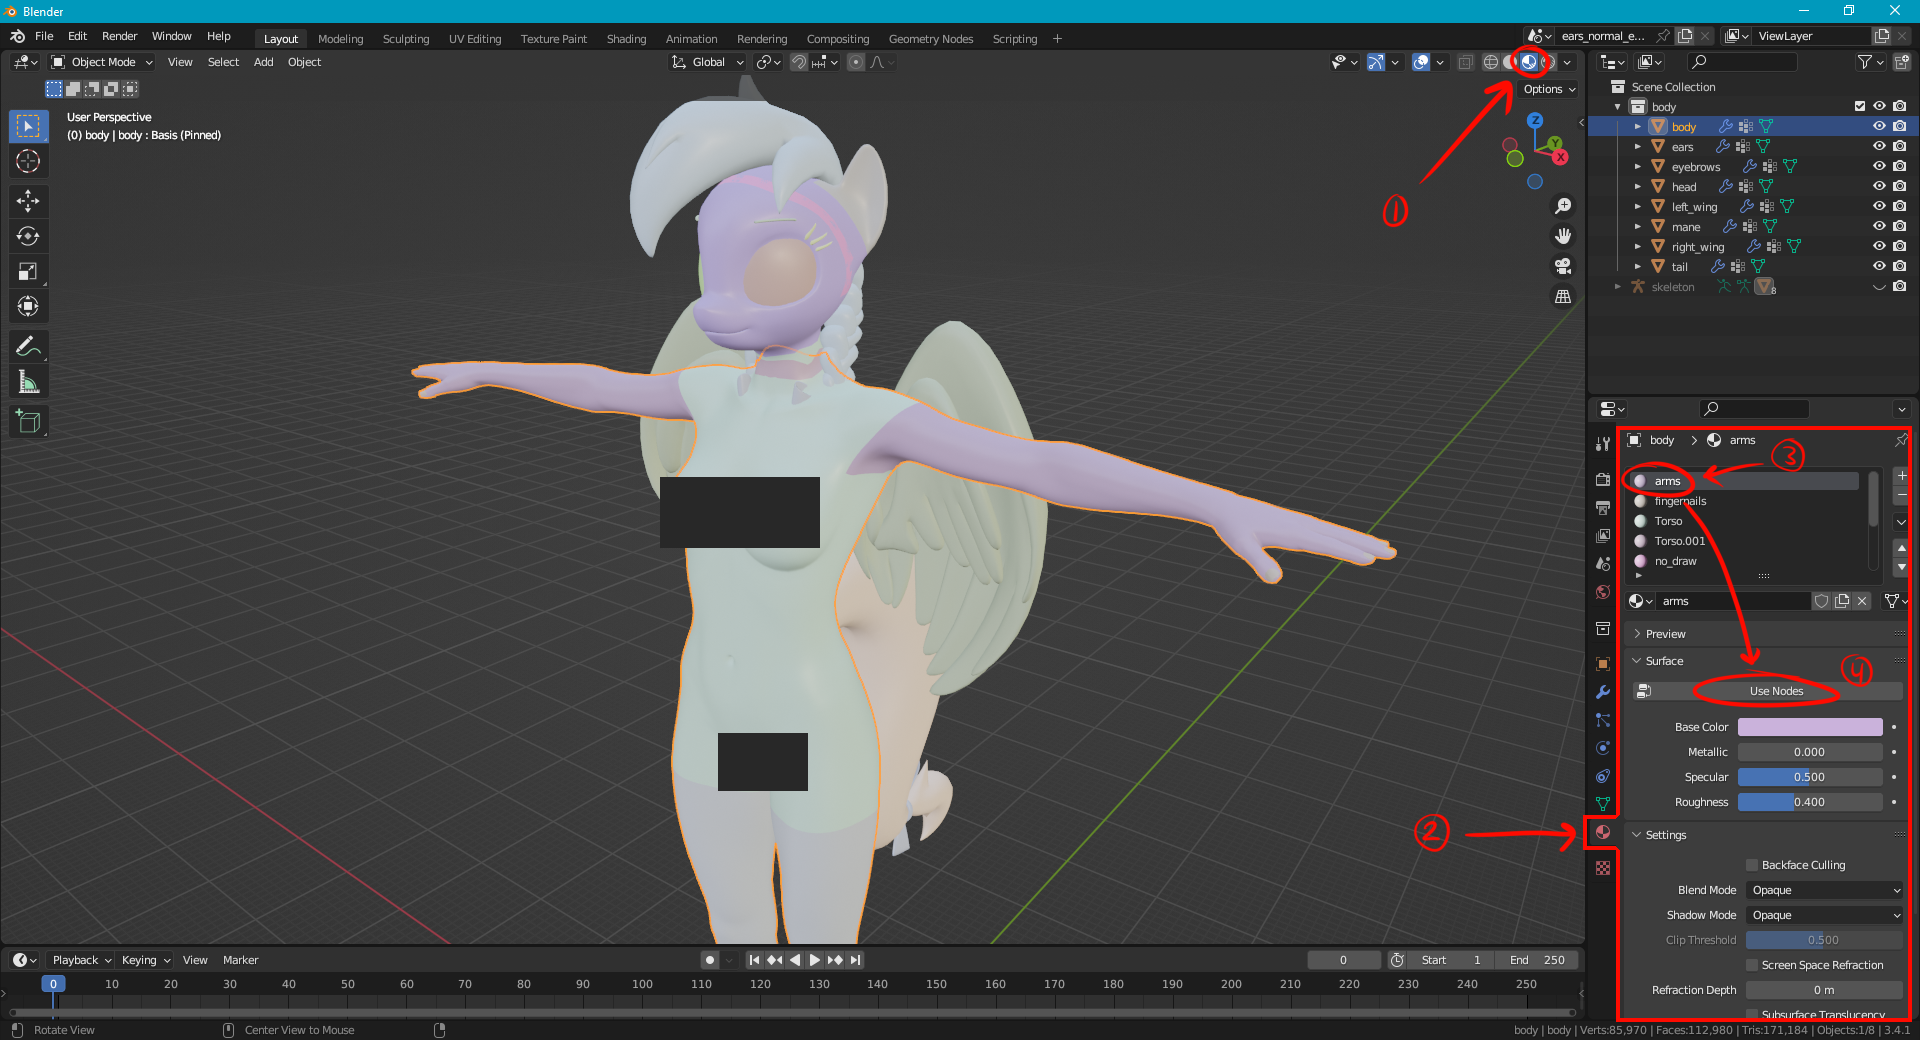
First off, in your viewport, click the Viewport Shading icon. This way you will see your material textures when you add them.
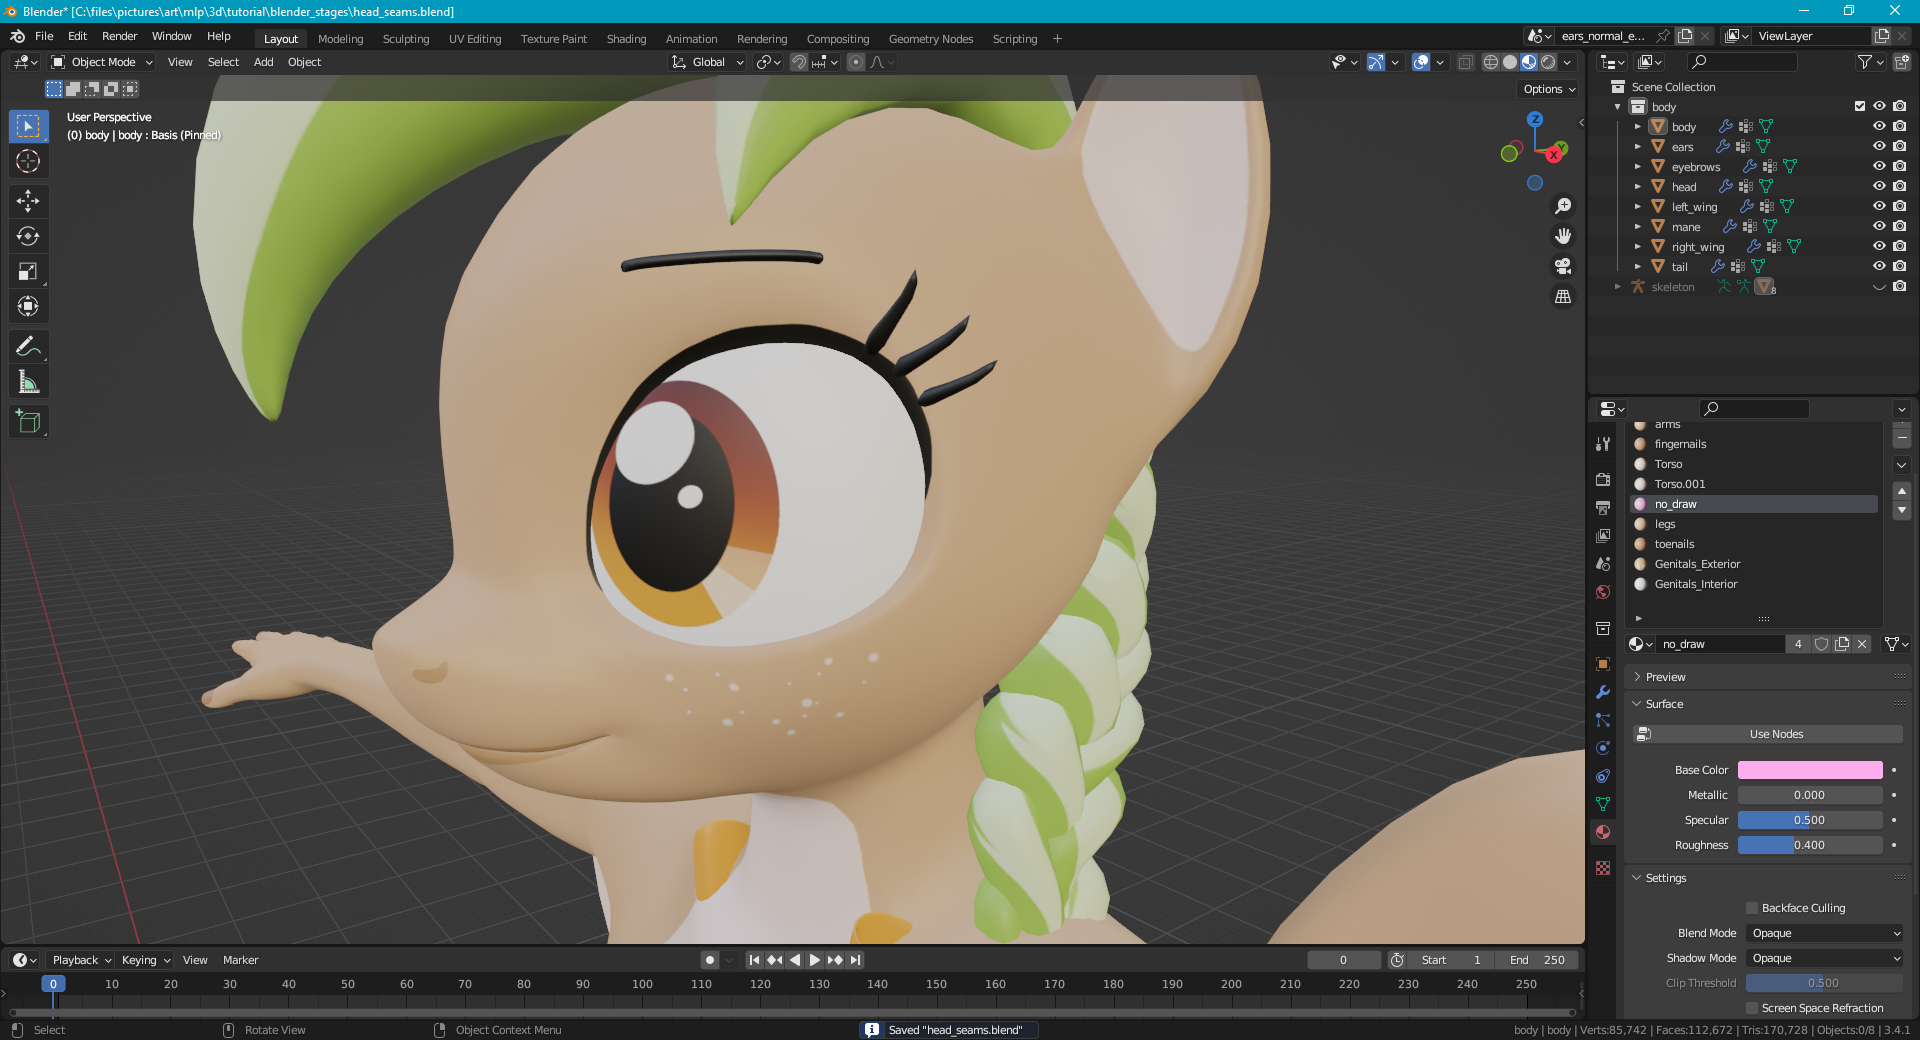
The models you imported will have materials, but they are currently missing textures. Let’s add them now. Click on your body, then, in the settings panel, click the Materials tab. There will be a list of all materials that the body uses. Click on the first material in the list.
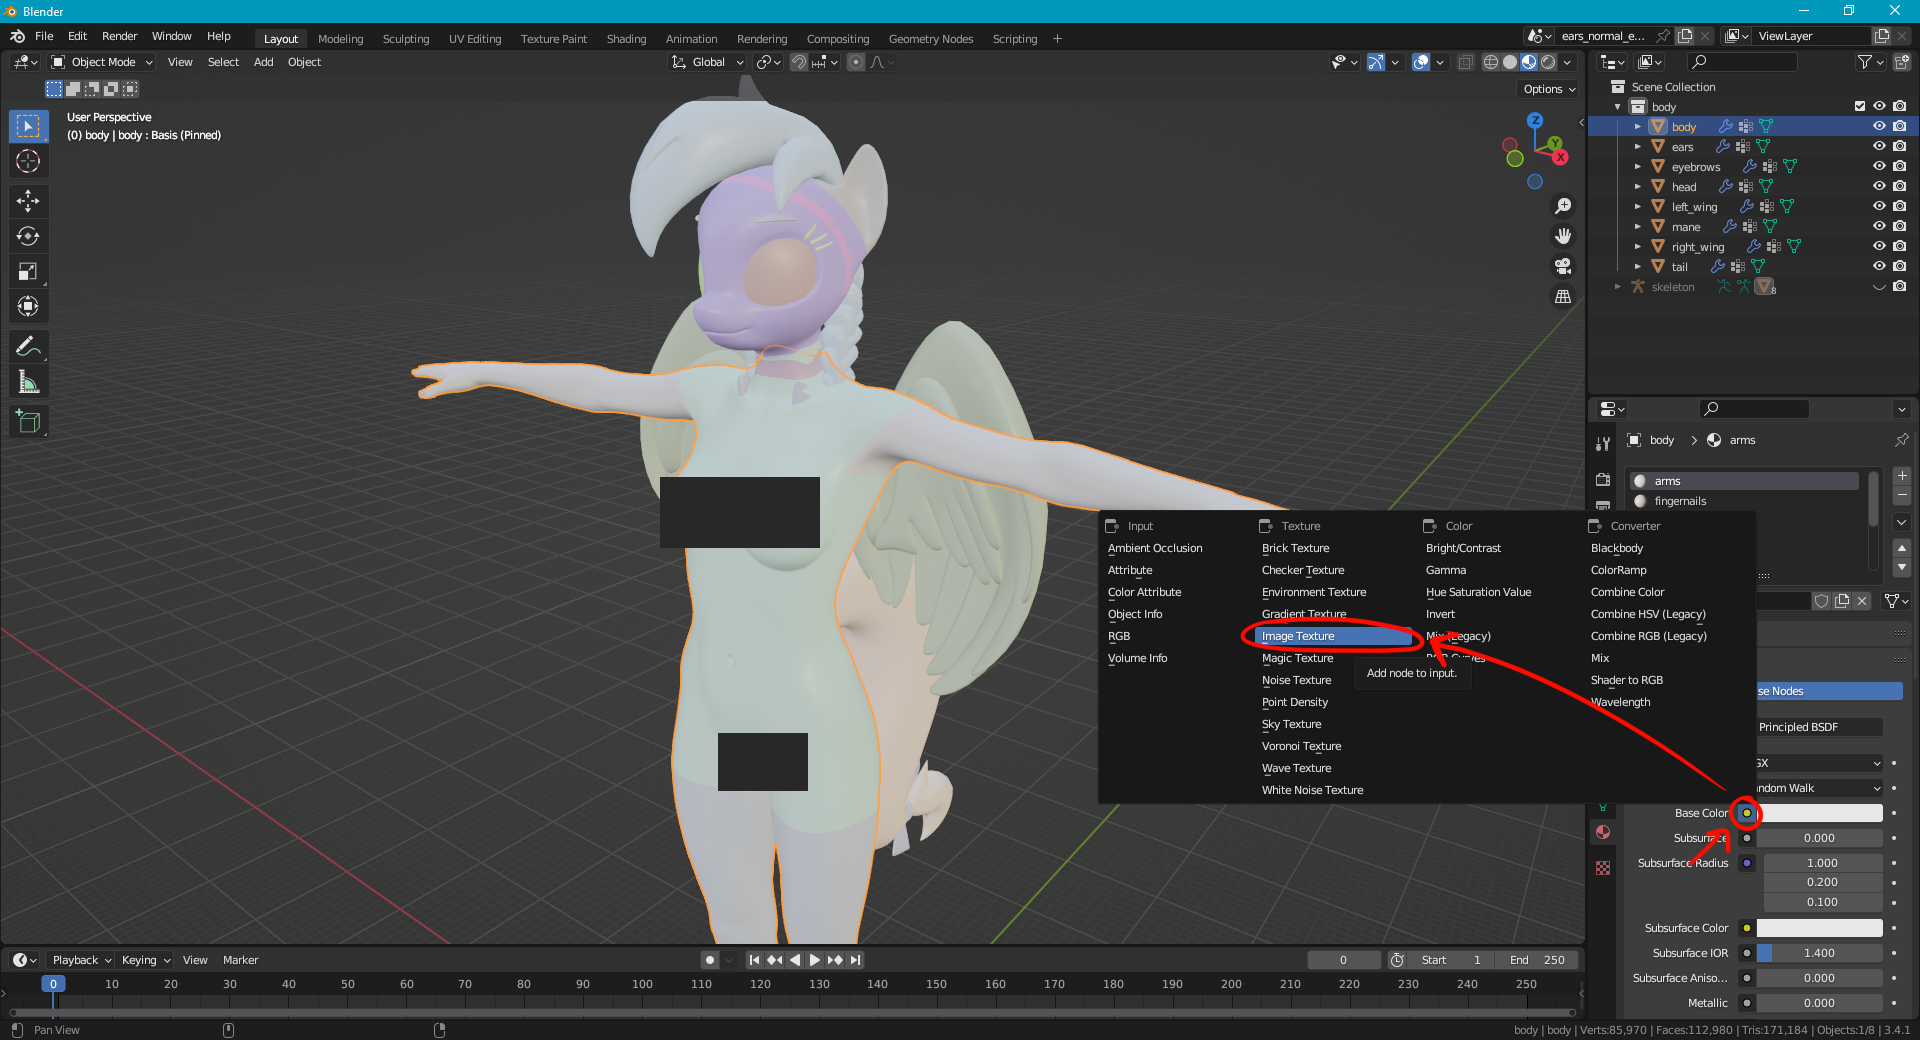
Then, below, in the Surface section, click Use Nodes. A new list of settings will appear. Next to the Base Color setting, click the yellow circle button, then select Image Texture. Click the Open button and find the matching image file for this material that you converted earlier. Afterward, the material should now show up with a texture in the 3D viewport.
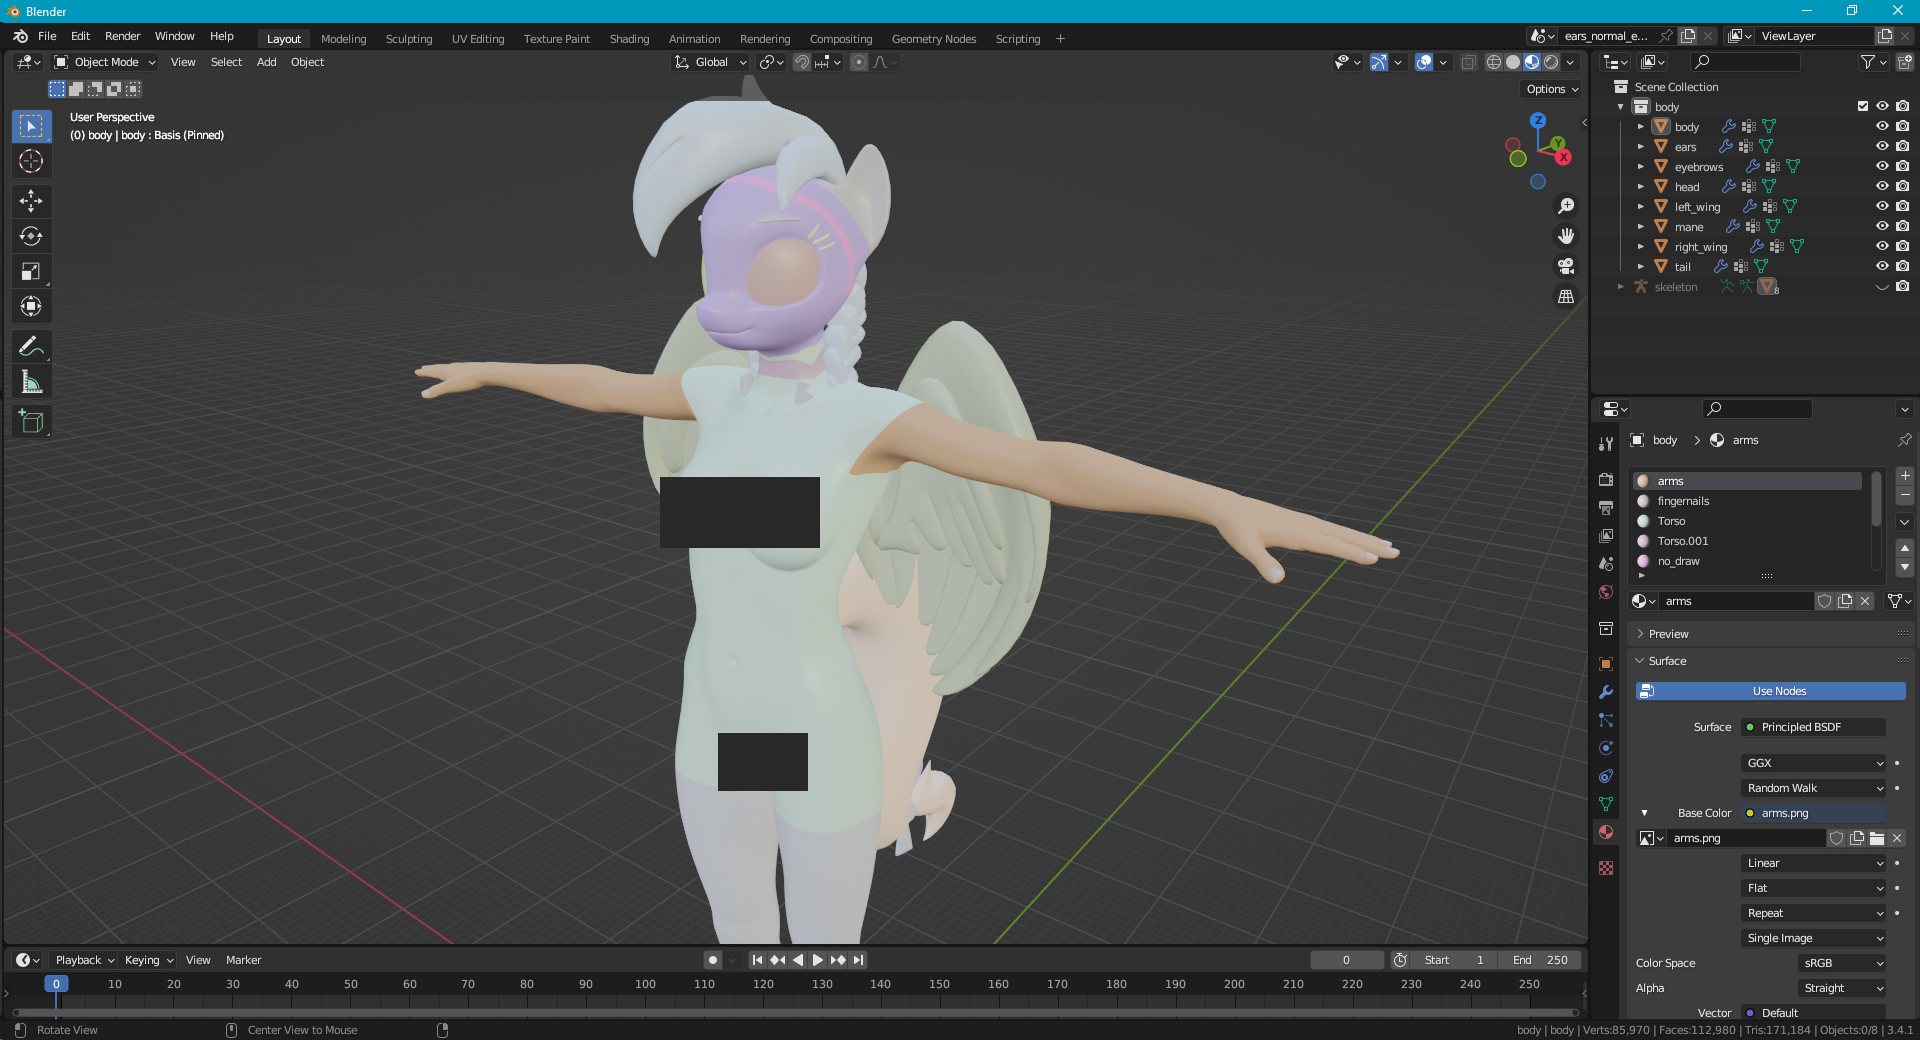
You may need to guess-and-check which image goes to which part, depending on how the files were named. There may not be an image for each material. For my model, there is no ‘fingernails’ image, likely because it is a single color. You can either create a new image with the color you want, then assign that to the Image Texture, or you can remove the Image Texture and select a color. I’ve created a new 16x16 image called “nails.png”.
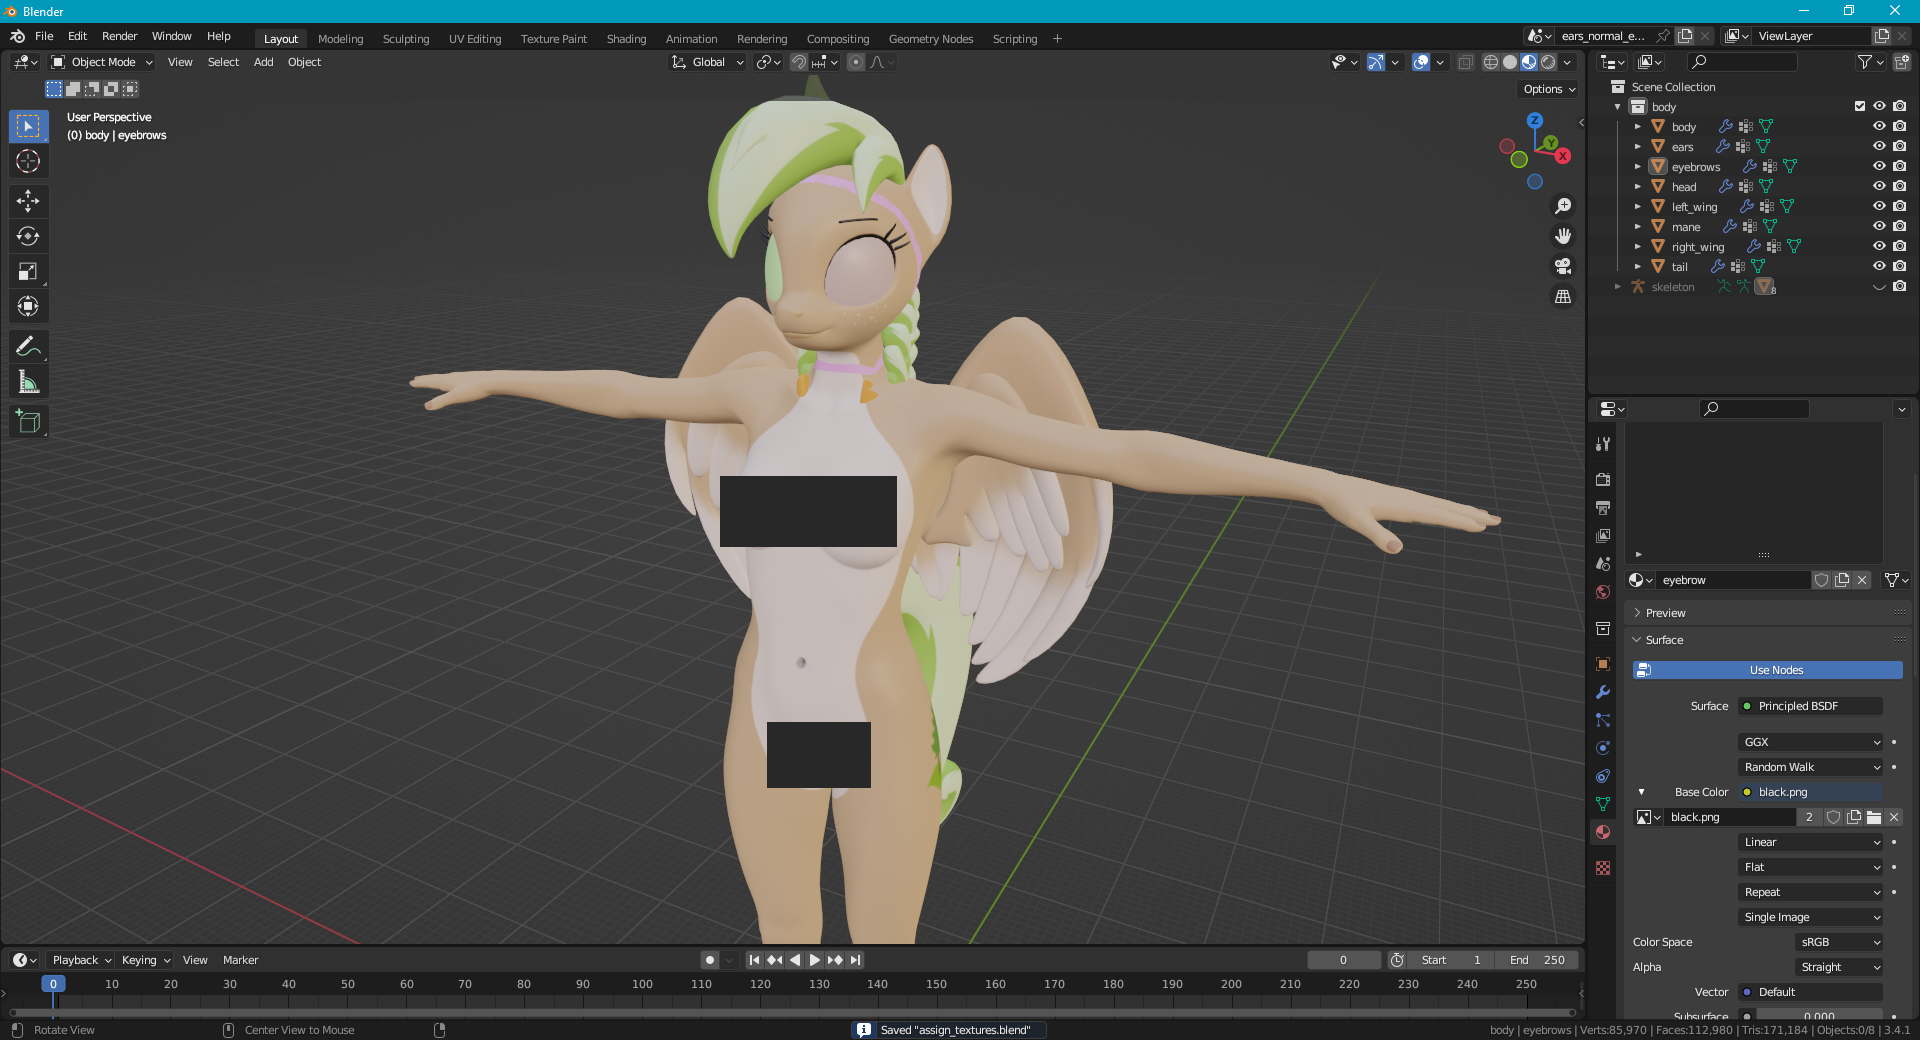
Go through your scene and assign textures/colors to each mesh. Ignore any “no_draw” materials. Some meshes might reuse materials, like the body material. For Image textures, you can select an existing texture in the scene from the dropdown, so that you don’t need to load it twice.
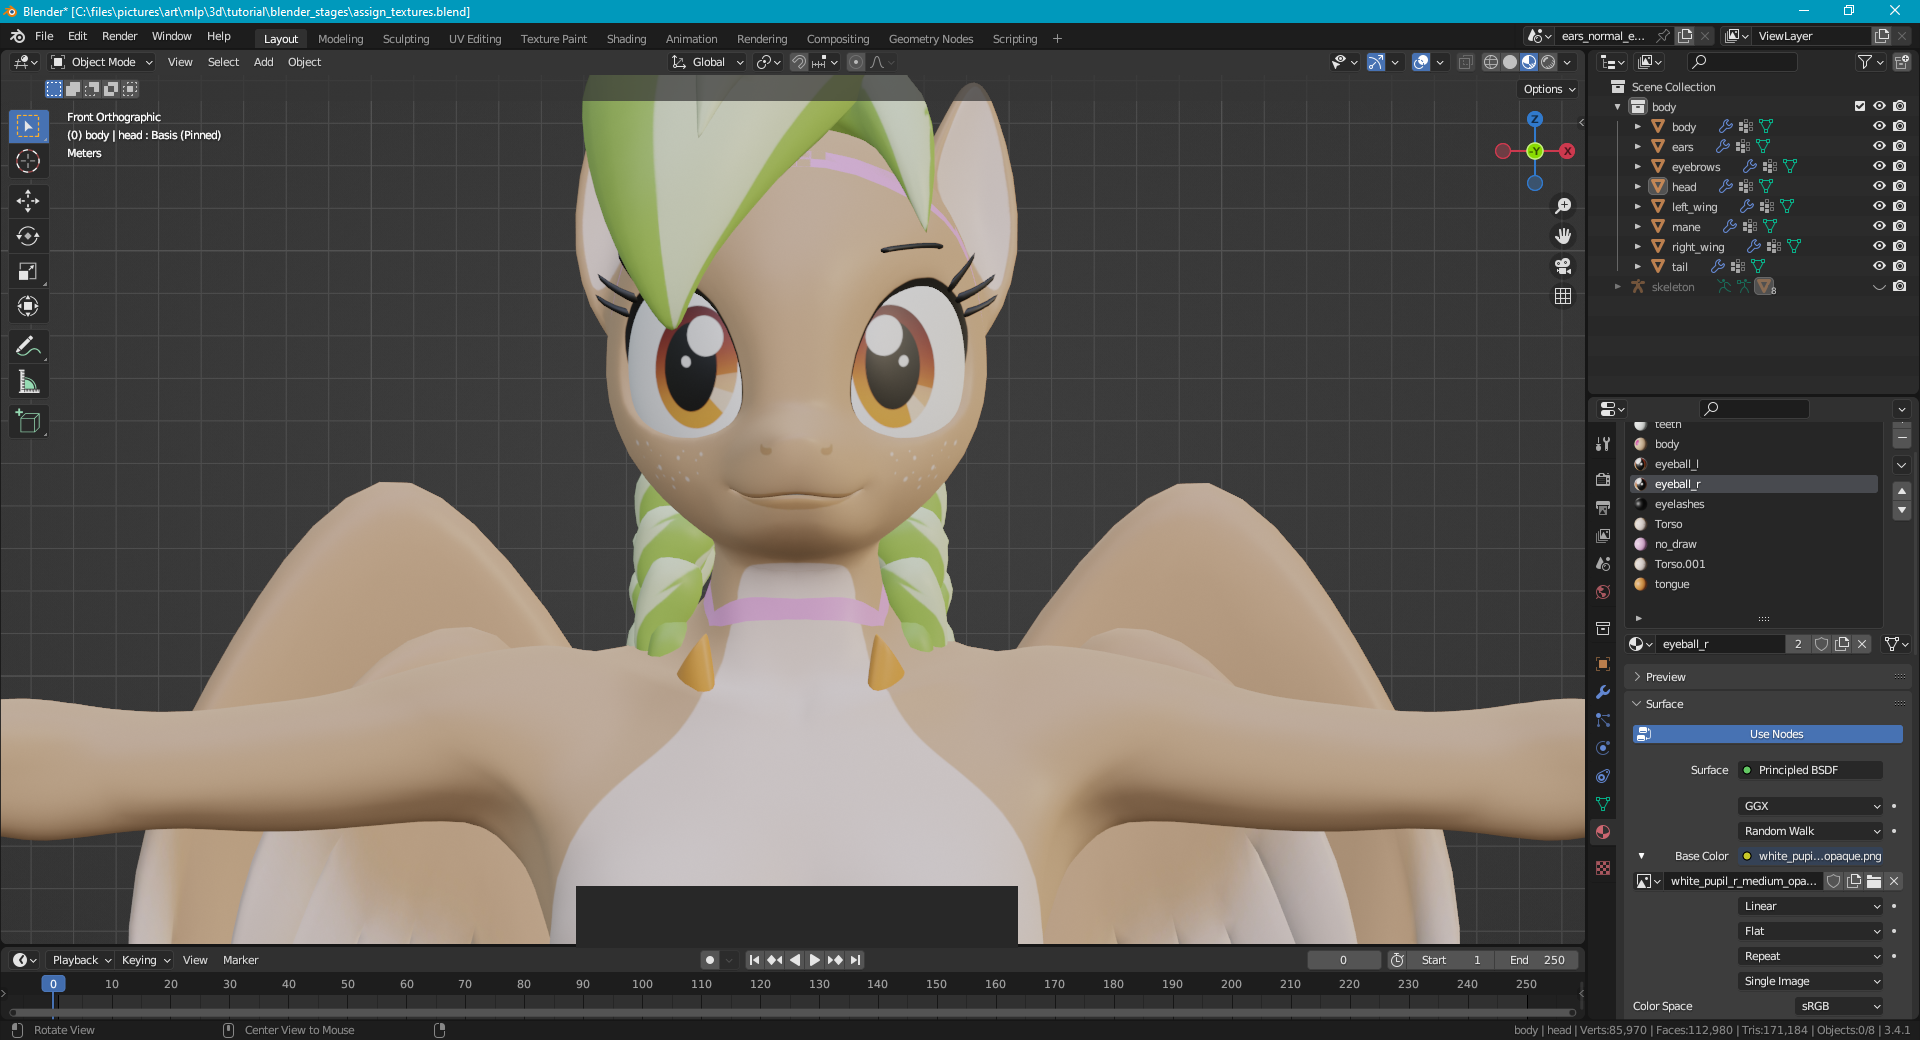
For the eyeball textures, you can use the pupil images. I like to use the “white_pupil_medium_r/l” images. But first, you will need to remove the transparency from them. Open the pupil images in an image editor, then give them a white background (or whatever color your eyeballs are). Then, save them. Now, you can assign them in Blender. If you are not happy with how the pupils are focused by default, then you can move them around in the texture image, resave them, then reload them into Blender.
Remove the Head Seams
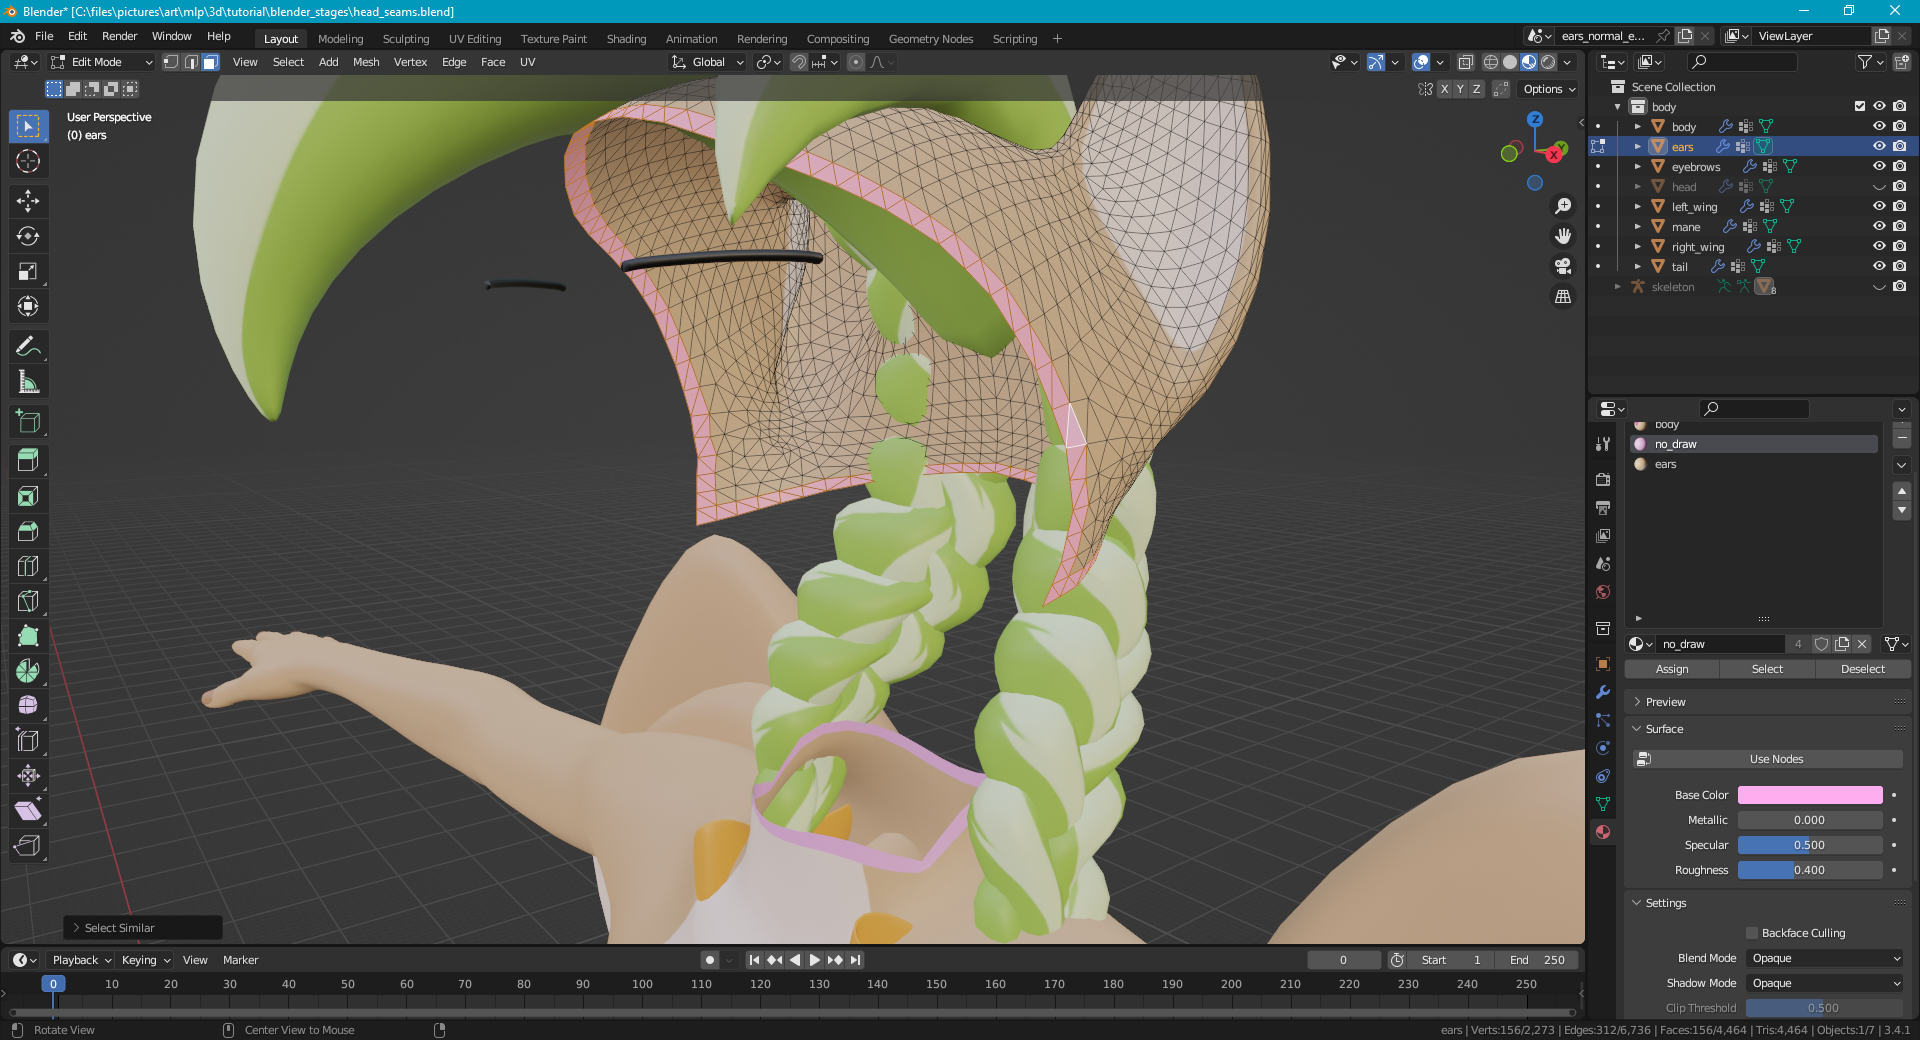
There are two seams, one in the neck to separate the head & body, and another in the head to separate the face & ears. We do not want these seams because they will cause lighting issues.
Start by hiding the ears and body so that the seam on the head is more visible. Select the head, then enter Edit mode by pressing tab or by selecting it from the dropdown in the top-left. Then, choose Face Select mode. Click on one of the faces (rectangle shapes) in the seam near the ear. Press Shift+G then choose Material. Press Delete then choose Faces. This will delete the seam geometry from the head. Press tab to go back into object mode. Now hide the head and unhide the ears and body meshes, then delete the seam geometry from them in the same way. Finally, unhide the head and you should see the body, head, and ears connect up without any seams.

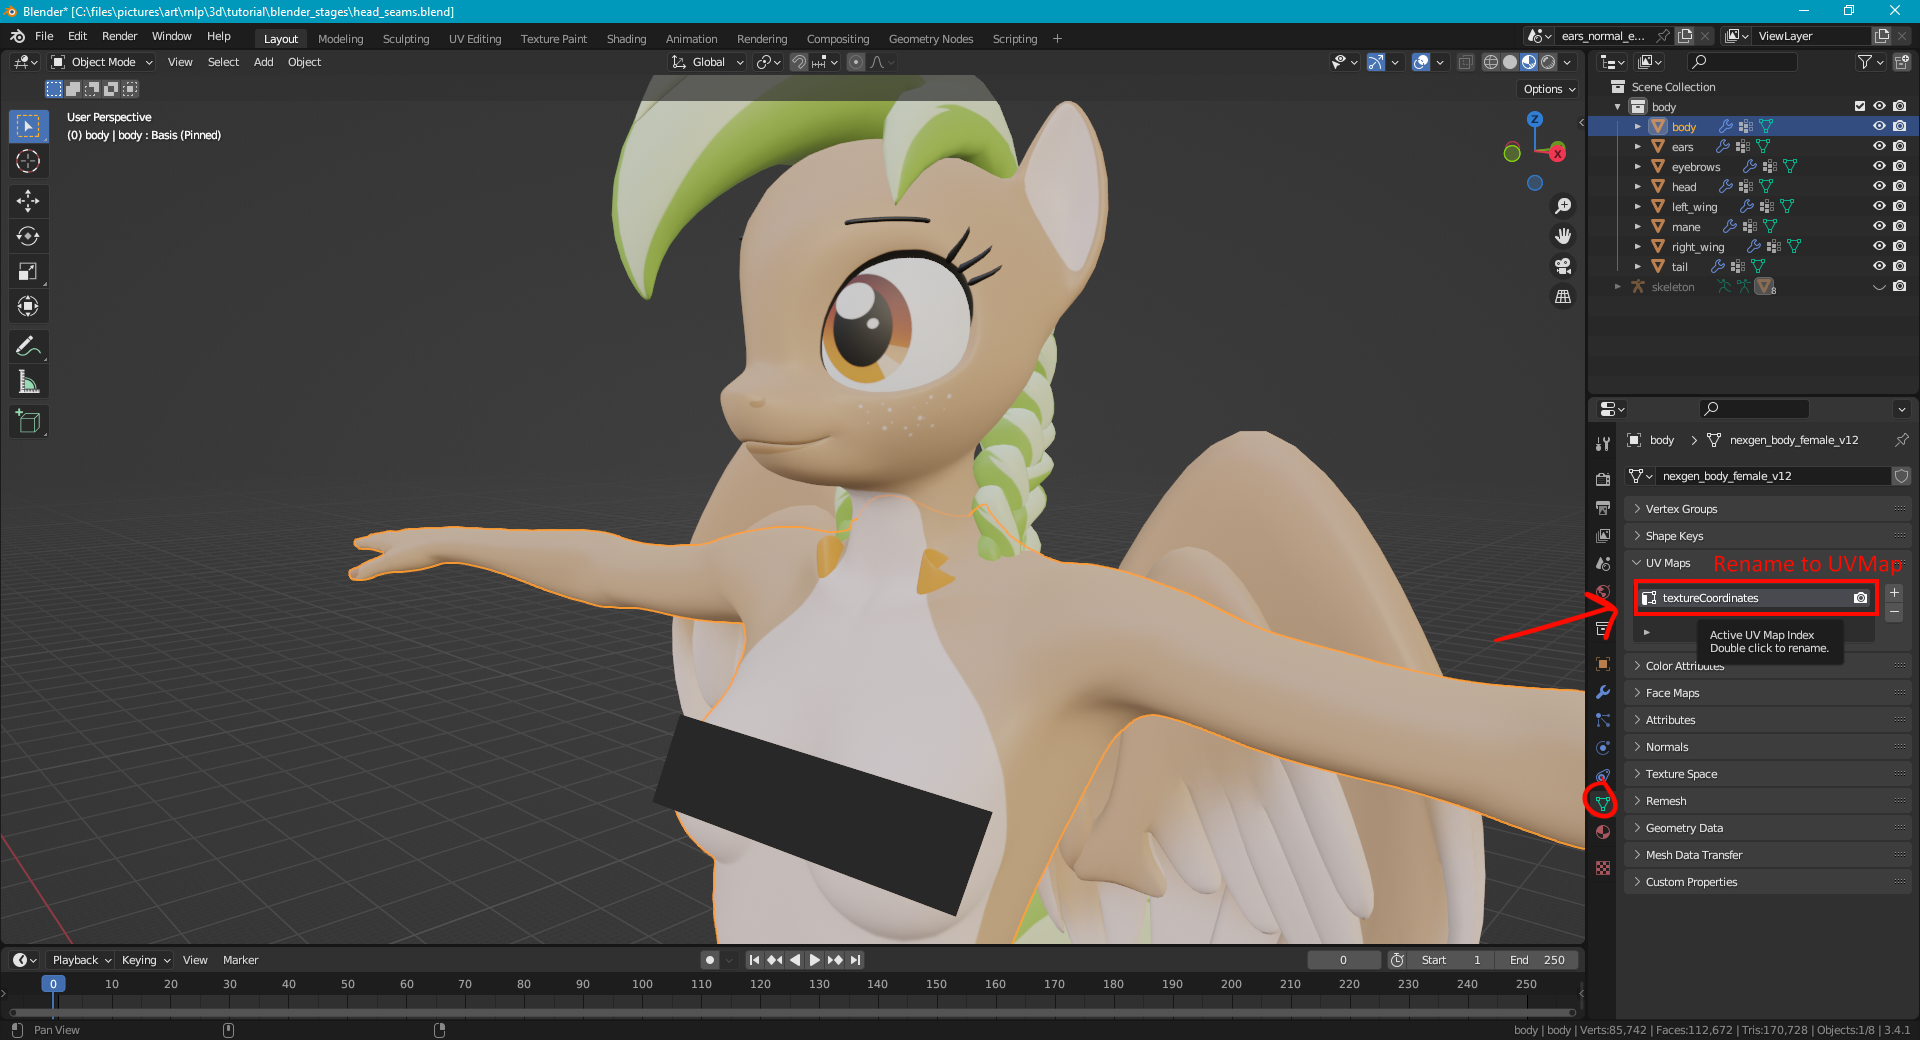
Now, let’s join the head, ears, and body together so that they are one continuous mesh. Before you do this, ensure that each of these meshes have the same UV Map name. Select the body mesh, go to its Mesh tab, then in the UV Maps section, rename the entry so that it is called “UVMap”. Repeat this for the head and ears. This will prevent your materials from breaking after joining meshes.
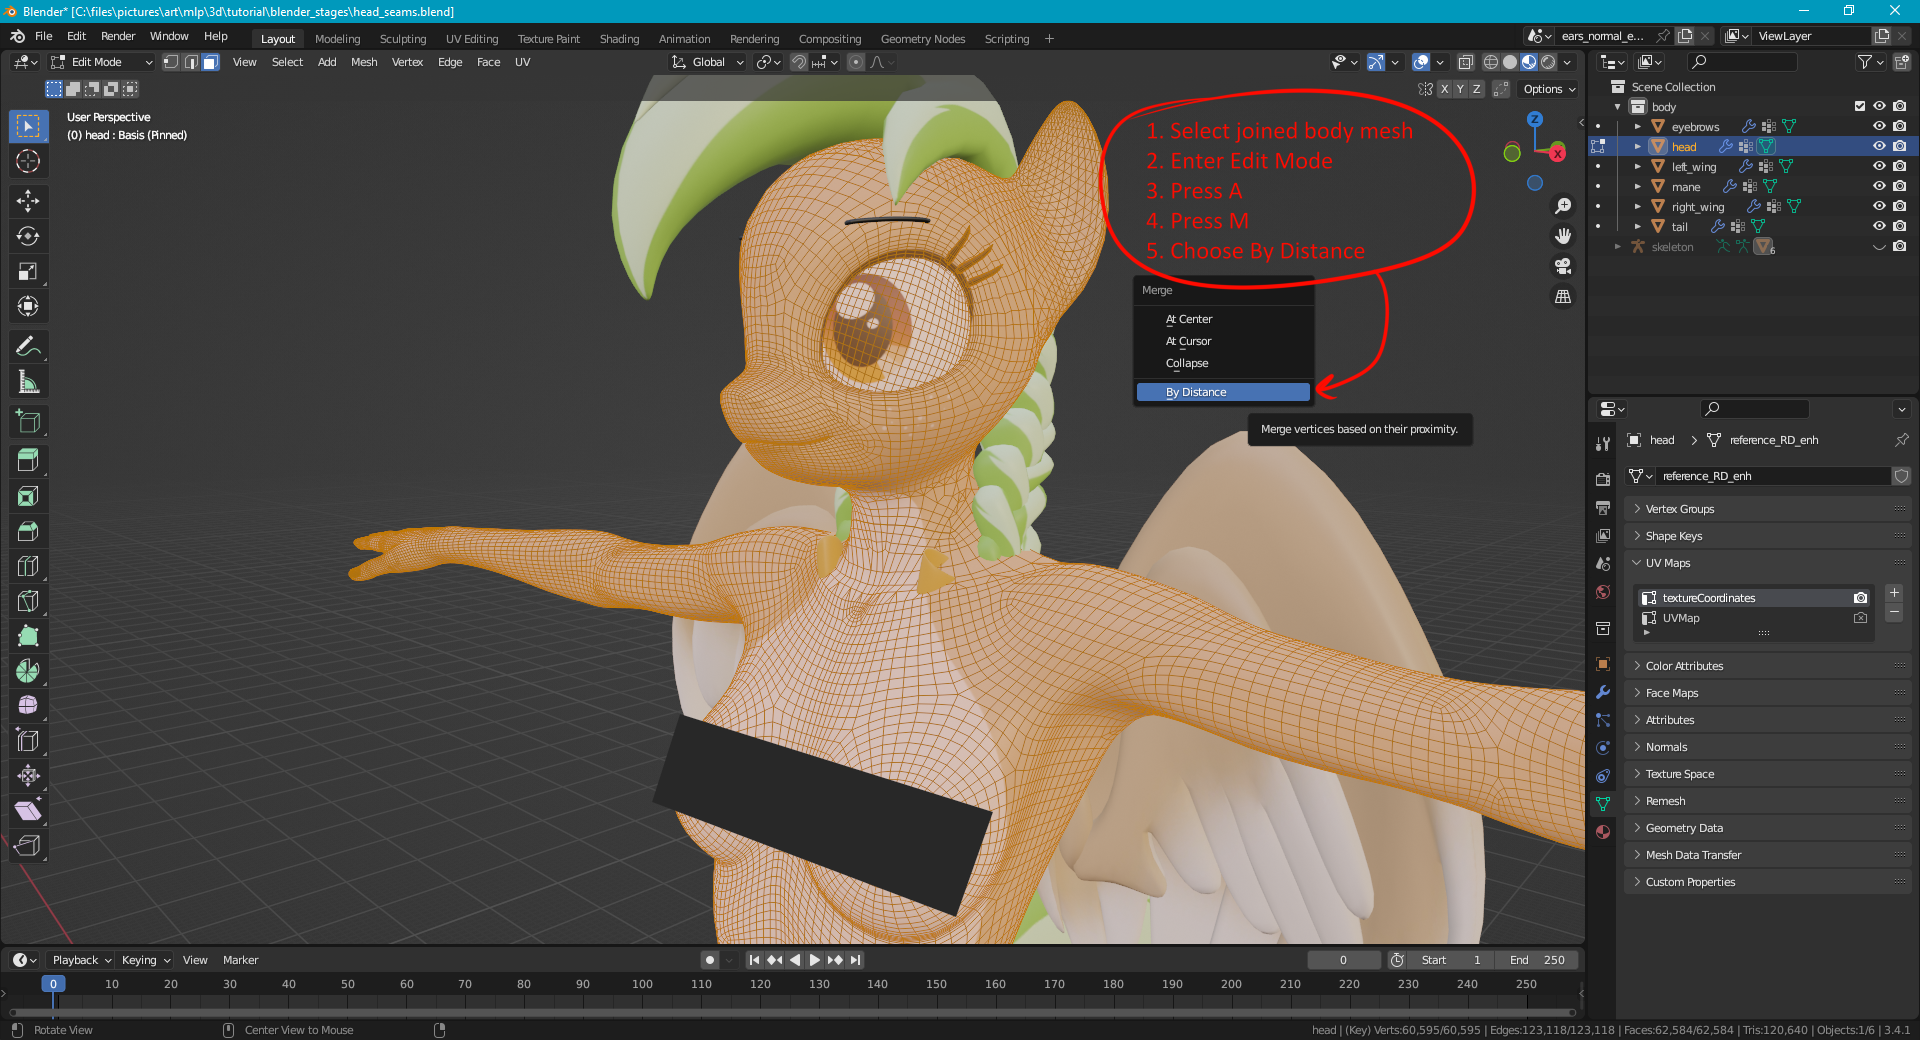
Afterward, select the head, then ears, then body. Press Ctrl+J. This will join the objects into one. With the joined body still selected, press tab to enter edit mode. Press A to select all vertices. Press M to merge, then select By Distance. This will merge the vertices connecting the body/head and head/ears together, sewing the seams so they will no longer be visible in-game. After joining and merging, double check that all your Shape Keys are still listed in the joined mesh’s Mesh tab (for body and head).
Optional Optimizations
There are many additional customizations you can do to the model. Optimizations will help with performance when other players view your avatar. By default, a NexGen model has a very high polygon count and will be categorized as “VeryPoor” performance. Anything you can do to reduce polygon count, number of meshes, and number of materials will help with this. Here, I will suggest a few optional customizations.
Joining Meshes
Joining meshes together will reduce the number of draw calls needed to render your avatar. You can join all your body meshes together in the same way as described in the head seams section. Remember to ensure all UV Maps are named the same, and double check that all your blend shapes are still there after joining.
Removing Unused Bones
Some bones you may not need even though they are included in the armature. For my case, there are bones for “Hair Mirror” which are intended for a horizontally flipped mane. I removed all the “mirror” bones from the mane. My model also has bones for open and closed wings. I only used the closed wings, so I removed the open wing bones.
Removing Unneeded Geometry
There may be extra geometry in your model you don’t need. For my model, I did not want to use any of the internal NSFW bits (genitals). To remove them, I entered Edit mode, selected the unneeded vertices, deleted them, then tried to close any holes that were created.
Reducing Polygon Counts (Decimate Meshes)
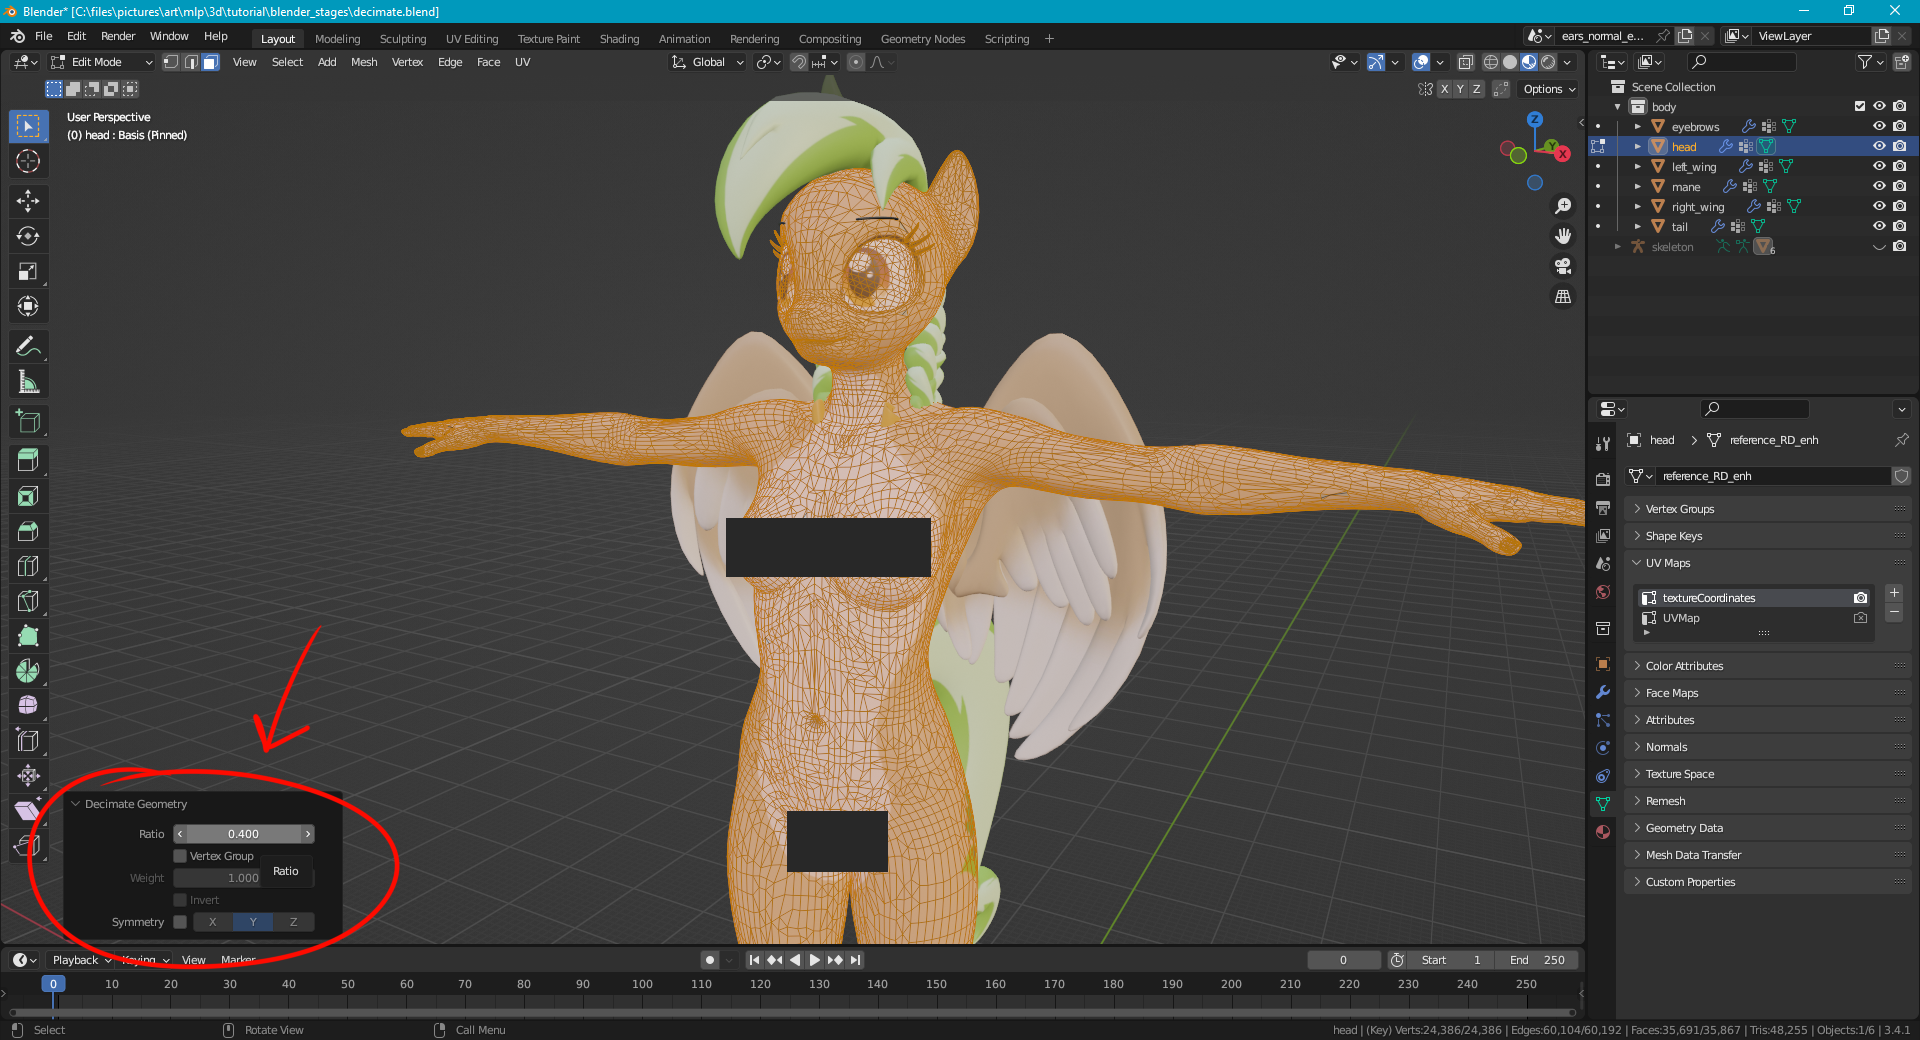
Decimating a mesh will reduce its polygon count, but also lower its level of detail. It can be done to an extent, but be warned that it will make your mesh topology ugly. To do this, select your mesh object, enter edit mode, select the geometry you want to decimate, then select Mesh > Clean Up > Decimate Geometry. Open the little settings window that shows up in the bottom left of the viewport. Set the raztio to something below 1. I went through all my meshes and decimated them with a ratio between 0.3 and 0.5.
Export Scene as FBX File
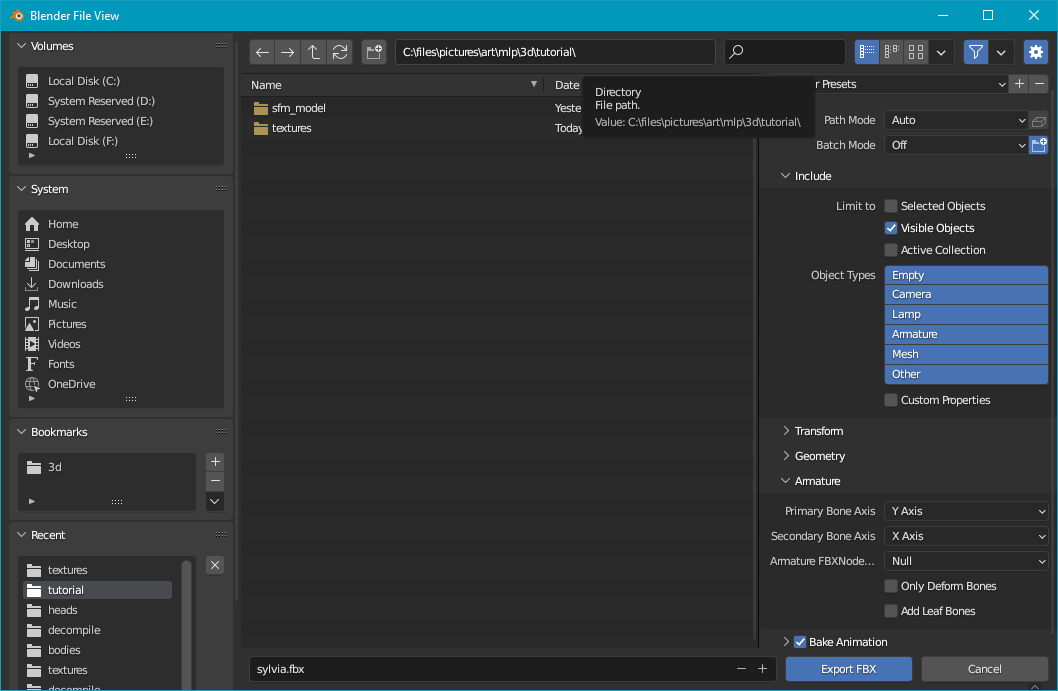
The model should now be ready to use in Unity for avatar setup. Select File > Export > FBX. Choose a location and name. I put it in the same place as my .blend file and named it “sylvia.fbx”. In the settings on the right, expand the Armature section and uncheck Add Leaf Bones. If you have “Visible Objects” checked, then make sure your objects are all visible in Blender (including the armature). Finally, click Export.
Unity Initial Setup
After exporting the model, you are now ready to jump into Unity and start configuring your avatar.
Create new project
Open the VRChat Creator Companion. Select the Projects tab on the left, then click the Create New Project button in the top-right. Select the “Unity 2022 Avatar Project”, give your project a name, then click Create Project.

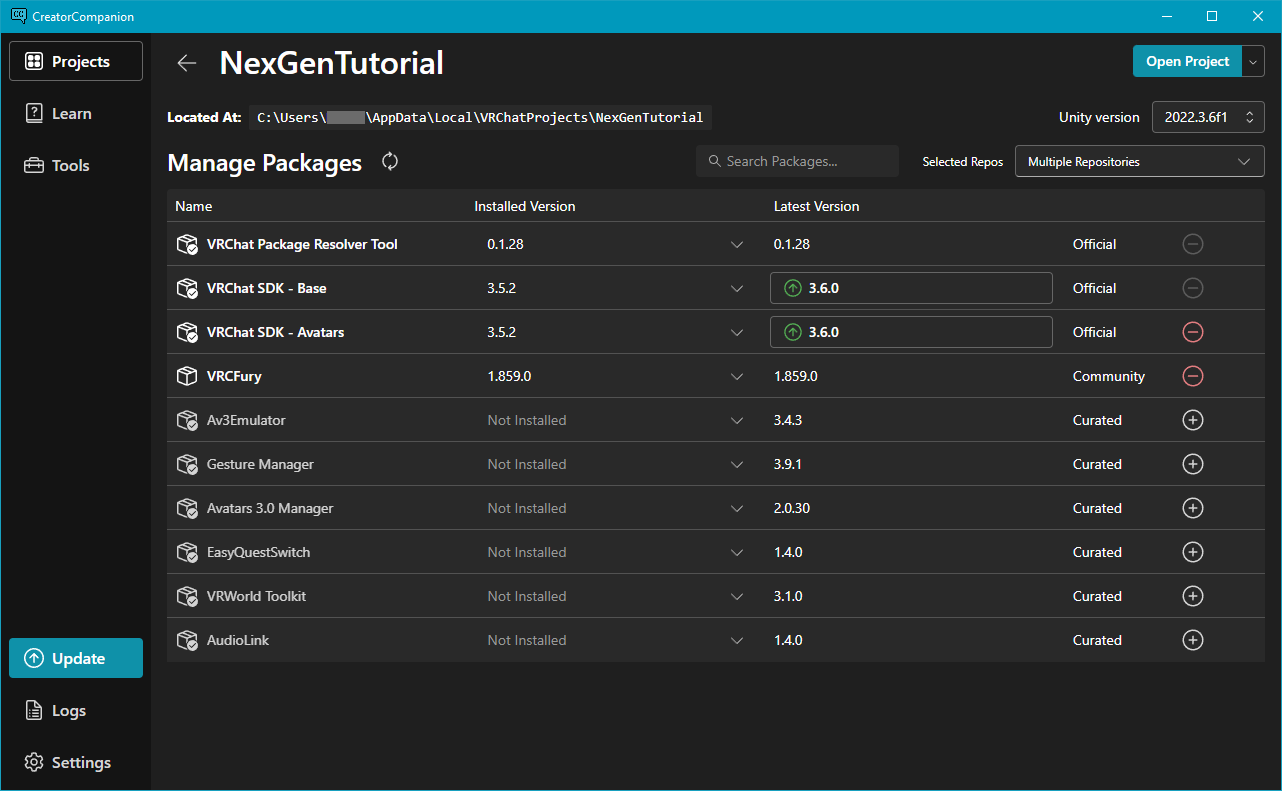
Next, select the packages you will need. For this tutorial, we only need the VRCFury package. Click the plus icon next to it. Then, click Open Project. Once the project opens in Unity, Save it.
Import Textures
Right click in the Assets folder, then select Create > Folder. Name the folder “textures”. Drag all your texture files into that folder.

Import FBX File
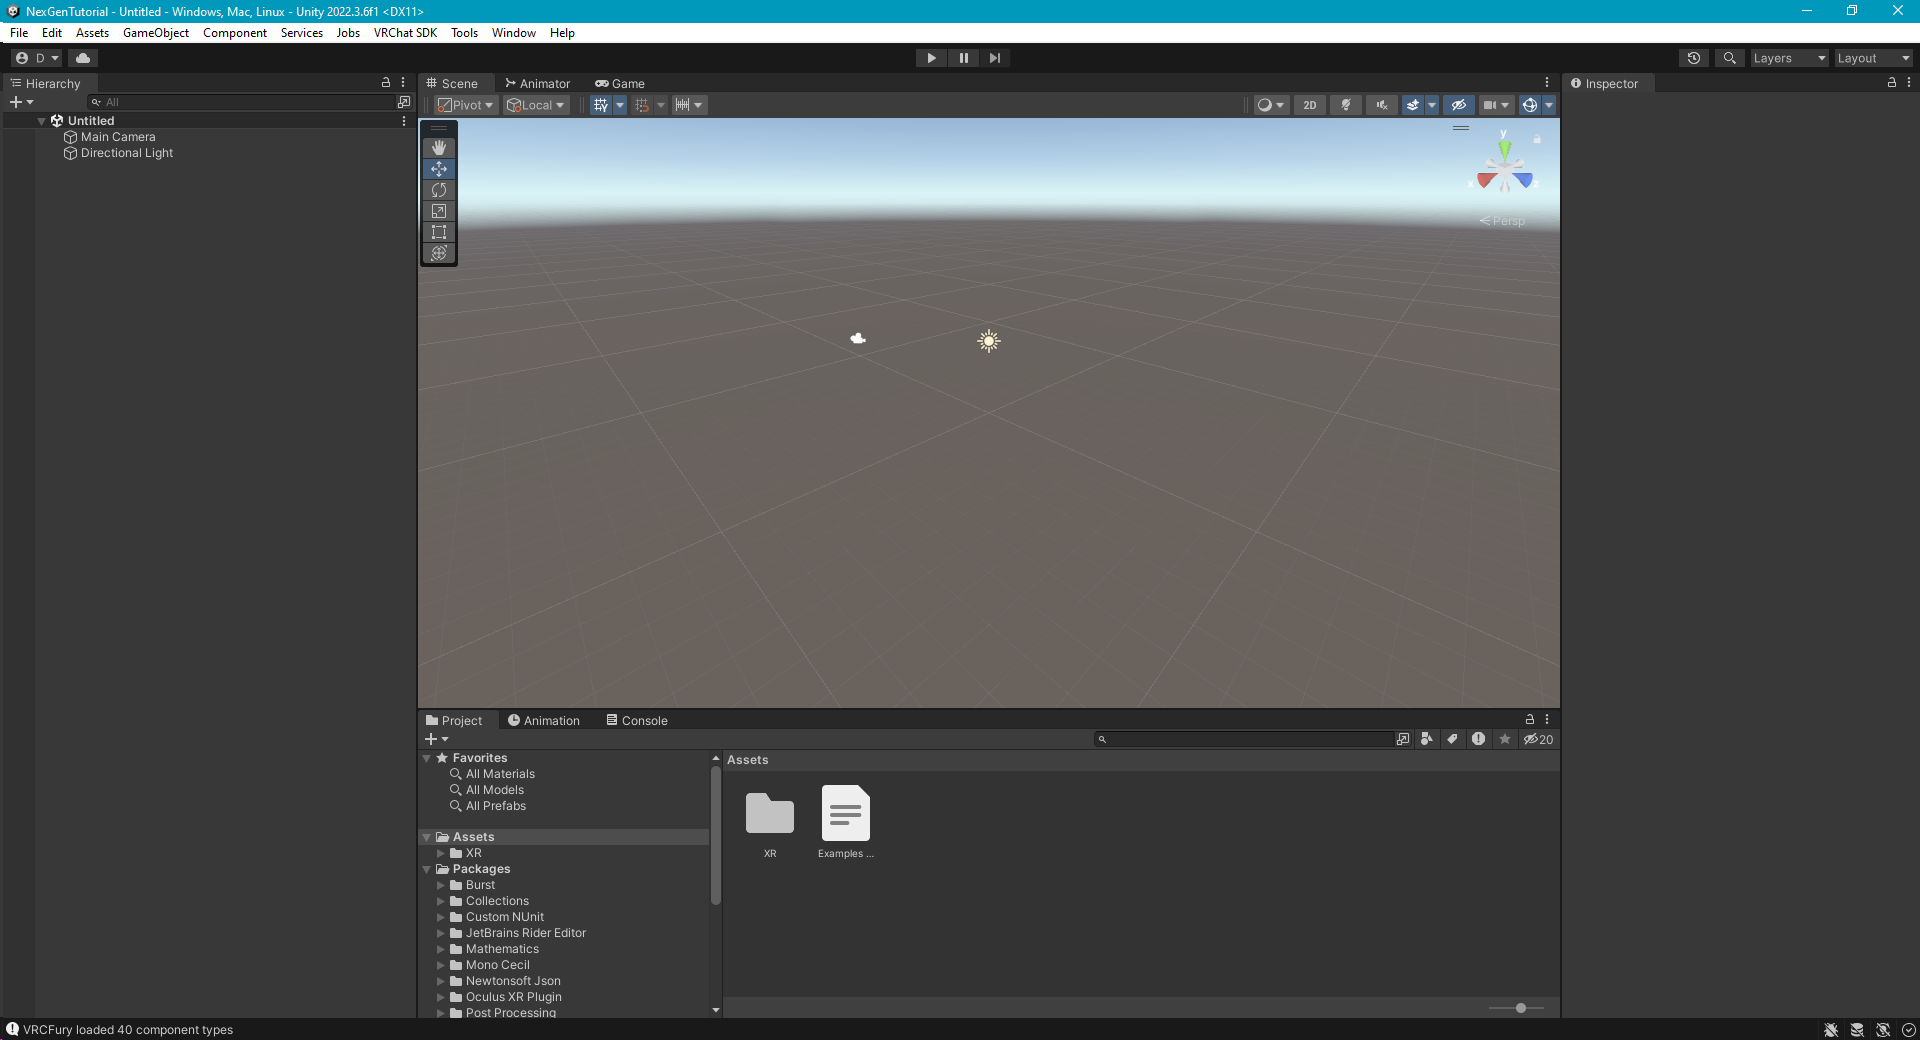
Reference Video Drag your exported FBX file into the Assets folder and wait for it to complete. Click on the added FBX file. Look at the Inspector panel on the right. Select the Rig button. then change the Animation Type to Humanoid and click Apply. This will automatically map your model’s bones to a humanoid figure
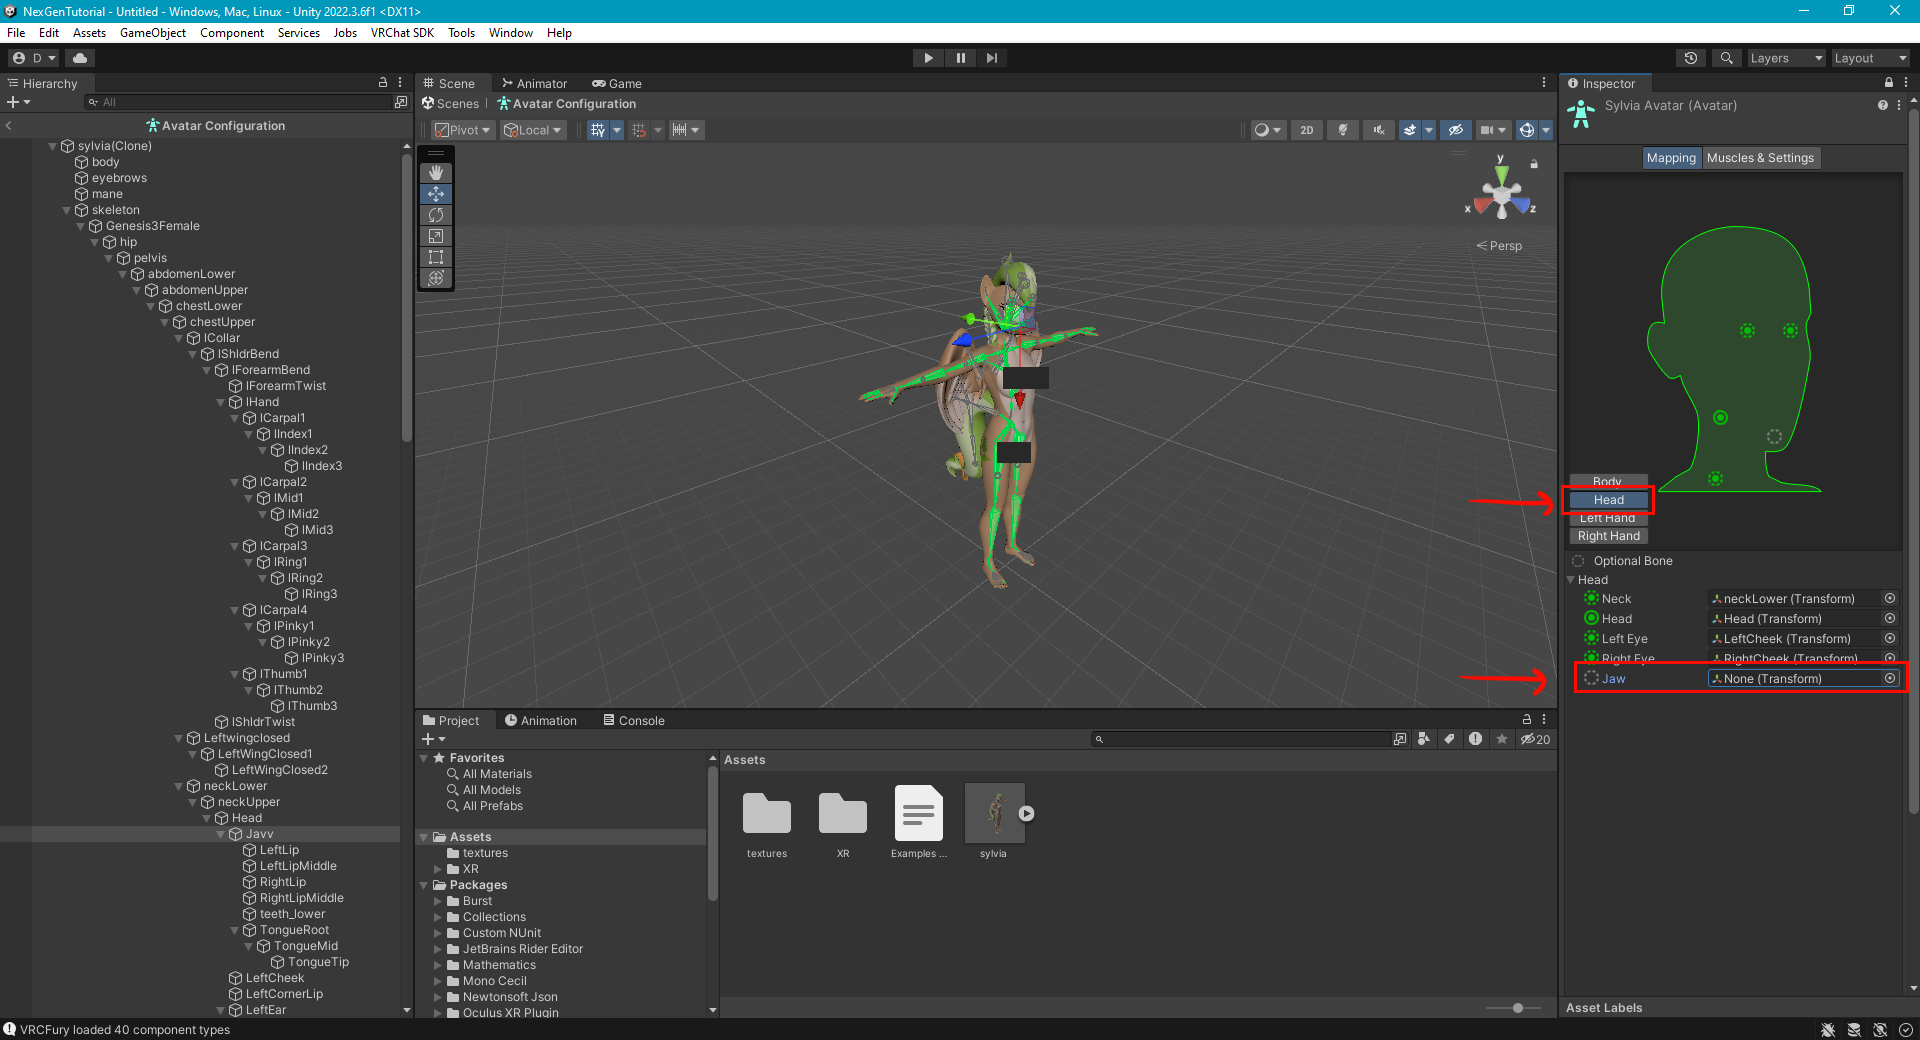
Click Configure. This will let you adjust the bone transforms and mappings. In the inspector panel, click the Head box, then click the circle to the right of the Jaw box and select None. This will unmap the Jaw bone from the avatar. This fixes an issue with the jaw being stuck open. Scroll down, then click Apply then Done at the bottom of the Inspector panel.
Initial Avatar Setup
Avatar Model
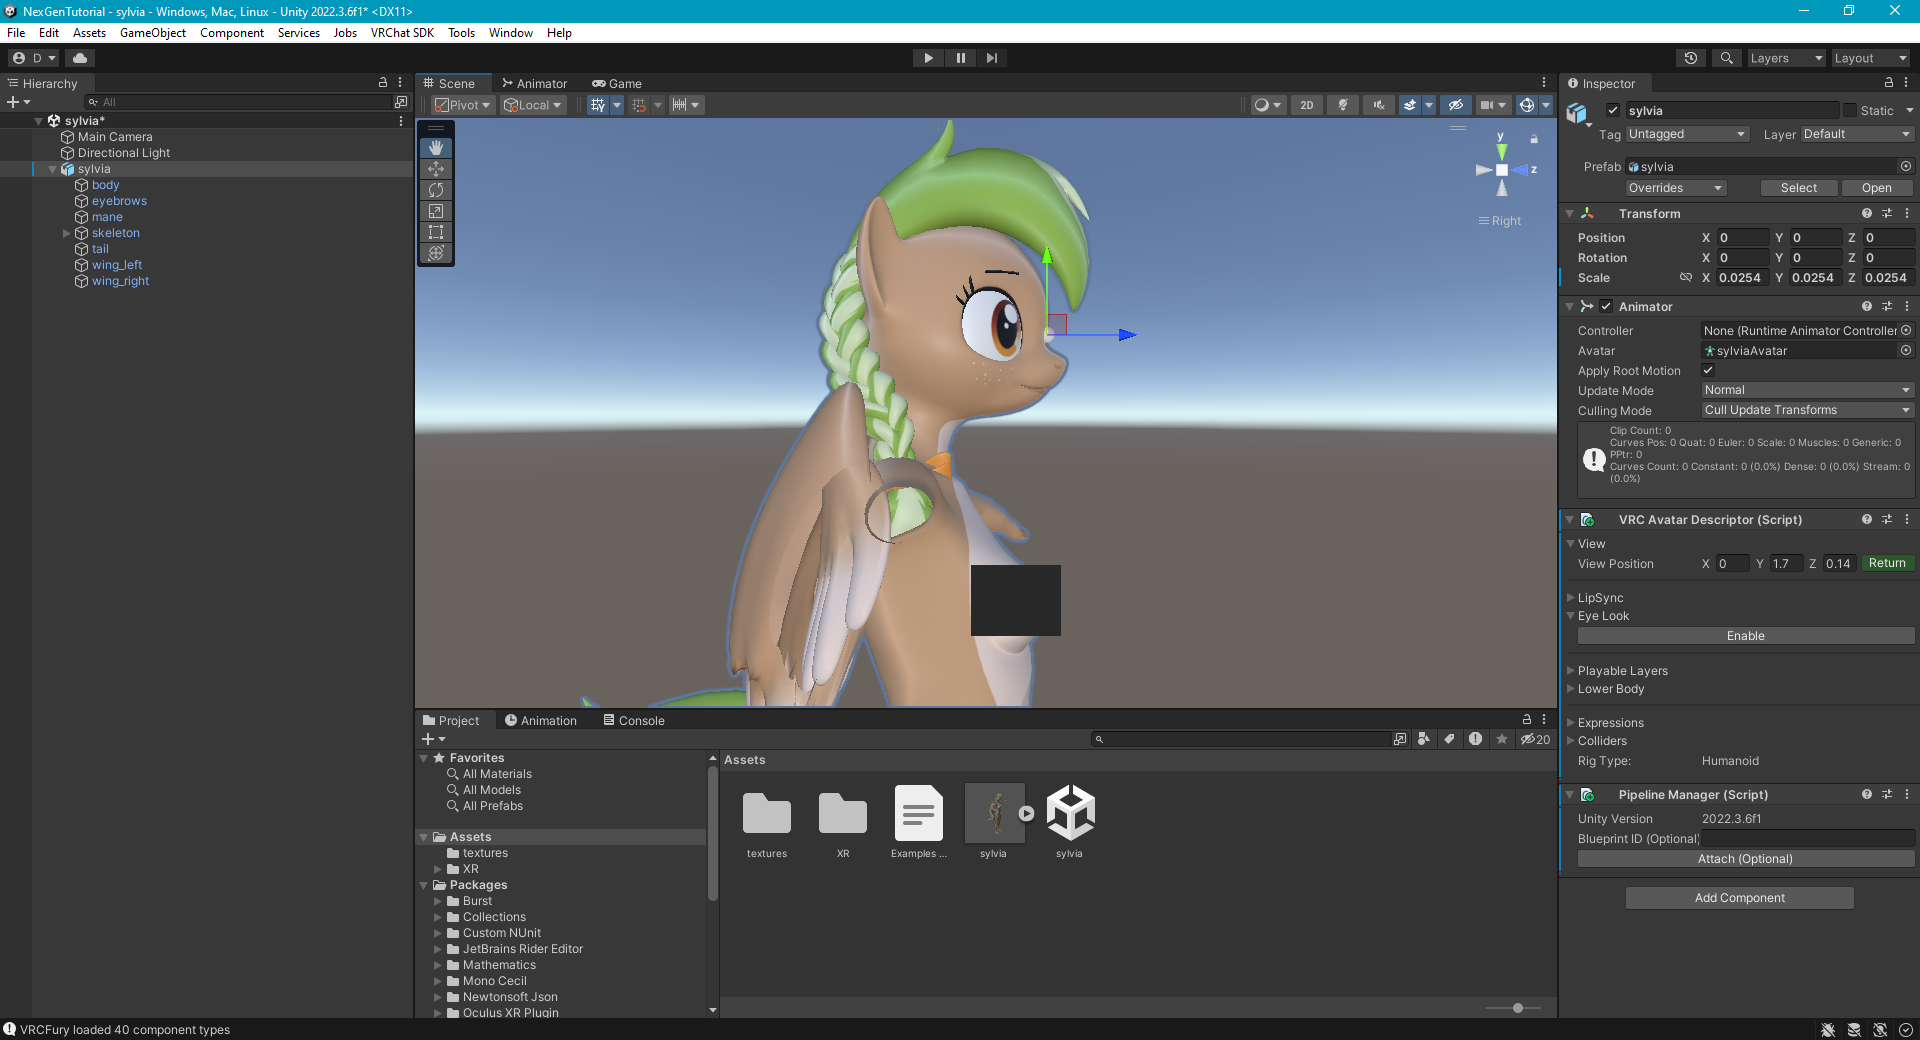
Drag the FBX file from your Assets folder into your hierarchy. The model will appear in your scene, but it will be insanely large due to a mismatch of units. The NexGen model was designed in inches, but Unity uses meters. To fix this, set the scale of your avatar. Click on your avatar in the hierarchy, then change the scale in the inspector panel to 0.0254. This will convert from inches to meters.
Now define your model as a usable VRChat avatar. In the inspector panel, click Add Component and search for VRC Avatar Descriptor, then select it. You will now see the component listed.
Mesh Renderer Fix
For all mesh objects, go to its Skinned Mesh Renderer component and check the box Update When Offscreen. This will fix an issue with the meshes disappearing when lying down in-game and when previewing animations in Unity.
View Position
The view position is where you will see from in-game. In the VRC Avatar Descriptor component, in the View section, click Edit. You should see a ball appear in the scene. If you don’t, then ensure Gizmos are enabled by clicking the globe icon in the top right of the viewport. Move the view position to between the eyes and in front of the face. I found that the position [X=0, Y=1.7, Z=0.14] looks good.
Expressions Menu and Parameters
An Expressions Menu is the radial menu you use in-game to configure various options about your avatar. Expression Parameters are values that are controlled through the menus and can affect things about your avatar. These will be used later in the tutorial for an optional body proportions slider, and for outfit toggles.
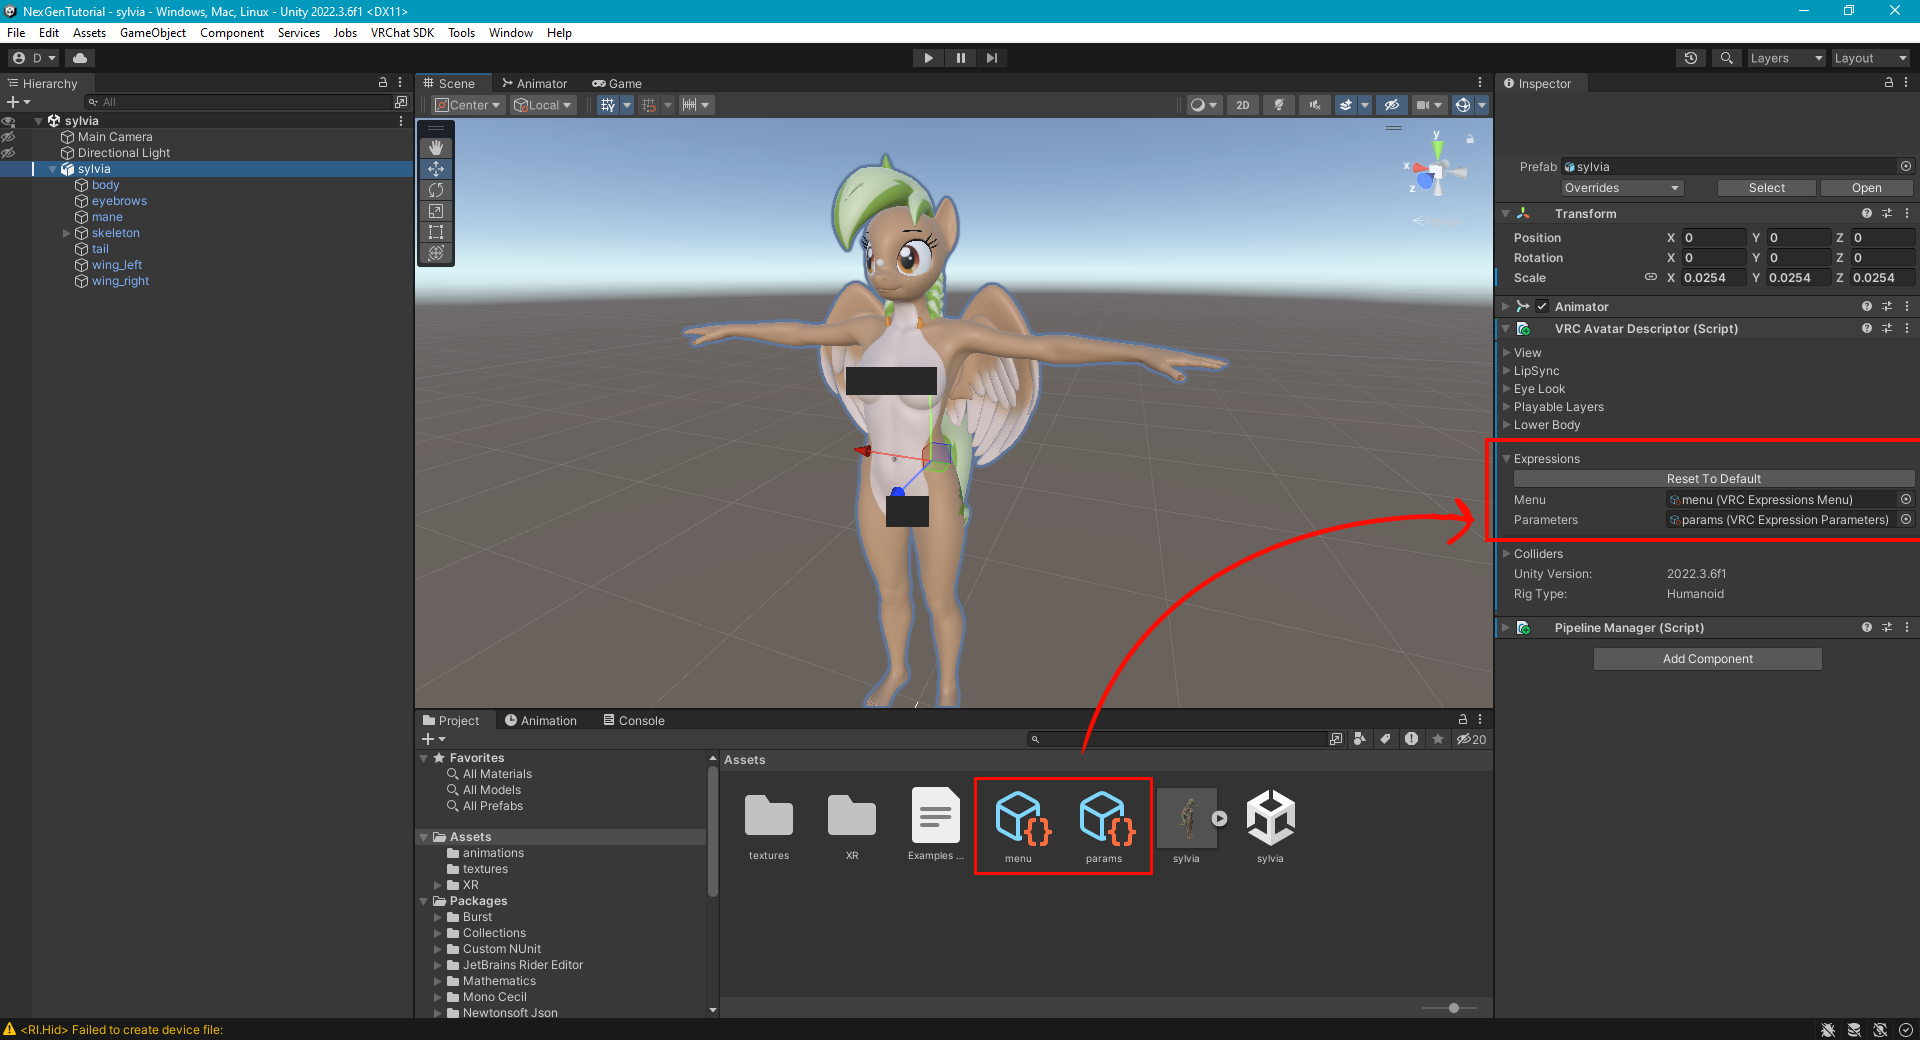
In your Assets folder, right click then Create > VRChat > Avatars > Expression Parameters. I called it “params”. Right click Assets again, then Create > VRChat > Avatars > Expression Menu. I called this “menu”. Select your avatar in the hierarchy, and in the VRC Avatar Descriptor, in the Expressions section, click Customize. Drag your new menu and parameter files into the Menu and Parameters boxes.
First Test Run
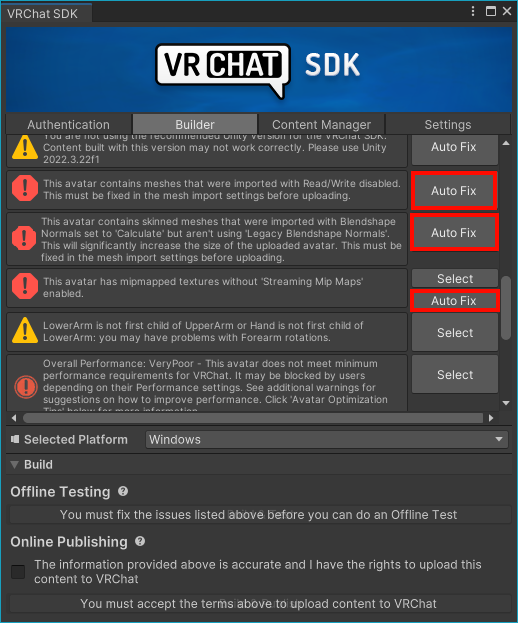
In the Unity menu bar, select VRChat SDK > Show Control Panel. Log into VR Chat in the Authentication tab. Then, switch to the Builder Tab and select your avatar. There will be a few errors listed under the validations section (red octagons are the important errors). Navigate to each error and click Auto Fix. You will likely need to do this Auto Fix every time you import a new model or material. You can fill in any other details about your avatar as well, but for now they are not important because we just want to test it. Click Build & Test at the bottom of the window. This will build your avatar so that it will be available in VR Chat.
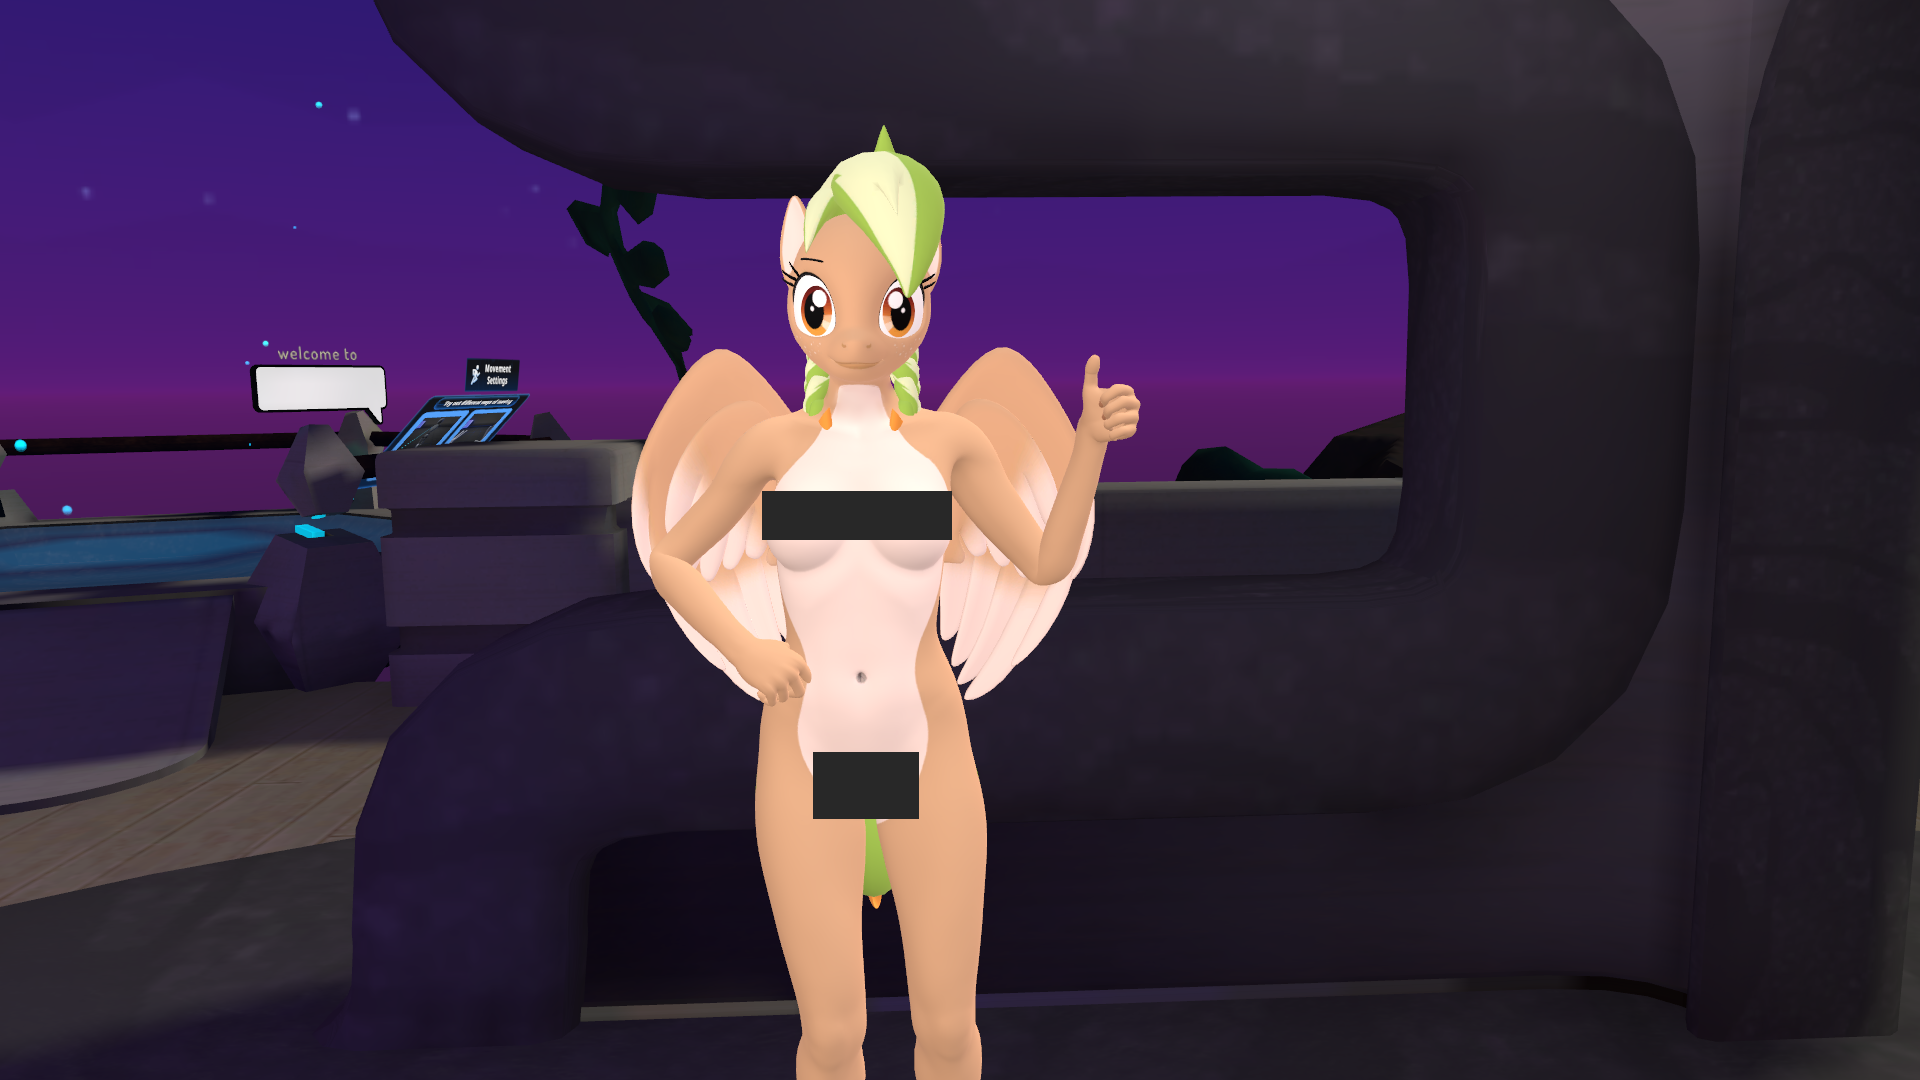
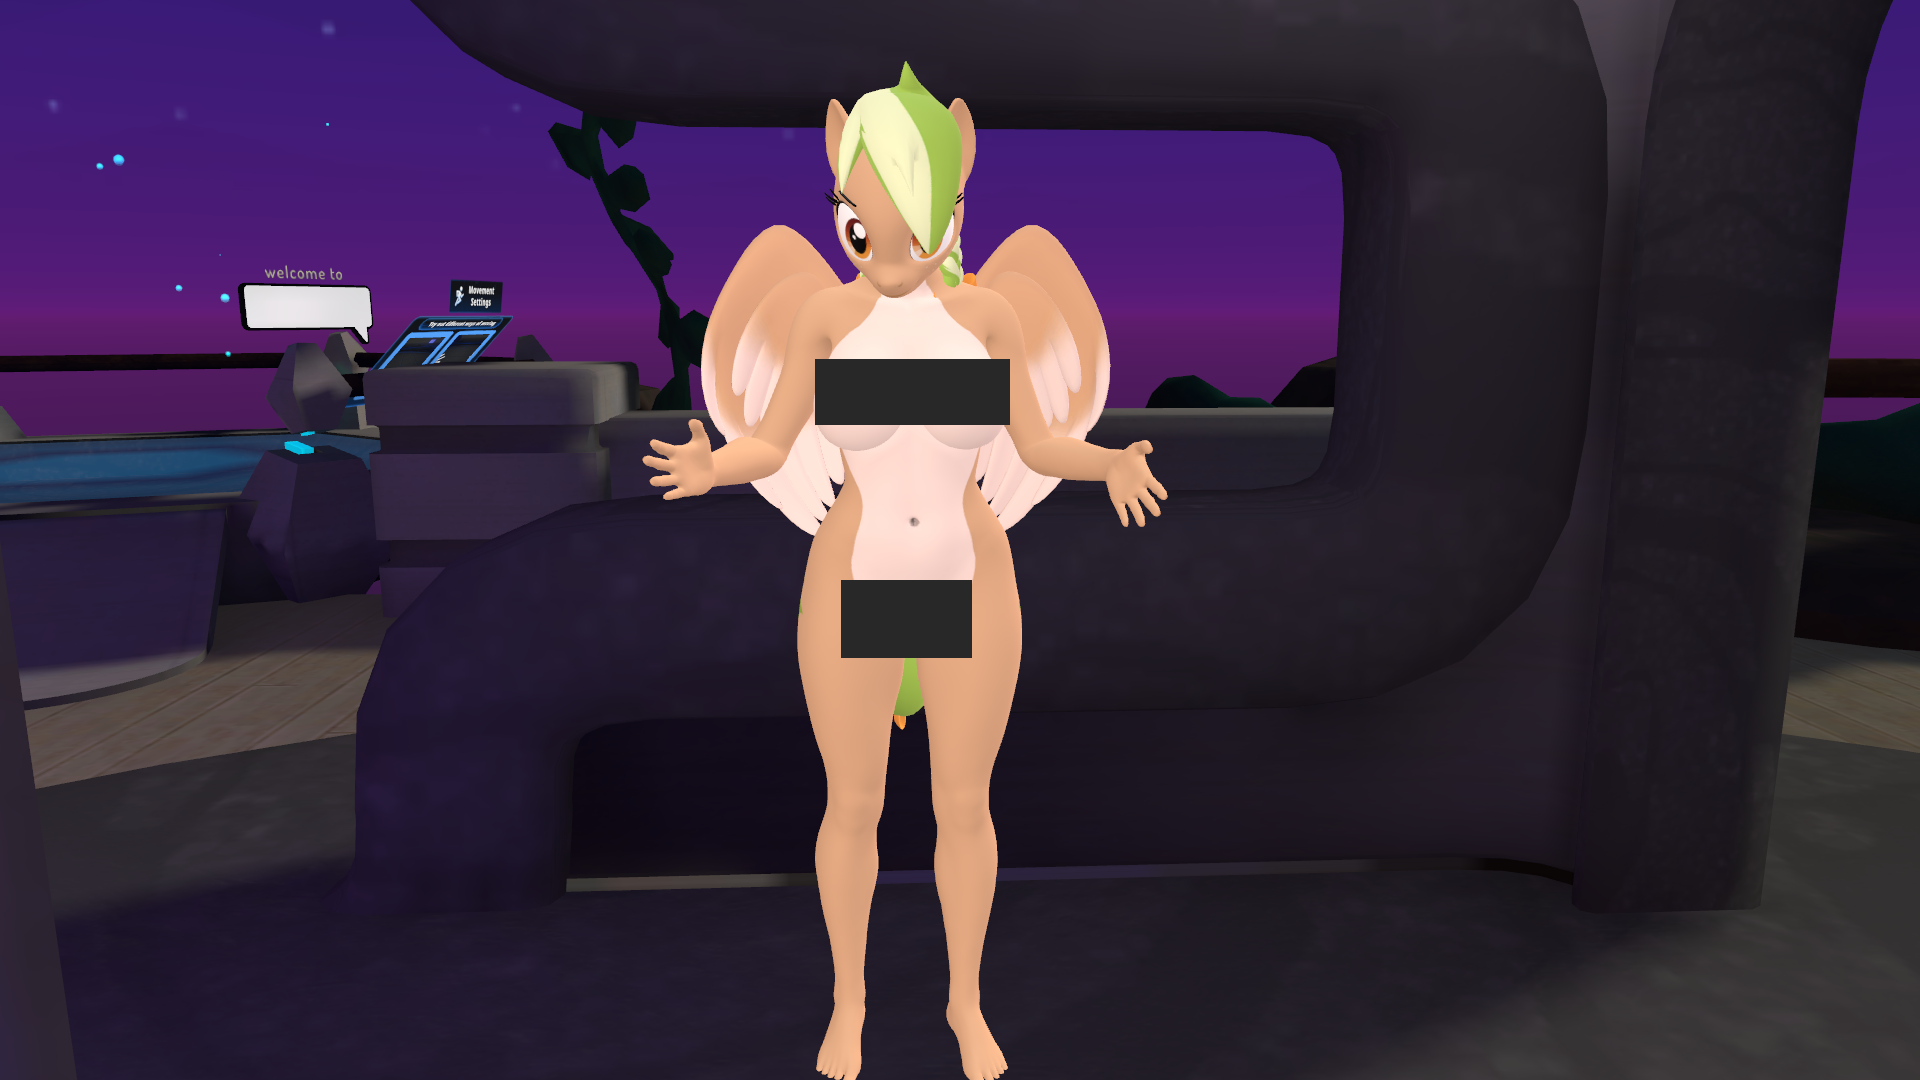
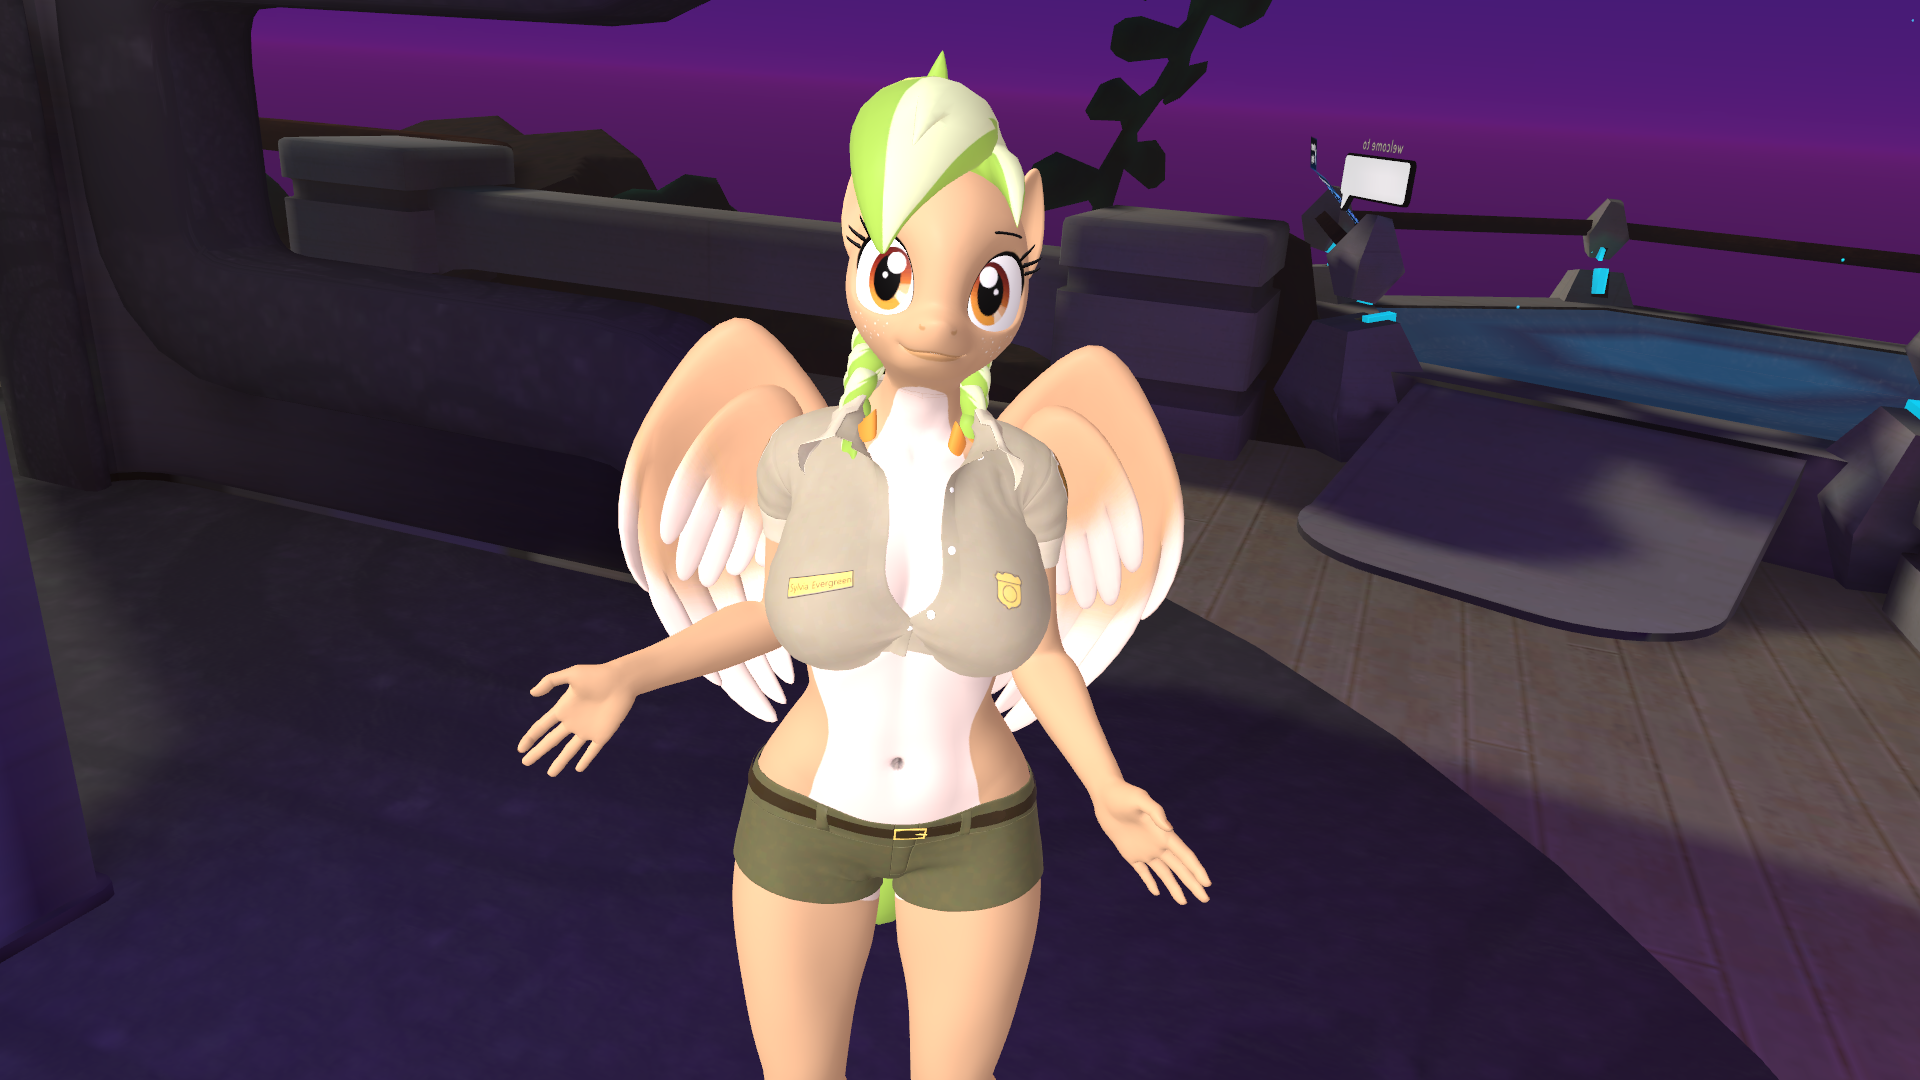
Your model is now ready for a test run. Start up VR Chat, then switch to your new avatar from the Other Avatars section. Congrats, you now have a working version of your NexGen pony in VR Chat! They are naked for now, but clothes will be discussed later in the tutorial. Take this time to verify all the bones are working, all the models are loaded, and your character’s height is appropriate.
Adding Jaw Movement
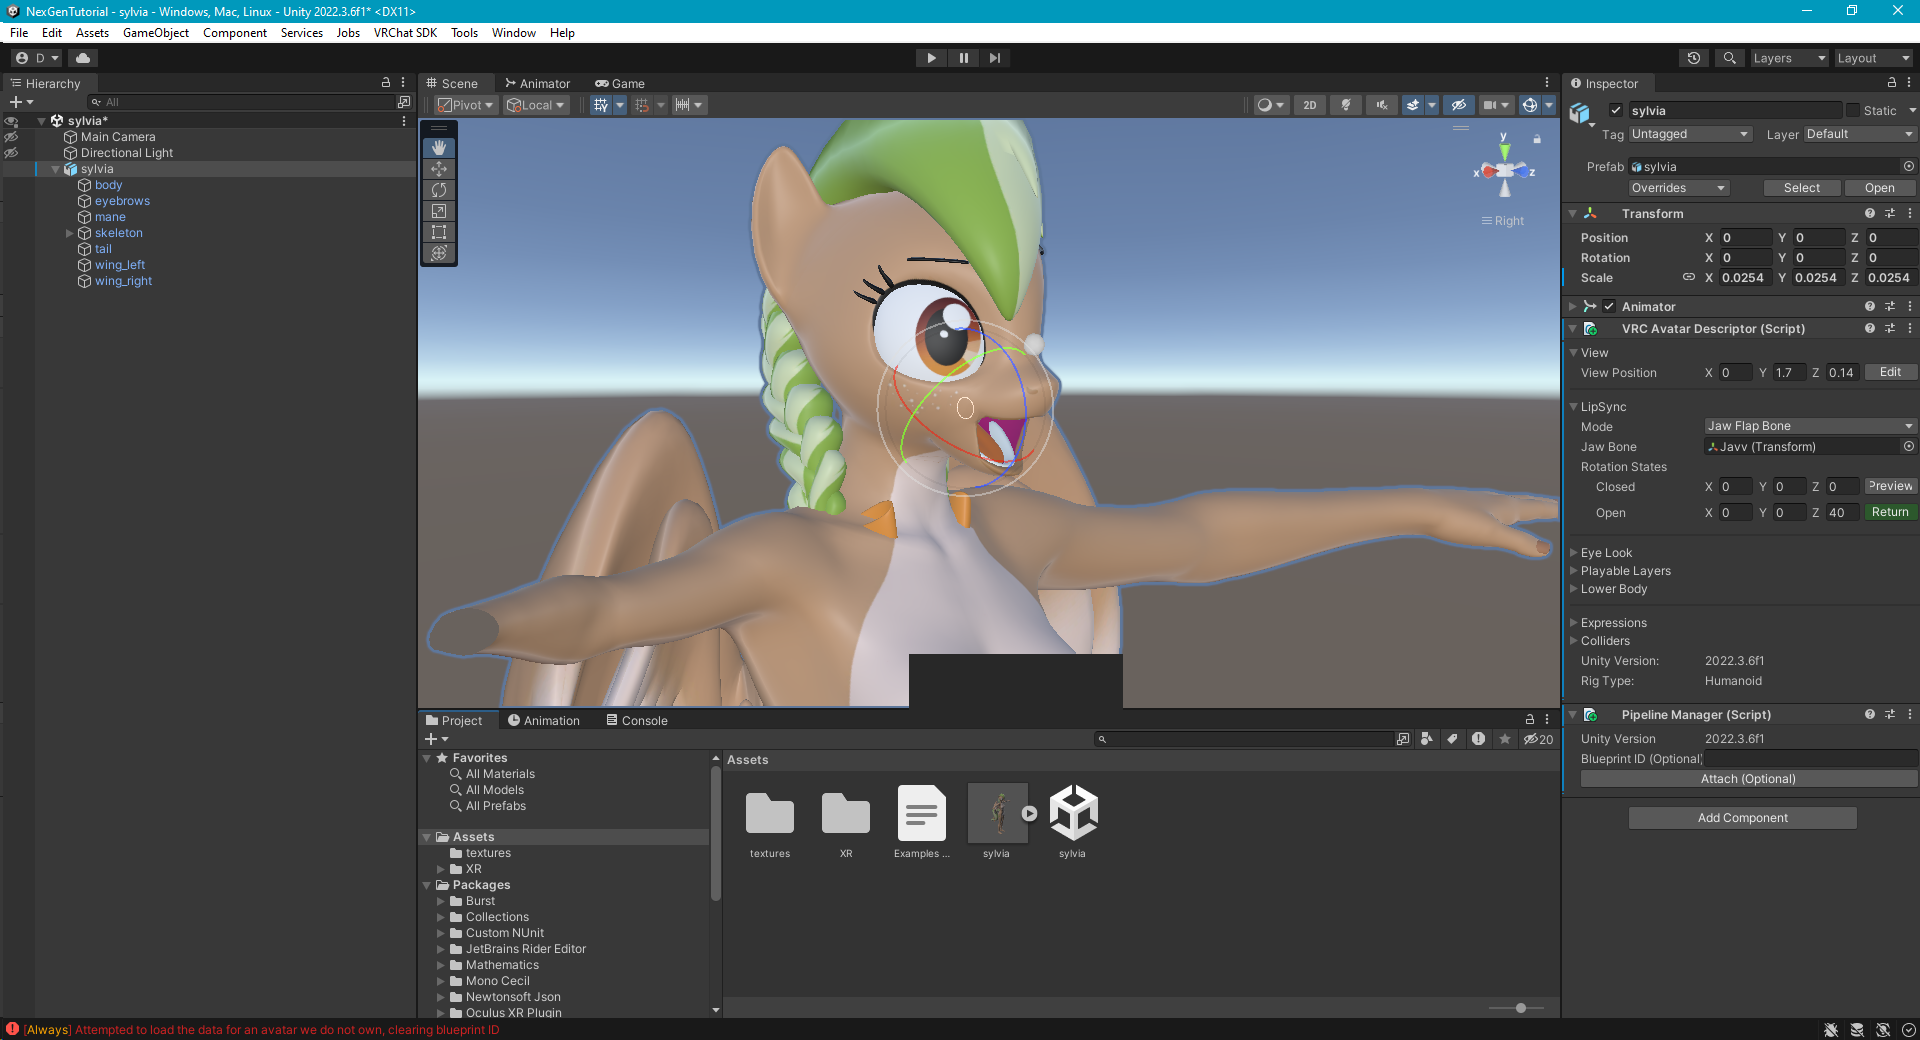
This is a rudimentary way of lip syncing, which opens and closes your mouth when you talk. Select your avatar object. In the VRC Avatar Descriptor component, in the LipSync section, set the Mode to Jaw Flap Bone. Then, click on the Jaw Bone box and set it to Javv. Set the closed rotation state to 0, 0, 0. Set the open rotation state to X=0, Y=0, Z=30 (you can increase this if you want your jaw to move more).
Adding Eye Blinking
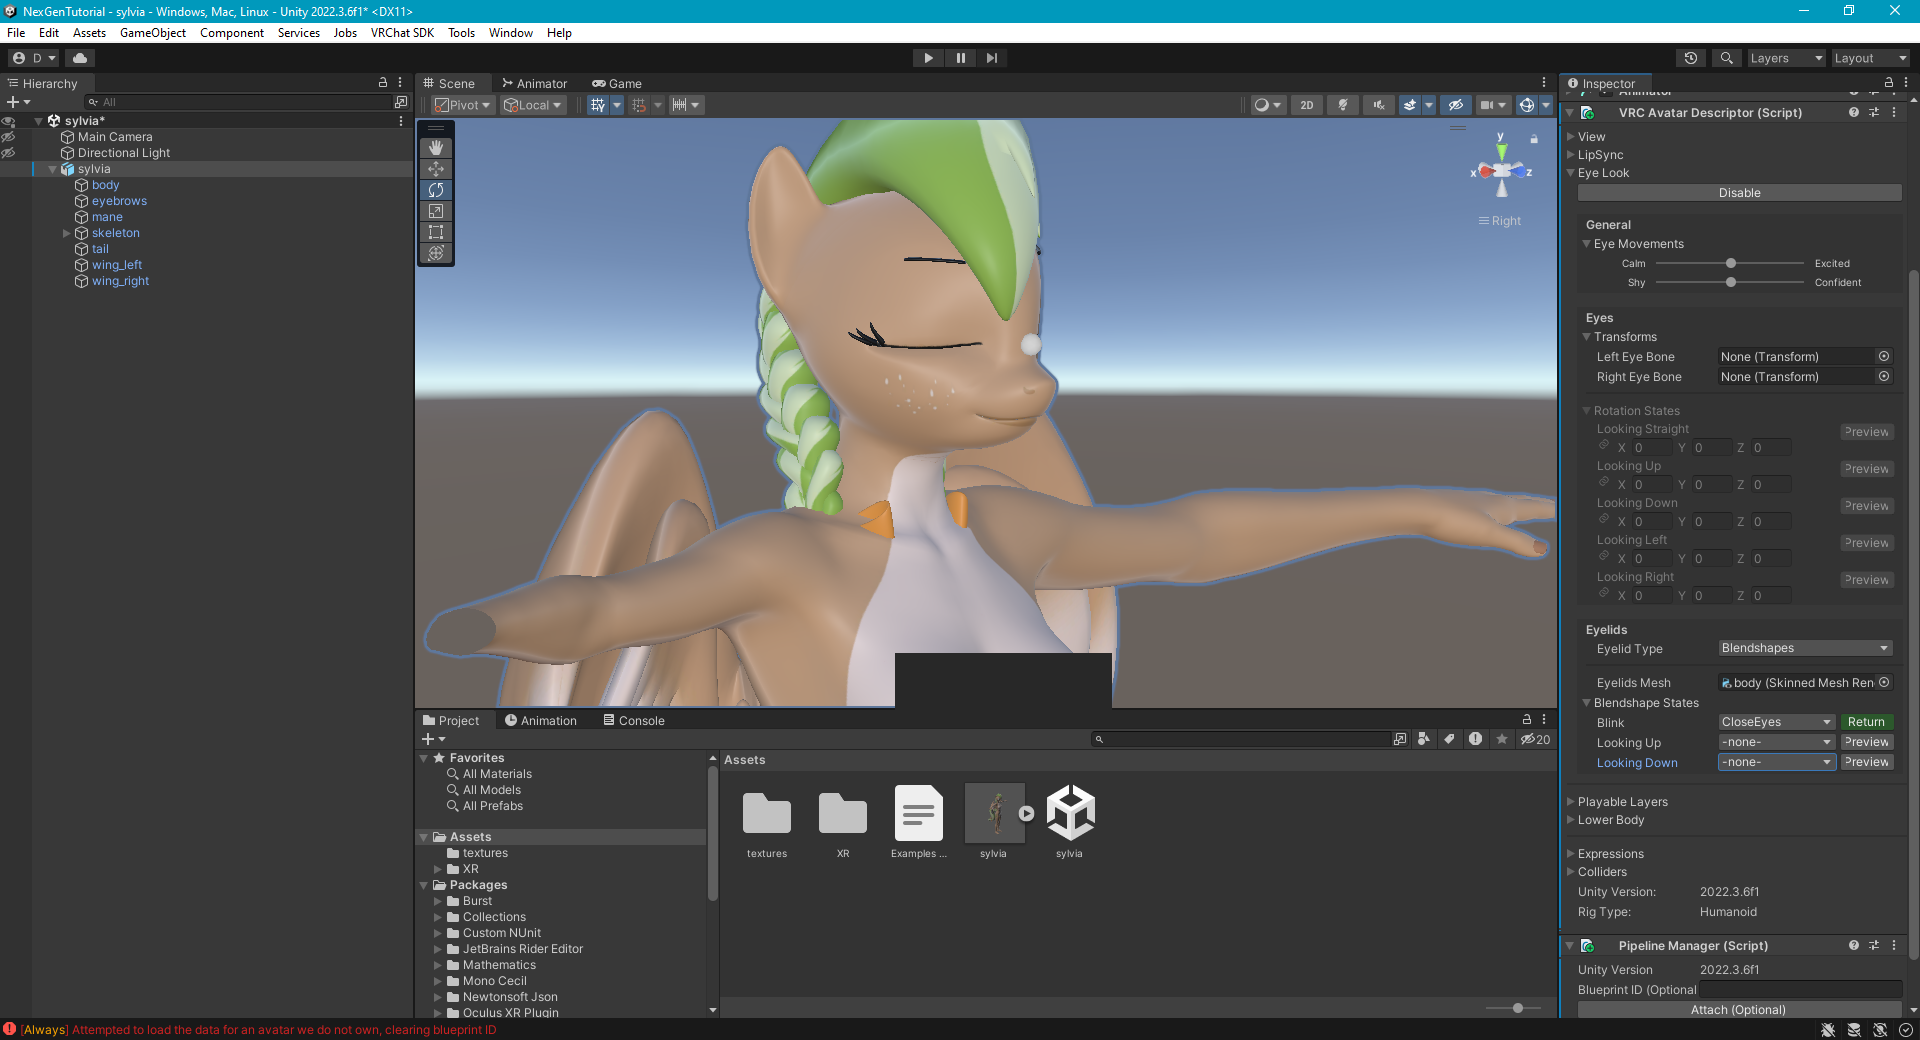
Click on your avatar and find the Eye Look section in its VRC Avatar Descriptor. Click Enable. In the Eyelids section, set the Eyelid Type to Blendshapes. Set the Eyelids Mesh to your body (or head if you kept it separate). Set the Blink blendshape to CloseEyes. Set Looking Up and Looking Down Blendshapes to -none-.
Customizing Body Proportions
This section will describe how to use animations and blend shapes to create customized body proportions.
Create the Reset Animation
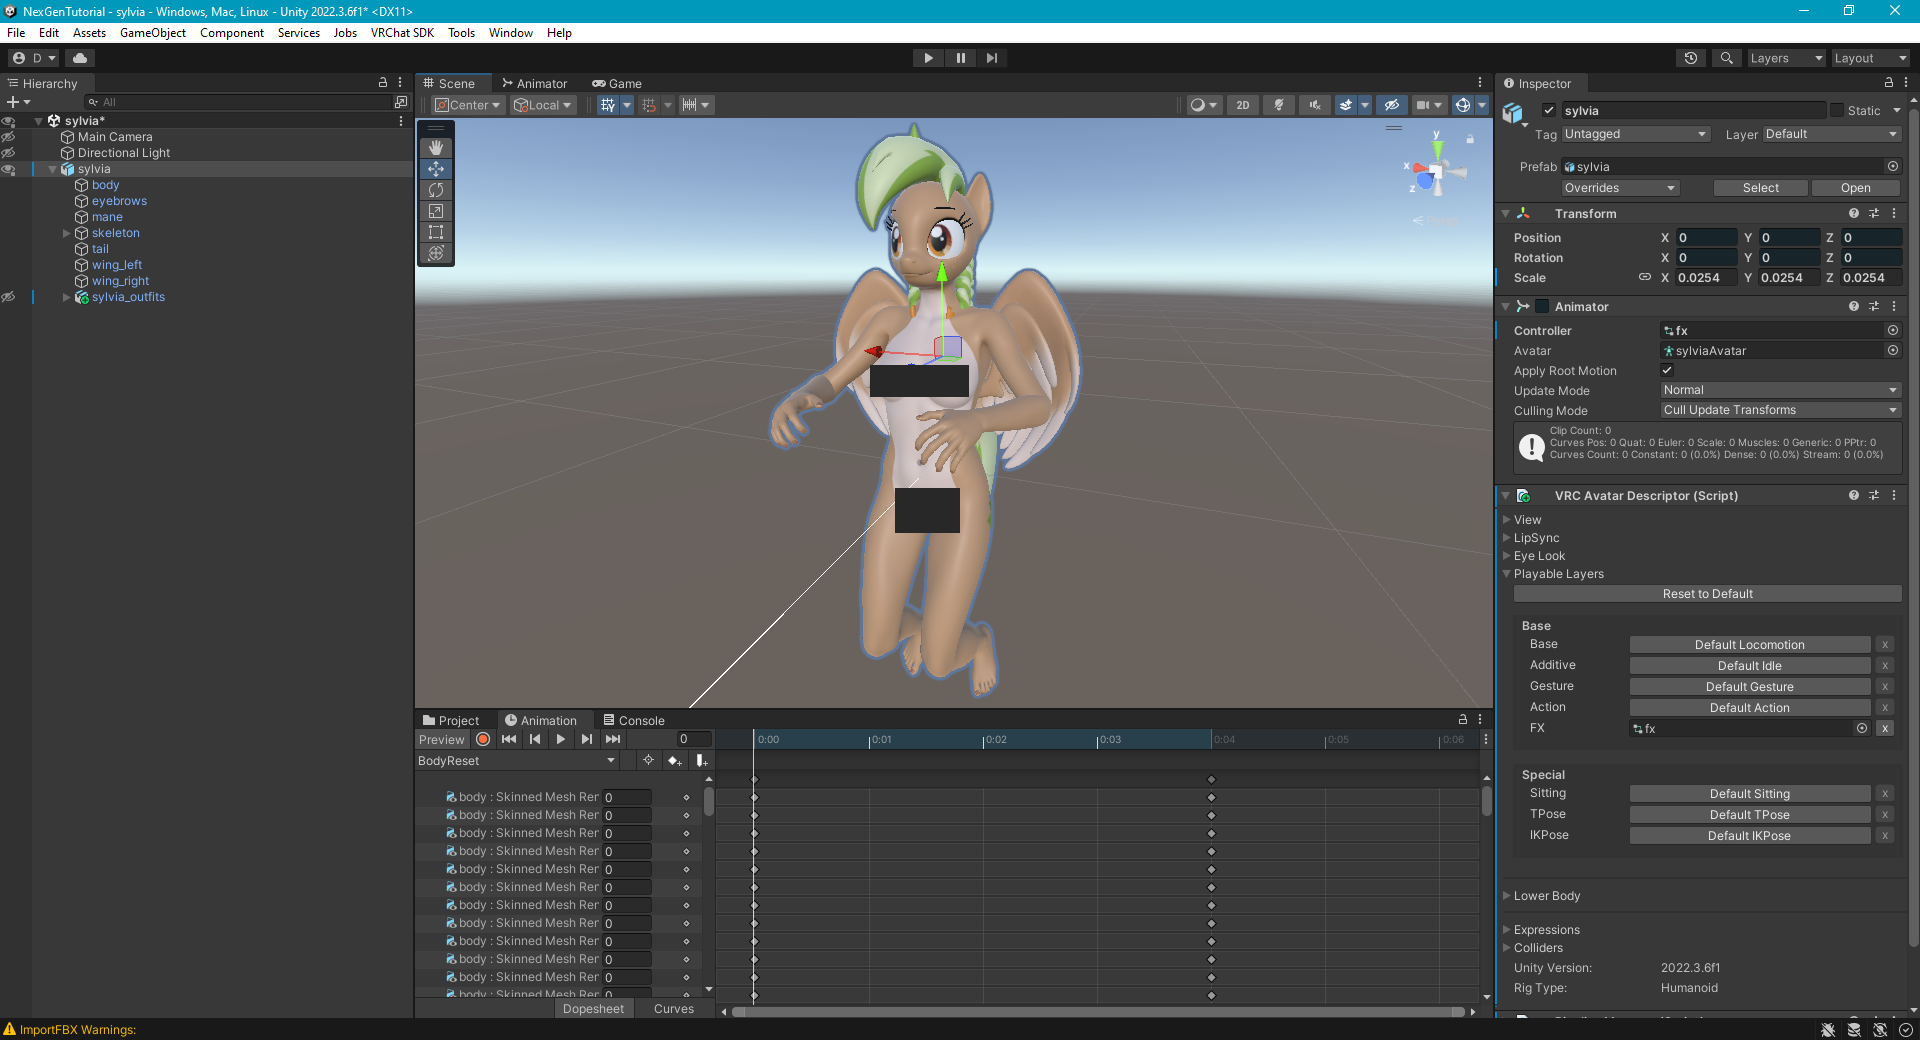
Select your avatar in the hierarchy. In the bottom of the UI, select the Animation tab. Click Create New Clip and call it “BodyReset”. I also created a folder called “animations” to put it in.
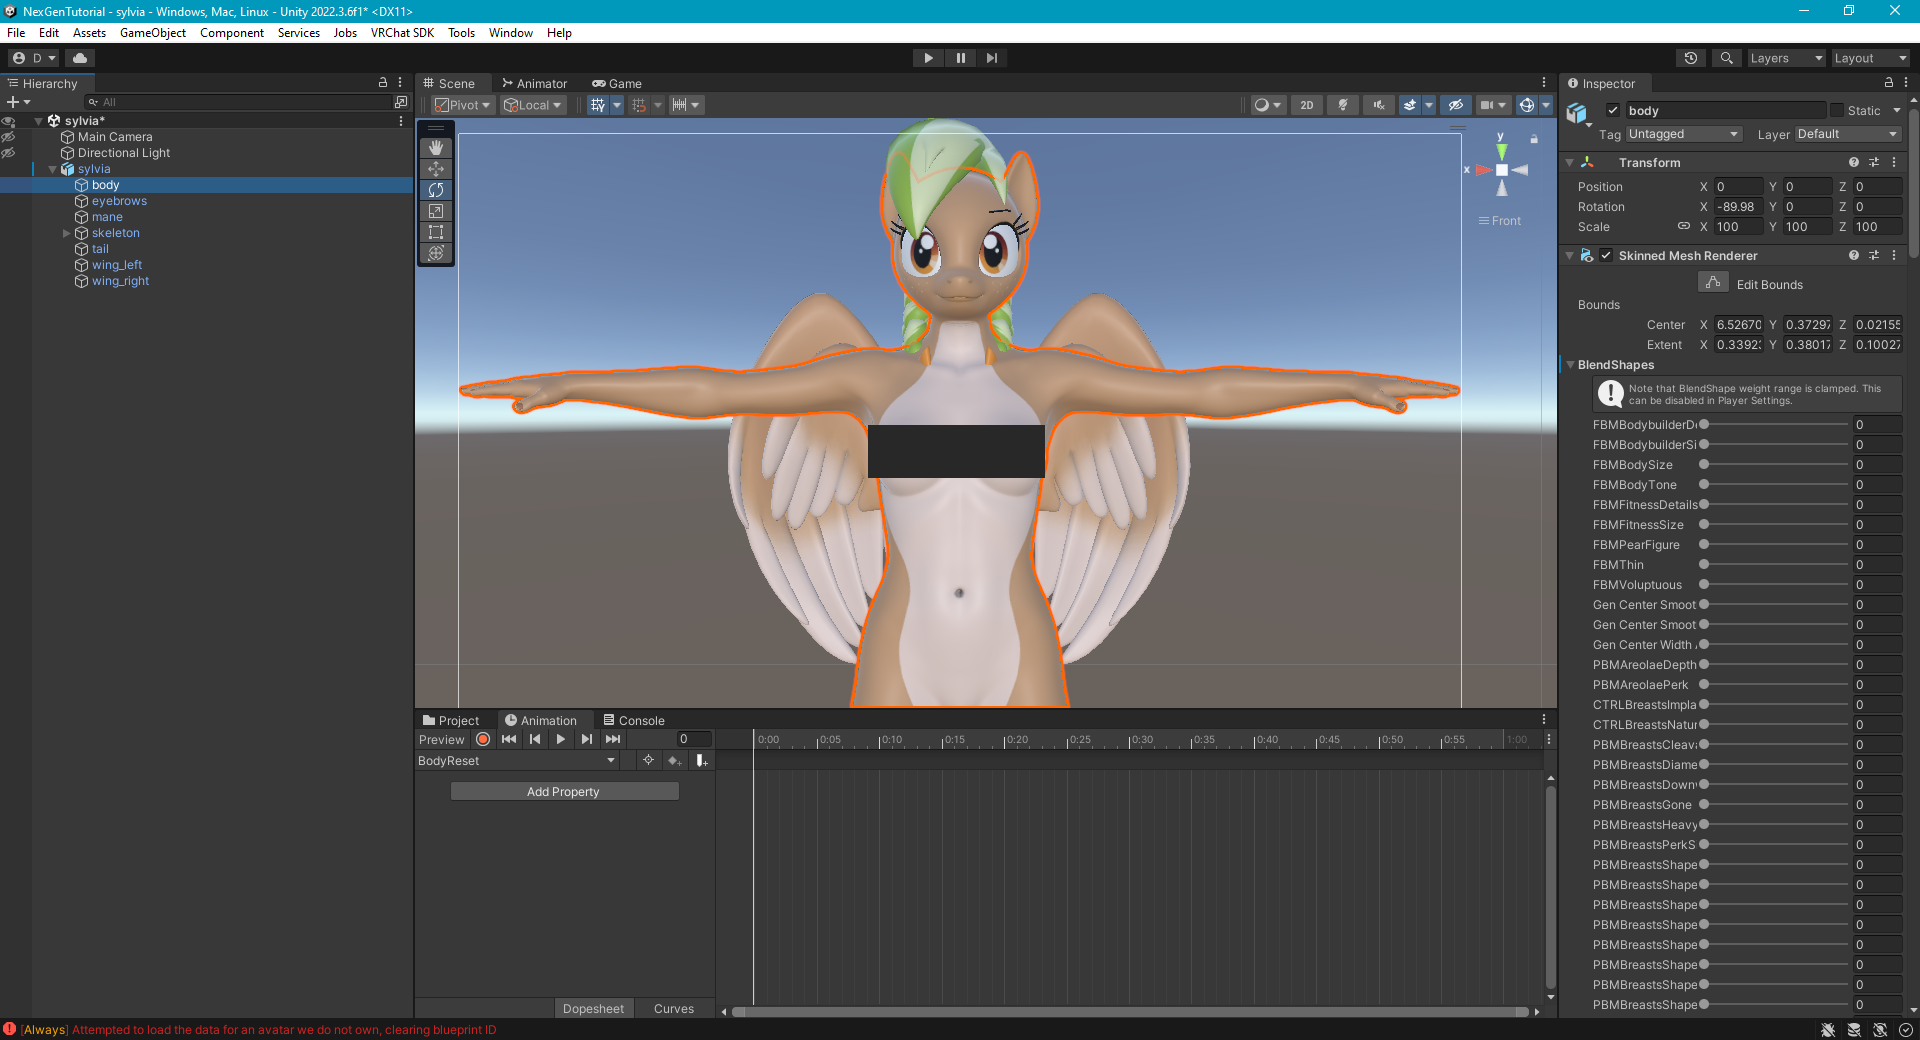
In the Animation tab, click the red record button. You will notice that the model changes into the notorious “bike pose”. This is mostly a nuisance, so try to ignore it. Select your body mesh and open its BlendShapes section. While recording, change all blend shape values to some number then change them back to 0. This way, the animation will set all these values to 0. Click the record button again to stop recording.
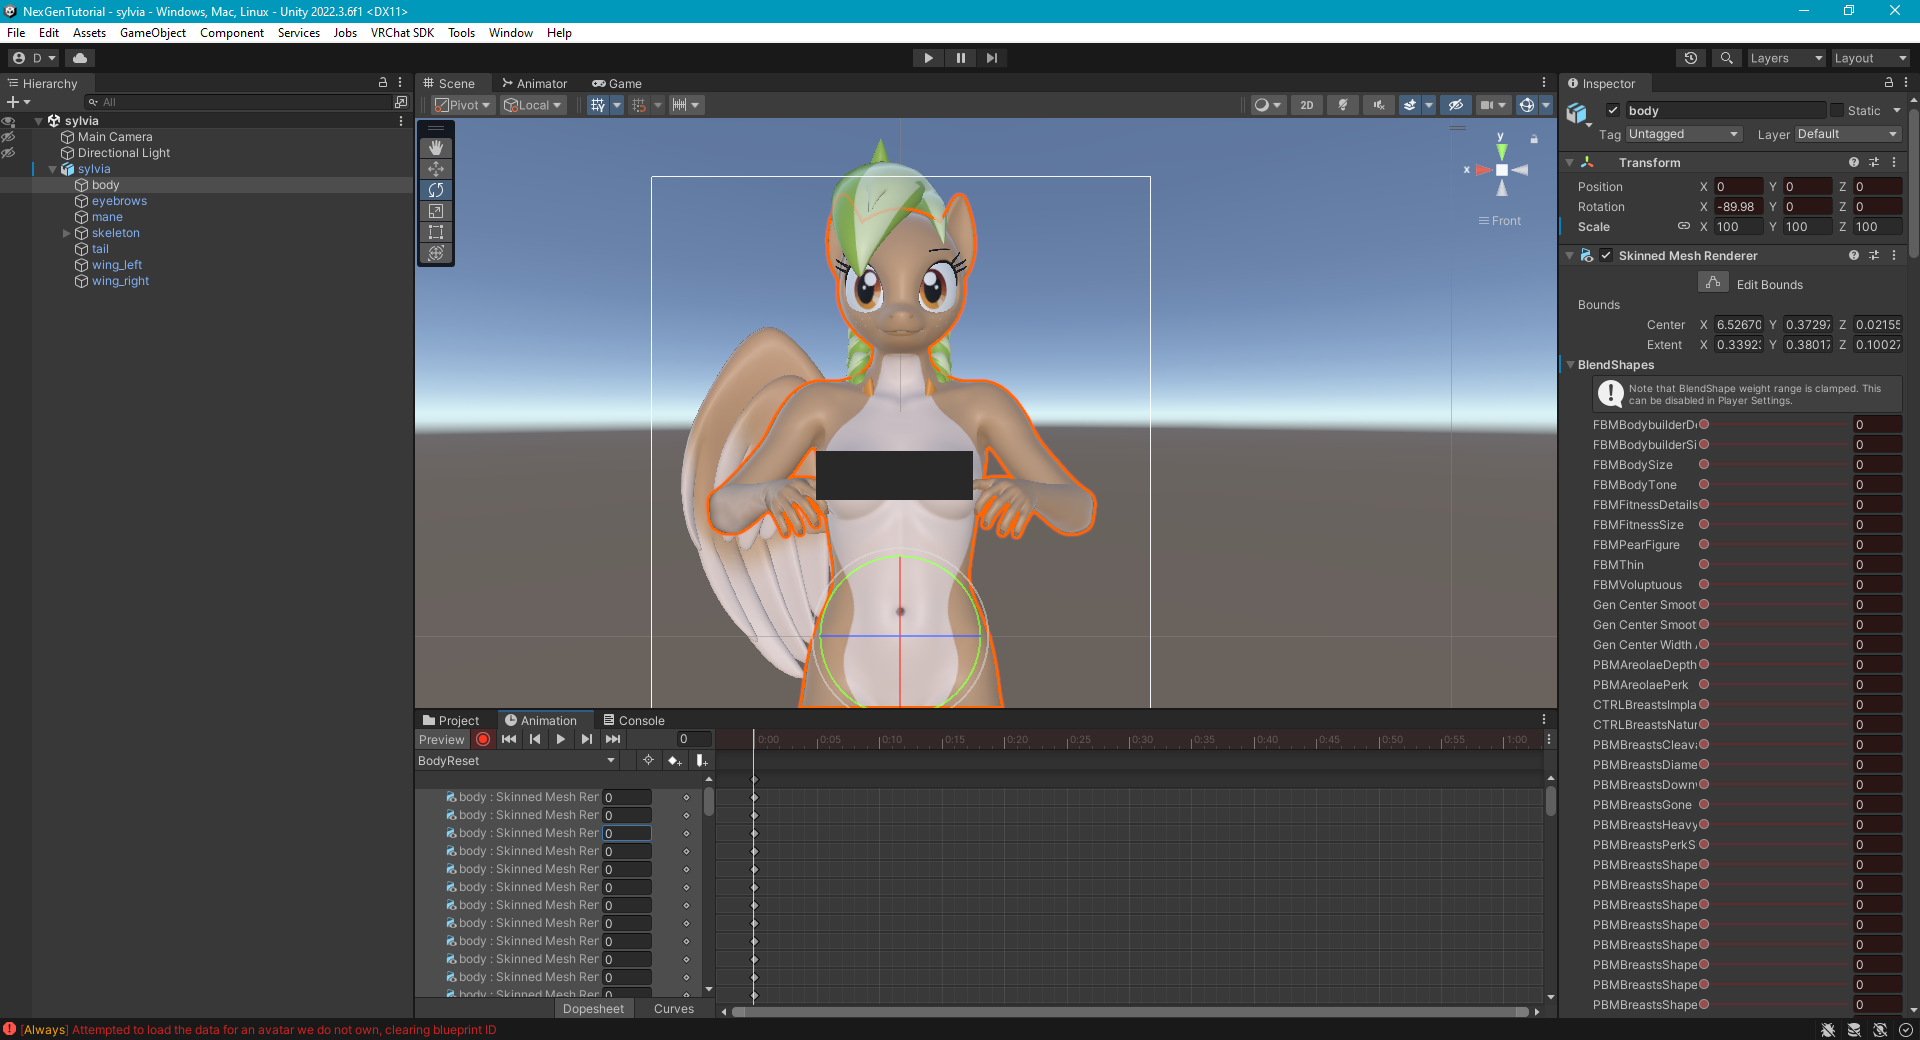
Now, click the blue diamond at the top of the timeline to select all nodes. Copy them, move the cursor to a later time in the timeline (like 0.1 seconds), then paste them. This will make the animation reset all body/face blend shapes when activated.
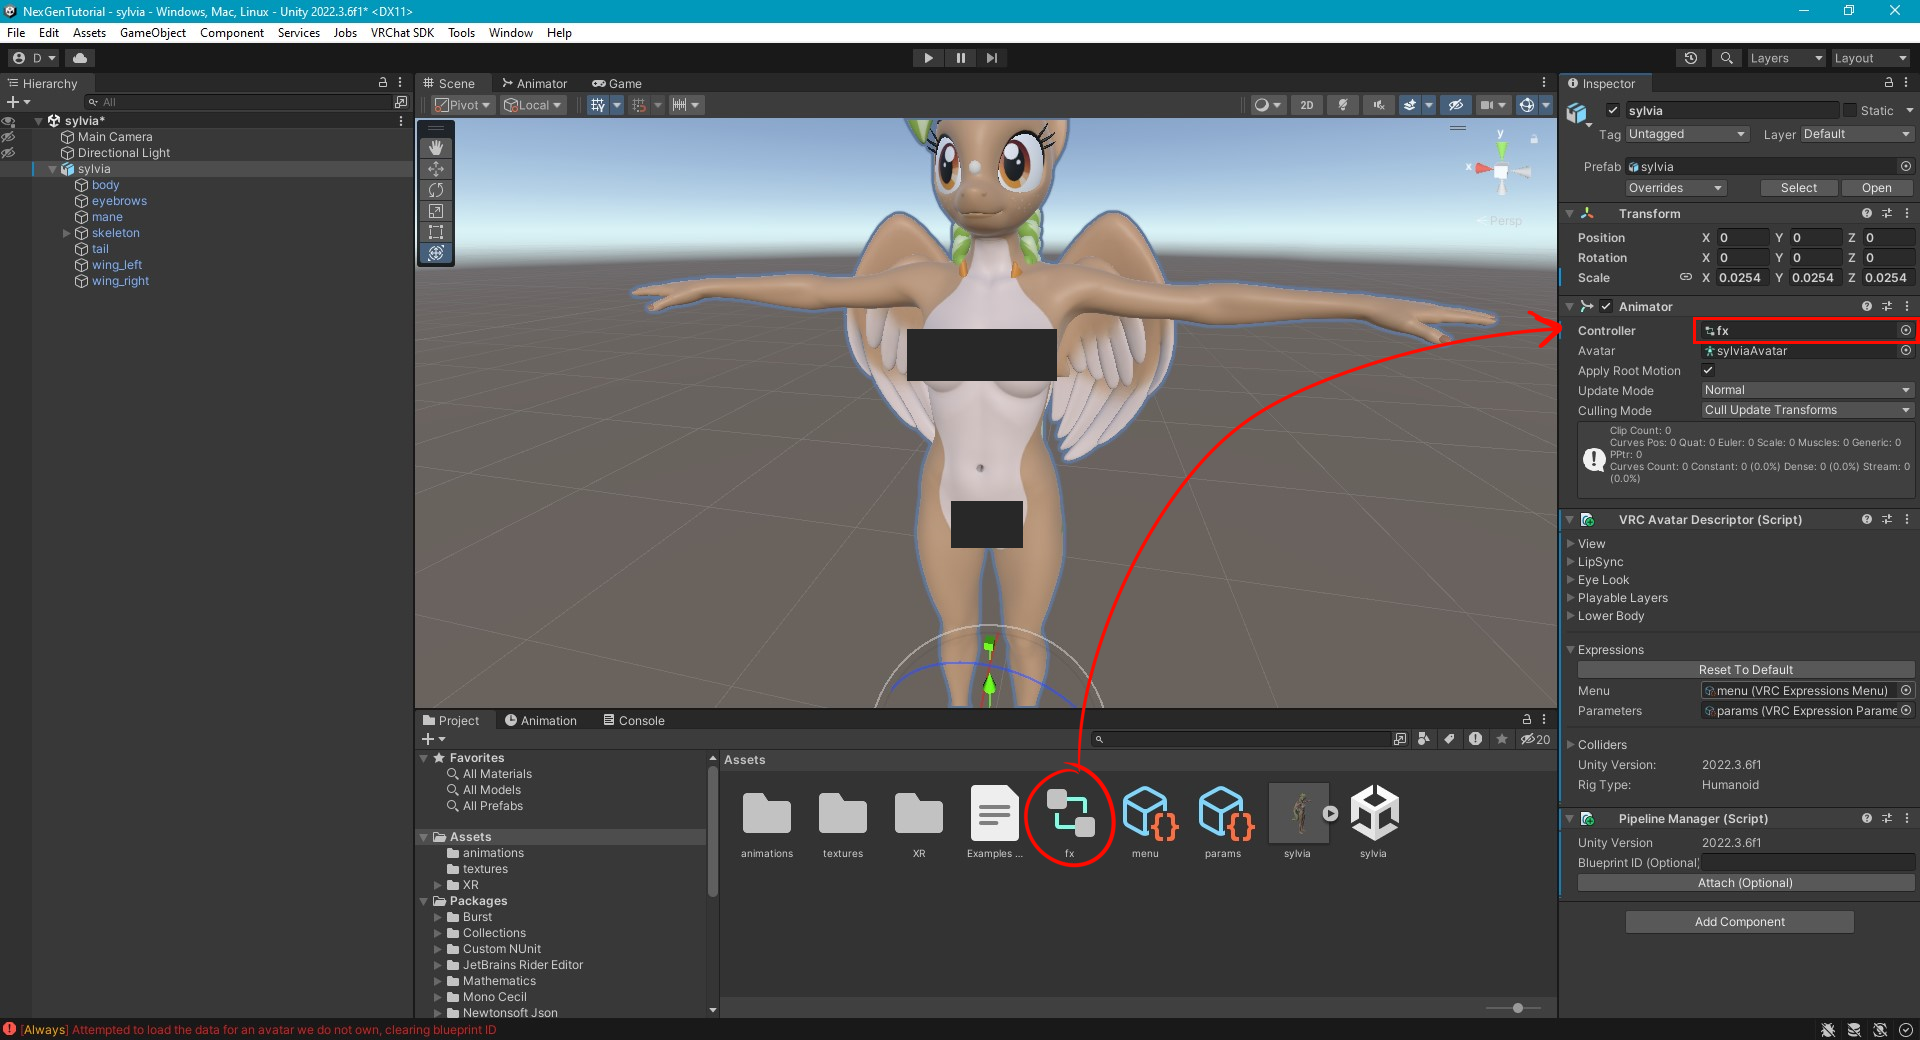
Create the Animation Controller
In your Assets folder, right click and select Create > Animator Controller. Name it “fx”. Click on your avatar and in its Animator component, change the Controller to your new fx object. In the VRC Avatar Descriptor, expand the Playable Layers section and click Customize. Set the FX to your new fx object. Now double click on the fx object to open the Animator tab. Rename the Base Layer to “BodyReset”, select it, then drag the BodyReset animation into the editor.
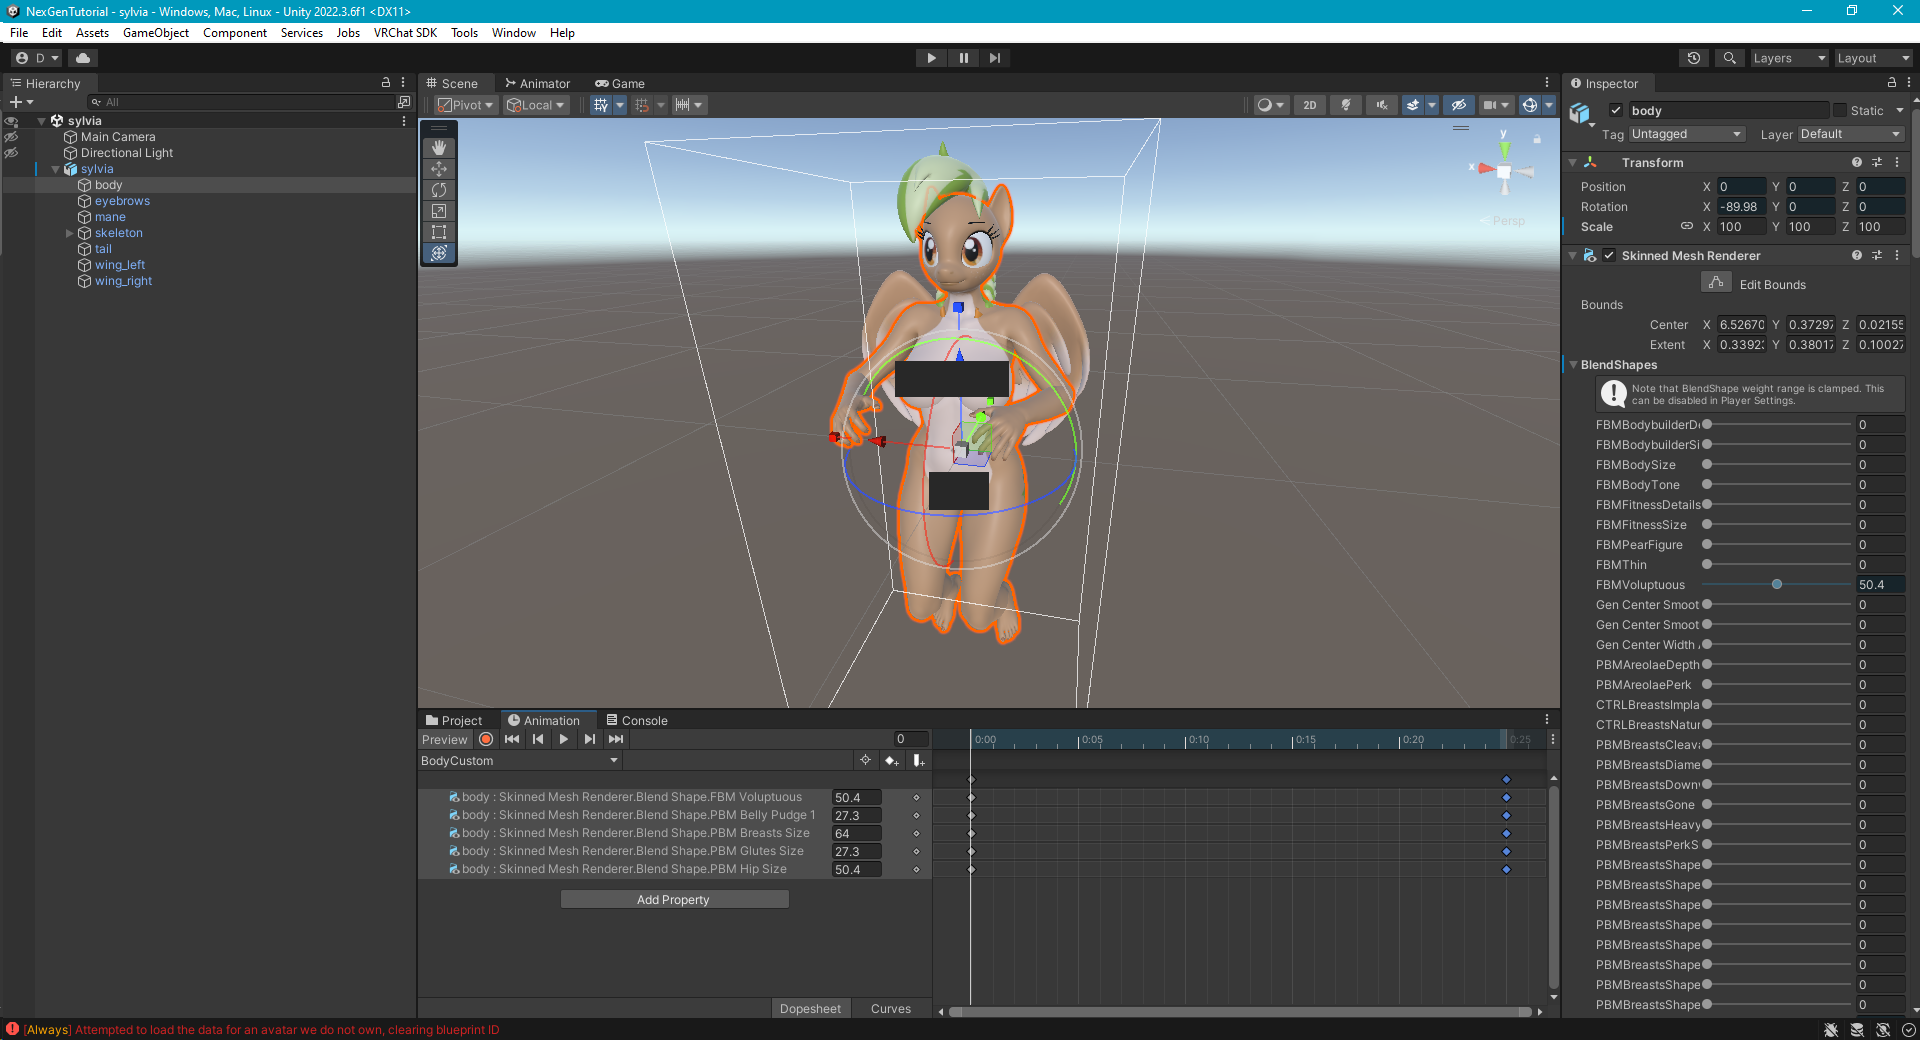
Create the Animation for Custom Body Proportions
Now create a new animation. Select your avatar, then in the Animation tab, click the Clip dropdown and select Create New Clip. I named it “BodyCustom”. This animation will store your desired body proportions. Select your body to see its blendshapes, click the animation record button, then change any blendshape values you want to use as your custom proportions. Only change the values that you need. Then stop recording. Select the keyframe (blue diamond) and copy it to another point in the timeline.
Open your animation controller (fx) again. Create a new Layer and call it “BodyProportions”, then select it. Click on the gear icon next to the new layer and set the Weight to 1. Drag the BodyProportions animation into the editor. This will override any blendshapes specified in this new animation over the reset animation.
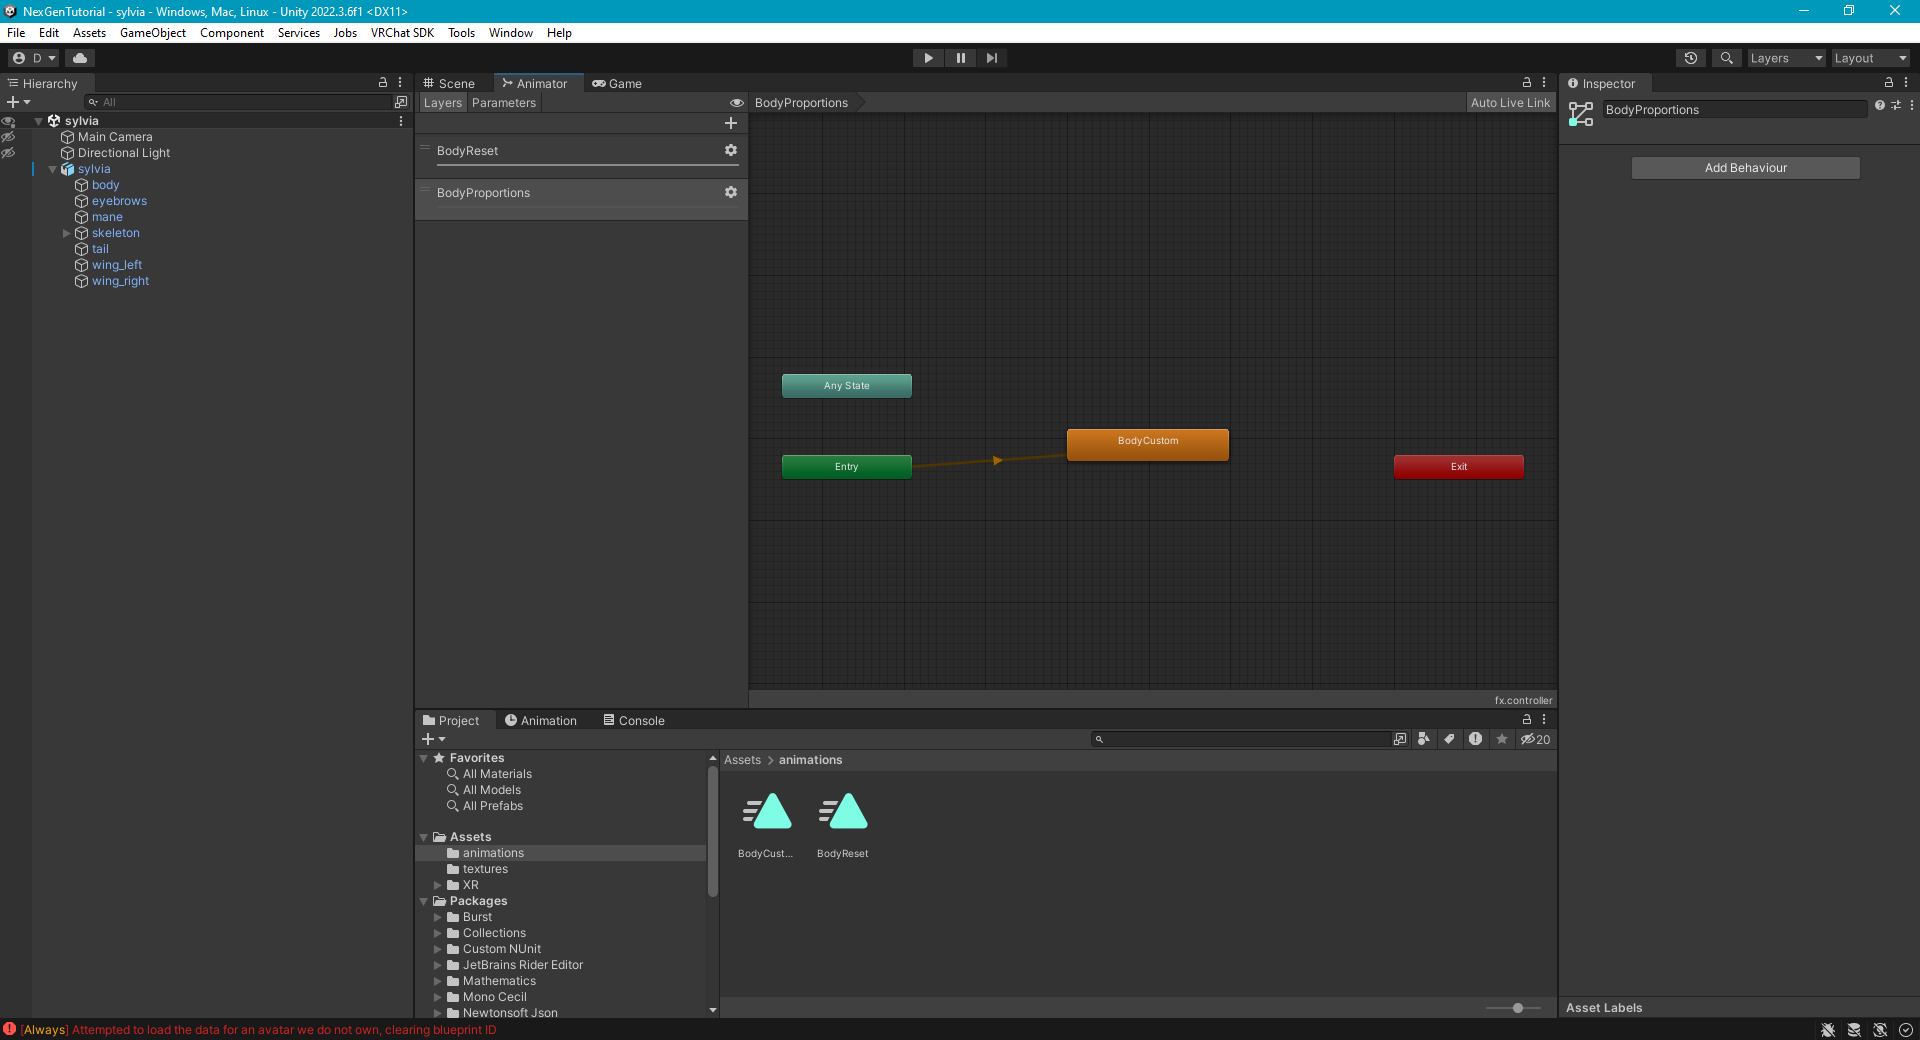
Now is a good time to test that things are working. Before you build your avatar, first open the Scene view and the animator tab, then change the clip dropdown to a different clip. Your avatar should go back to a T-Pose. This is necessary so that your avatar in VR Chat is not posing to ride a bicycle.
Using a Blend Tree
This step is optional, but it allows you to have a slider parameter that you can change in-game, that will blend between your default body and your custom body.
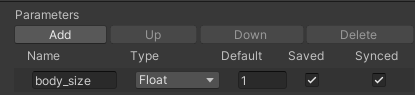
In your Animator tab, click on the Parameters button in the top-left. Add a new parameter with the plus button, then choose Float. A Float is a fractional value between 0 and 1, like a percentage. Name the parameter something like “body_size”.
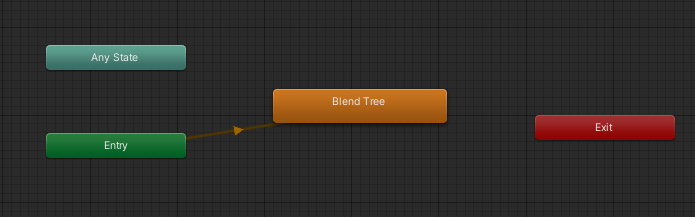
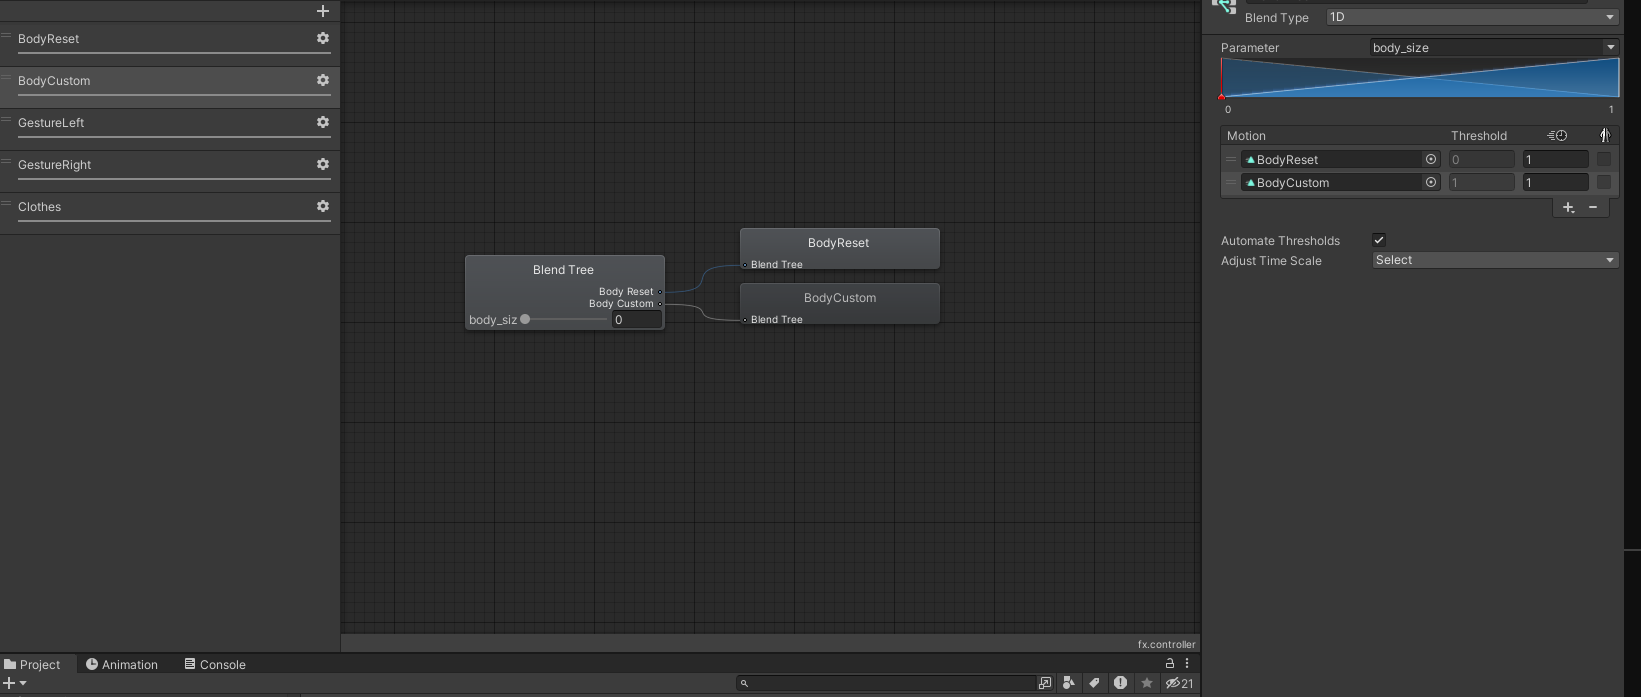
Click back on the Layers button in the top-right. On the BodyCustom layer, remove the existing BodyCustom state, then right click the editor, Create State > From New Blend Tree. Double click on the Blend Tree state, then select the Blend Tree inside it. Set the parameter name to the same name you set before (“body_size”). Click the plus button, then Add Motion Field. Set the motion to your BodyReset animation. Add a new motion field, then set it to your BodyCustom animation.
Now, go back to your Expression Parameters (“params”) and Add a new Float parameter with the same parameter name. Set its default value to what you would like (1 for full custom body, 0 for default body, or anything in between to blend). Check Saved and Synced.
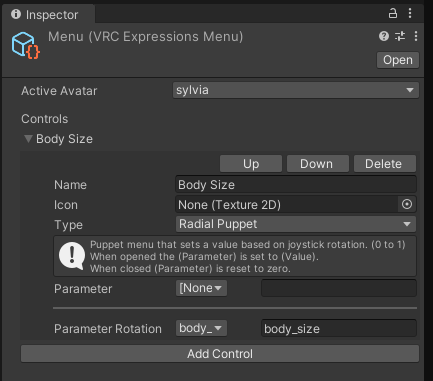
Finally, go to your Expressions Menu (“menu”) and click Add Control. Give it a name to use in-game. Change the Type to Radial Puppet and set the Parameter Rotation drop down to your body_size parameter name. Do NOT change the value of Parameter (leave it as None). Now, when you test in-game, your expression menu will have a new slider to change your body proportions!
Adding Facial Expressions
This will allow you to use hand gestures in-game to change your facial expression.
Set Up the Animator for Gestures
Select your avatar and open the Animation tab. Create a new animation clip called “IdleFace”. This animation will represent our idle facial expression. You may optionally record blendshapes to this animation, but I prefer to leave it as the default.
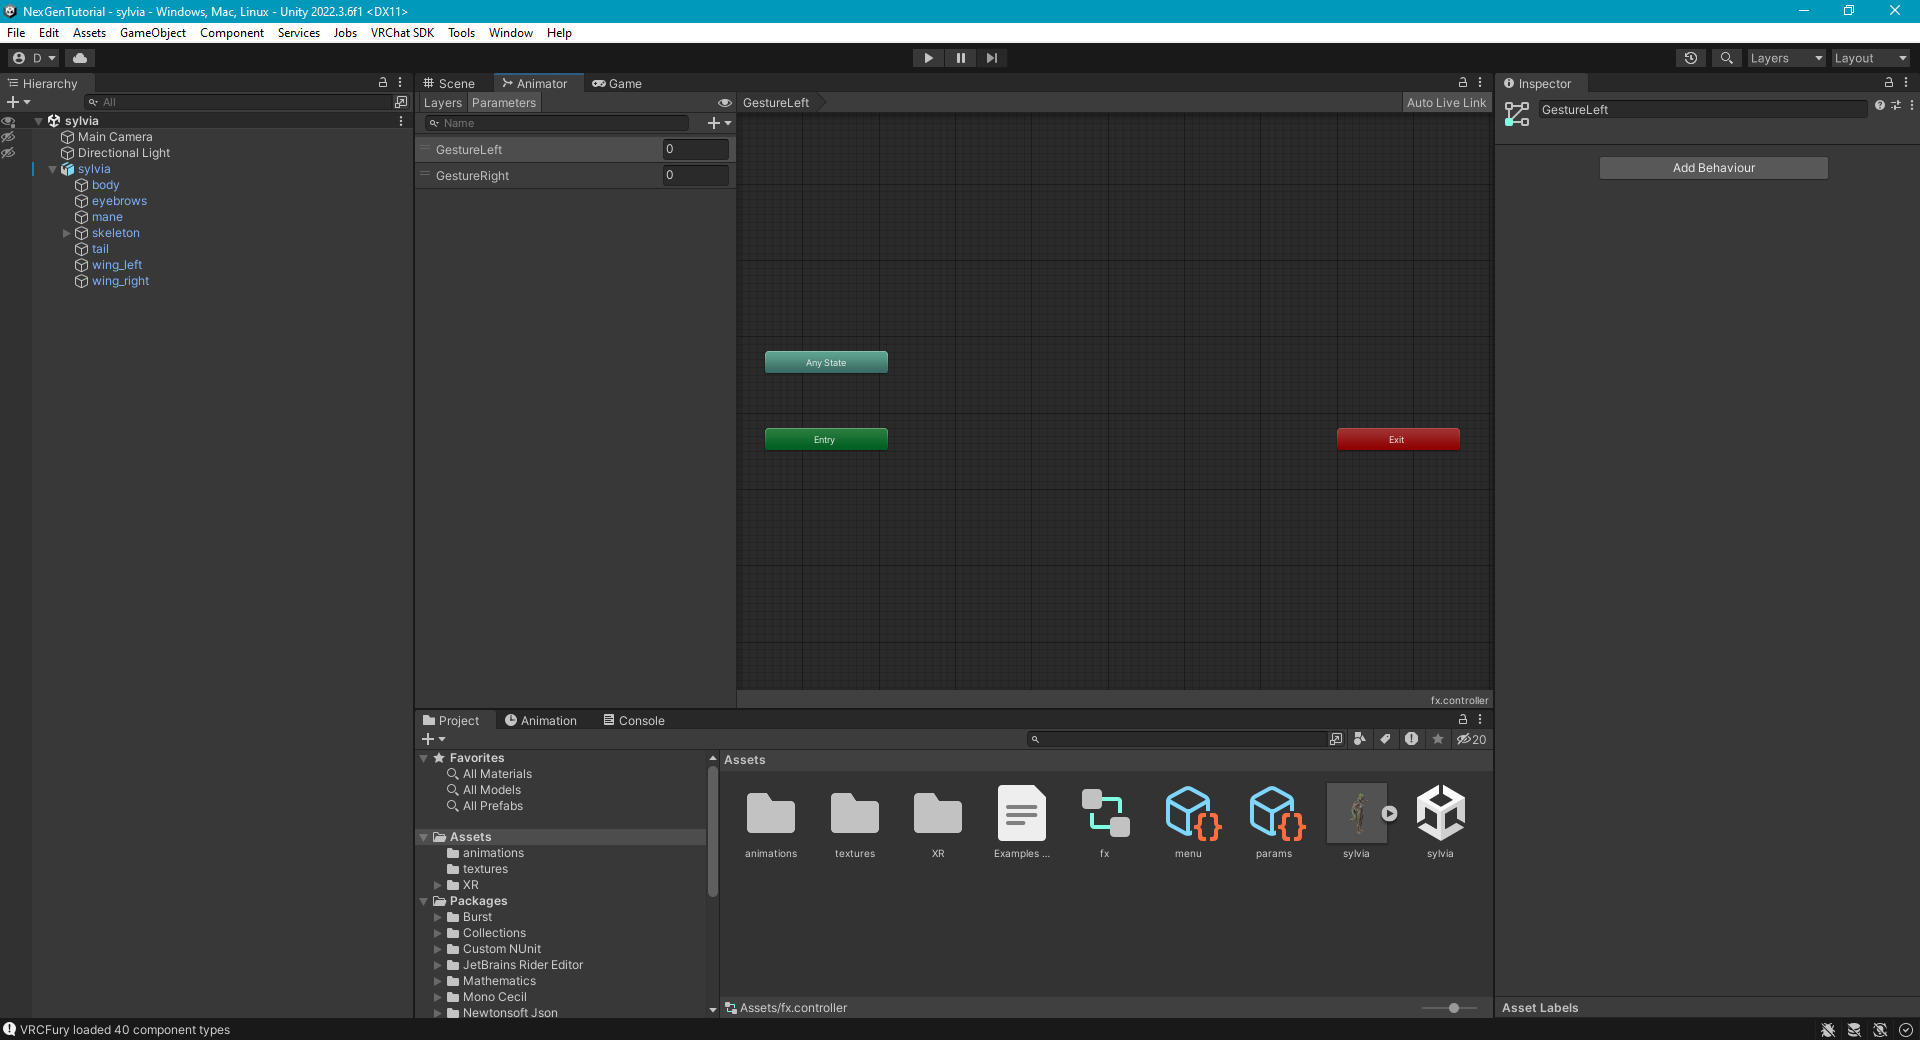
Open the Animator tab. Switch to the Parameters tab, and create two new int parameters called “GestureLeft” and “GestureRight”. These are built in Animator Parameters provided by VR Chat. They indicate which hand gesture the hand is doing with a number.
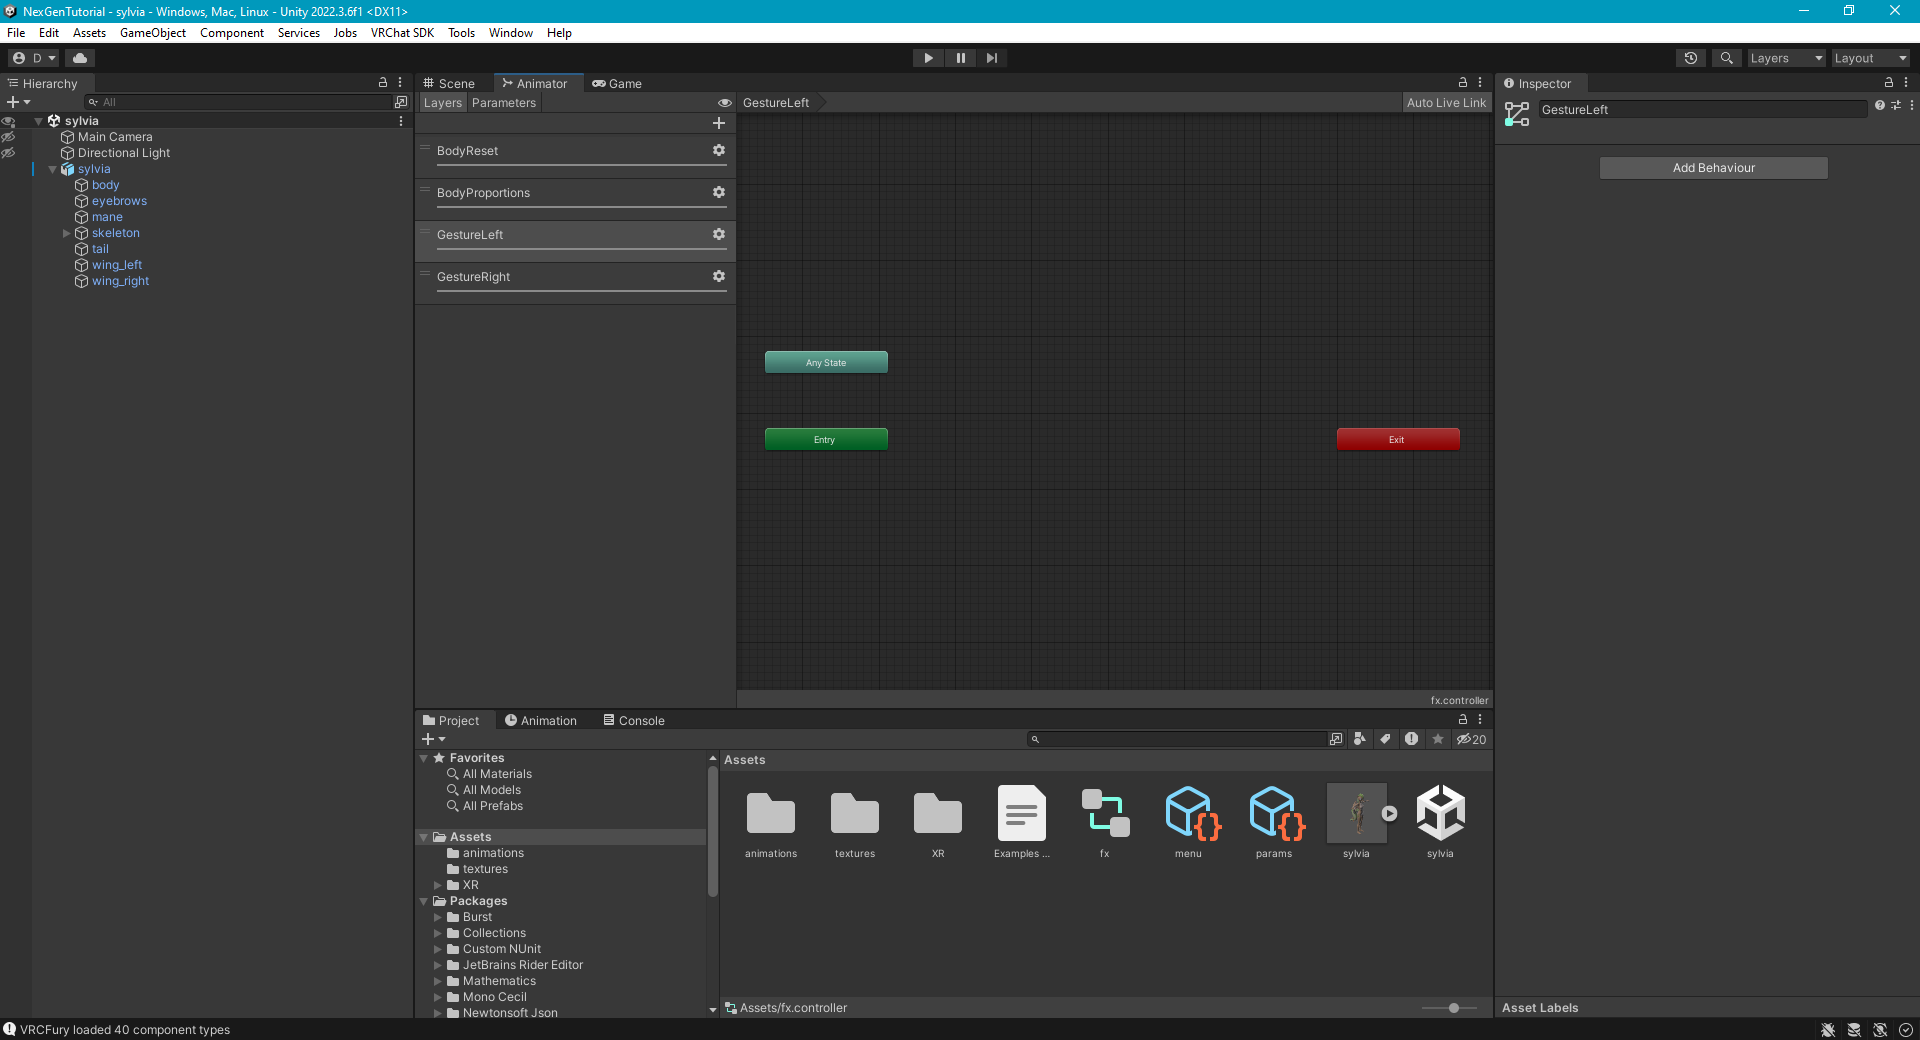
Switch to the Layers tab, and create a new layer called “GestureLeft”. Remember to change its weight 1. Repeat and create another new layer called “GestureRight”. These layers will be customized to change the avatar’s facial expression based on the gesture parameters.
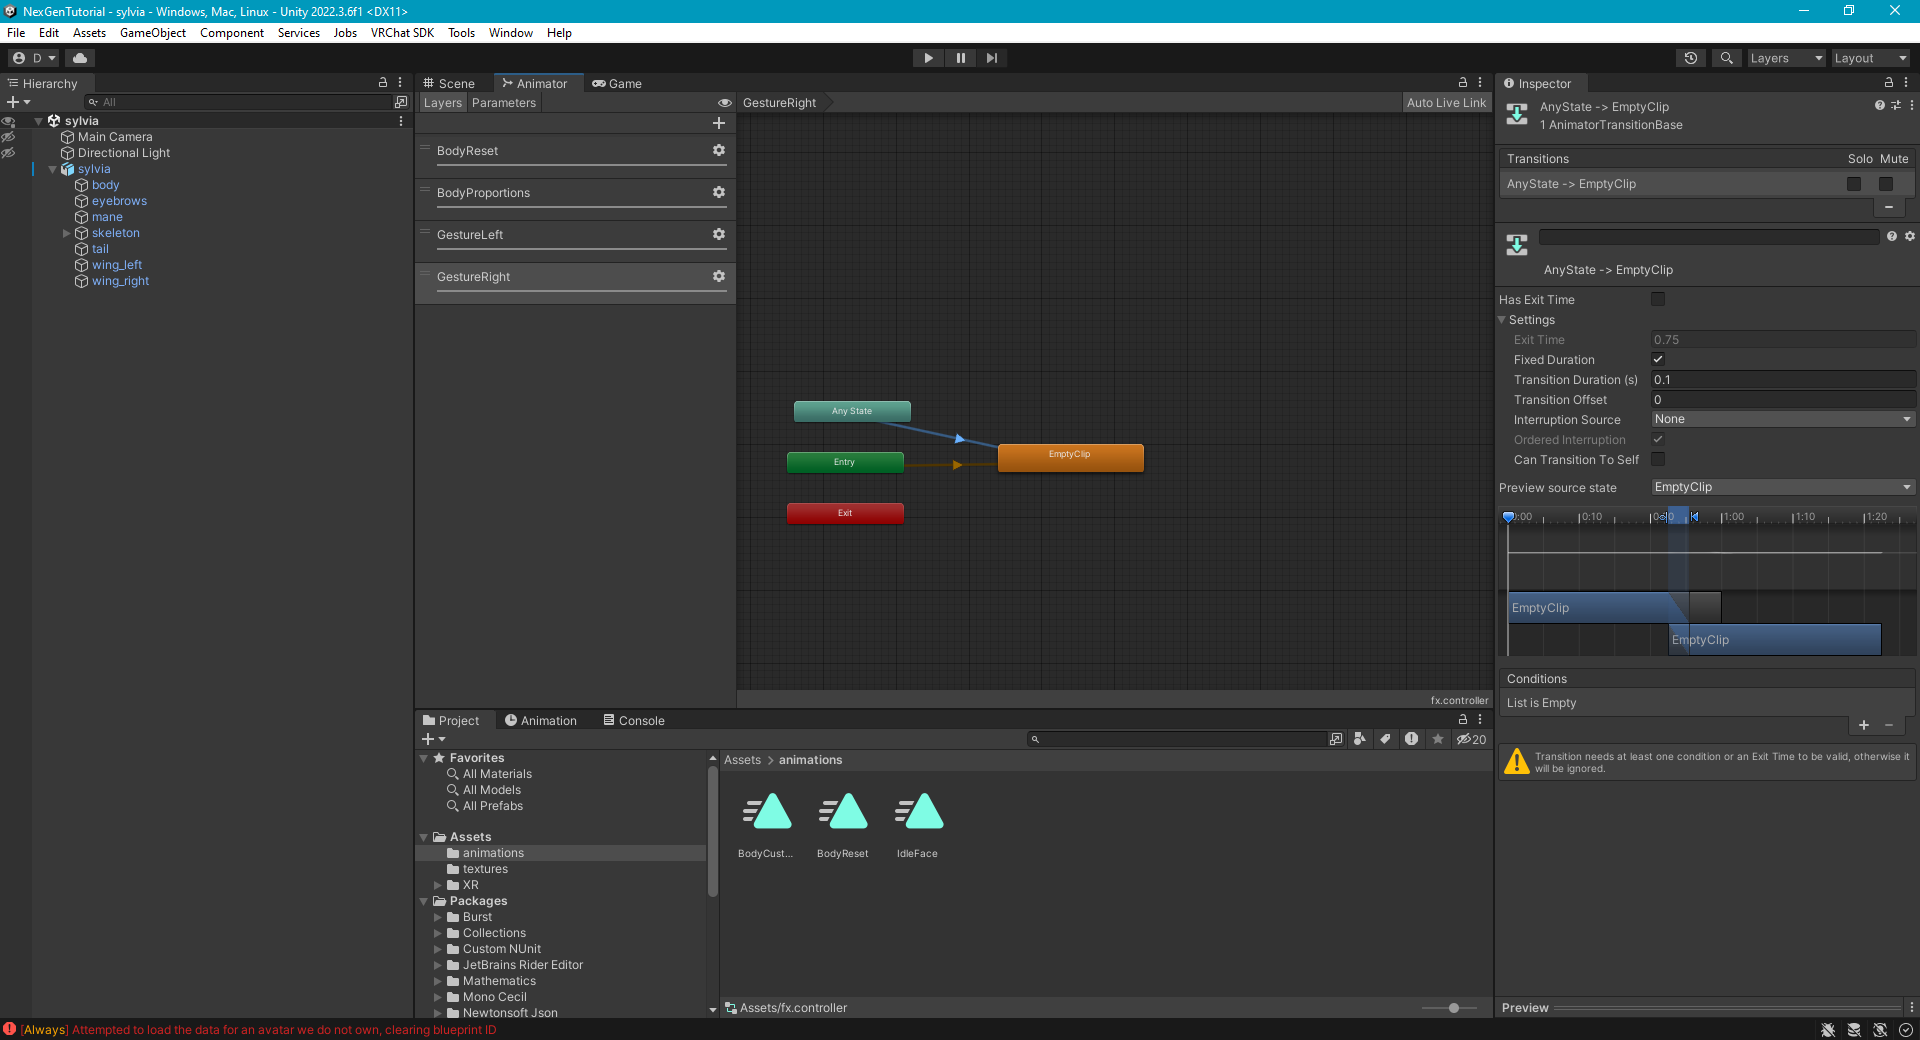
Start with the GestureLeft layer. Drag the IdleFace animation into the editor. Right click the Any State box, then select Make Transition. Drag it to the EmptyClip state. Click on the array that was created, then go to its Inspector settings. Uncheck Can Transition to Self, and set the Transition Duration to 0.1. This will make the layer switch to the IdleFace animation when the right hand gesture is 0. The value 0 indicates no gesture. Repeat this for the GestureRight layer.
Create Facial Expressions
Switch to the Animator tab and select the GestureRight layer. Drag the HappyFace into the editor. Right click the Any State, select Make Transition, then drag the arrow onto the HappyFace state. Click on the new arrow, then in its Inspector, uncheck Can Transition To Self, and set the Transition Duration to 0.1. Click on the plus icon under Conditions, then set the parameter to GestureRight, Equals, then 7. This will make the layer switch to the HappyFace animation when the right hand gesture is 7 (thumbs-up).

The table below shows all supported hand gesture values.
| Index | Gesture |
|---|---|
| 0 | Neutral |
| 1 | Fist |
| 2 | Open Hand |
| 3 | Finger Point |
| 4 | Victory/Peace |
| 5 | Rock and Roll |
| 6 | Hand Gun |
| 7 | Thumbs Up |
Repeat this process for as many facial expressions as you like for right and left hands. Keep in mind that with this setup, the right and left gestures can blend together, creating a mix between two facial expressions. This behavior can be tweaked with more advanced conditions, but I will not get into that with this tutorial.

Adding Phys Bones
Reference Videos:
Phys Bones add movement and interactions to your avatar, such as a bouncy mane, scratchable ears, or jiggly breasts. They require some tuning to look good, and will be different for each avatar’s unique mane/tail style. This tutorial will not go in-depth into Phys Bone configuration, so you should watch the reference videos if you want to learn more.
Basic Phys Bones
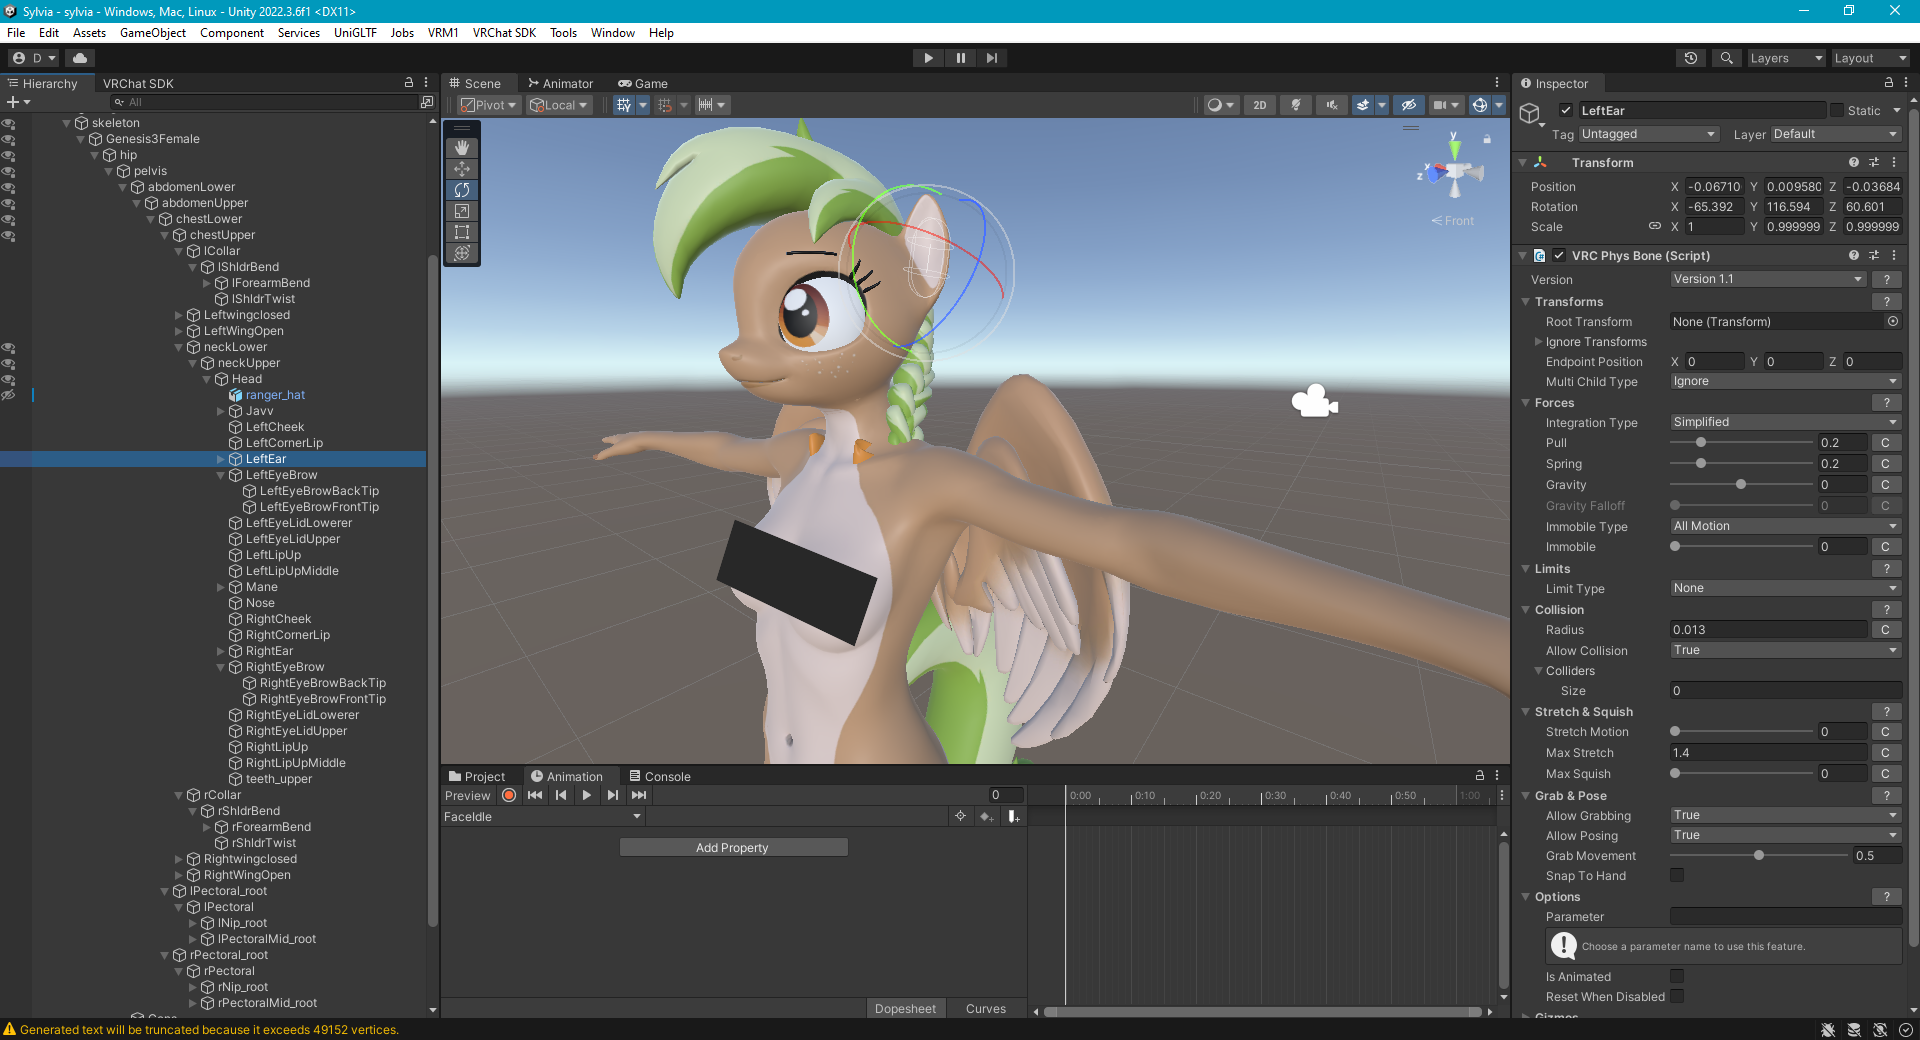
Let’s start by adding motion to the ears. Navigate your skeleton in the hierarchy until you find the ear bones. Click on one ear bone, then add a new VRC Phys Bone component. Repeat this for the other ear bone. Set the Radius value for each to about 0.013. This will allow them to be interactable. For ears, I like to leave the Forces values as their defaults, but you can tune them how you like.
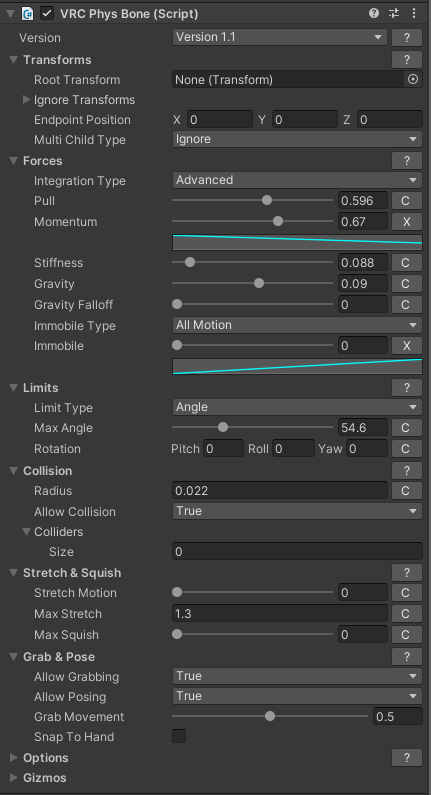
For the breasts, I added Phys Bones to the lPectoral and rPectoral bones. They can be a bit tricky to tune, but here are the values I used.
Other bones I added Phys Bones to were Rightwingclosed, Leftwingclosed, and the Tail. I simply left their forces as default, and assigned them a radius.
Now your avatar should have some wiggly jiggly bits! You can test them out by either entering Play mode in Unity then moving your avatar around, or by doing another Build and Test to try them out in VR Chat.
Phys Bone Colliders
My character has pigtails which are currently clipping through the shoulders. Using Phys Bone Colliders can prevent this from happening in-game. First, I added a Phys Bone component to the Mane bone. I then assigned it a radius and adjusted the forces. I added some gravity to them so that they hang downward when I tilt my head. I also set the Max Stretch to 1.5, meaning that when players grab the pigtails, they can be stretched to 1.5 times their original length. Ouch!
To add a custom collider, go to the bone that you want it to collide with, and add a VRC Phys Bone Collider. Adjust the shape, radius, and transform of this component until it aligns with the geometry. Then go back to the original bone and add those two bones to its Collders list. I added a capsule-shaped collider that goes down the neck and another capsule collider between the shoulders. Now my pigtails will hang down over my shoulders or behind my back.

Adding Outfits
Outfit Setup in Blender
Finding Outfit Models
Find your outfit models from your preferred online sources. SFMLab is a good resource to look for models that match the NexGen body. There are several packs you can find that include a lot of outfits in one. They will need to be decompiled, but they should fit the best to your model’s body.
Here is a downlink link to an outfit pack which includes the shirt and shorts I show in this tutorial: Download Link
I have also customized the textures to match my character’s Park Ranger uniform.
Decompile the Models
If your outfit models were made for the source engine, then you will need to decompile them with Crowbar and VTFEdit, same as when you decompiled your NexGen model.
Import Outfit Models
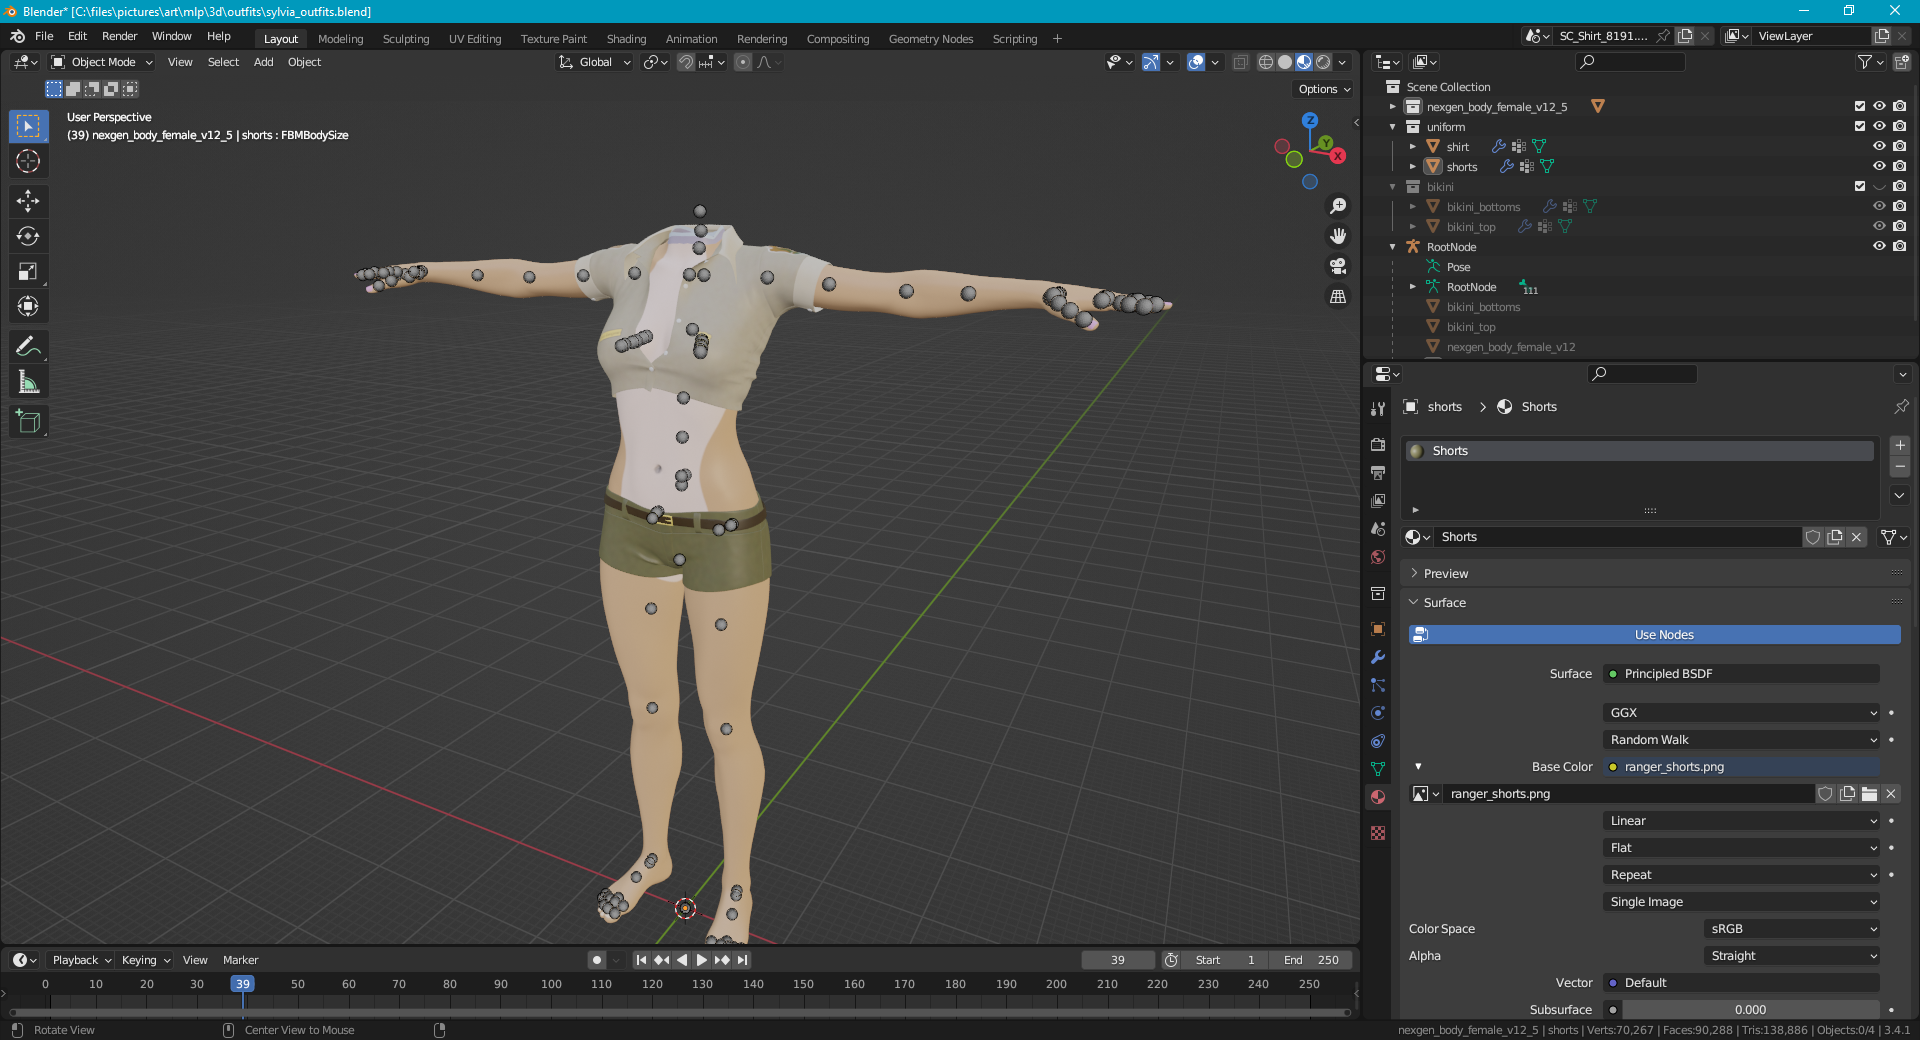
Create a new blender file and delete the default objects in the hierarchy. Import the outfit model into blender. Also import a body model from the NexGen sources that you can use to fit your clothing to. Set up all your material textures (mainly for the outfits, but if you want you can texture the body too).
Transfer Bone Weights
This step will copy all bone weights from your body to your outfit, so that the outfit will move when your body moves. This method of automatic skinning will work decently, especially for tight-fitting outfits, but it won’t work well in crease areas, like between the fingers and the crotch.
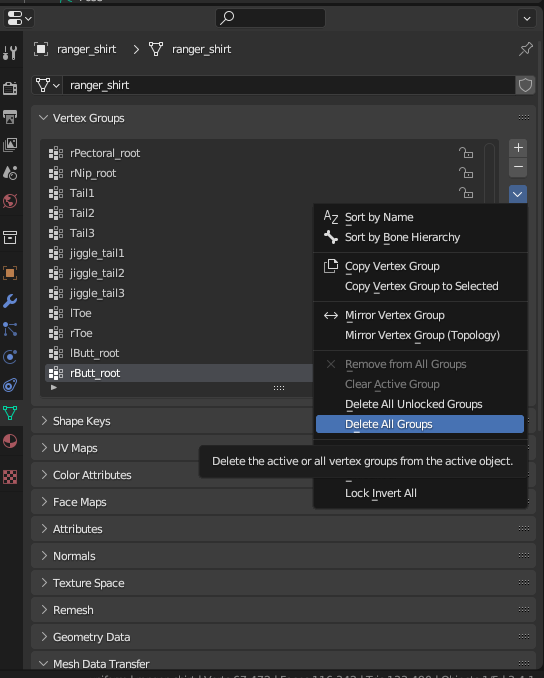
Start by selecting your outfit mesh, and going to the mesh tab. Under Vertex Groups, if there are groups listed, then click the down arrow on the right and select Delete All Groups.
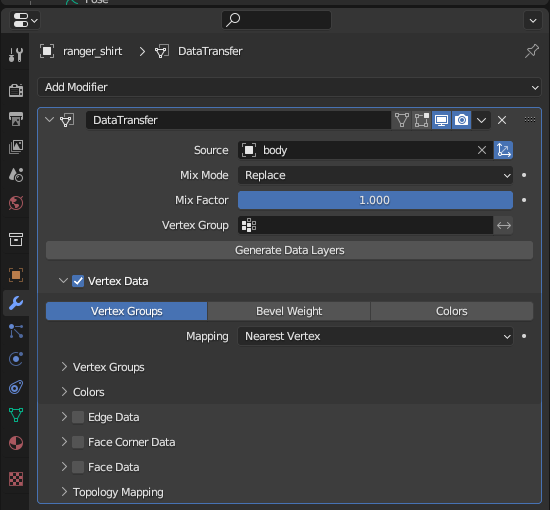
Next, go to the Modifiers tab. Delete the armature modifier if there is one already. Add a new Data Transfer modifier. Select Vertex Data, and click Vertex Groups to enable it. Set the Source to your body mesh, then click Generate Data Layers. Now click the down array at the top of the modifier, then click Apply.
Finally, Add anArmature modifier, and set the Object to your clothes’ root armature.
Transfer Shape Keys
This step will copy all shape keys from your body to your outfit.
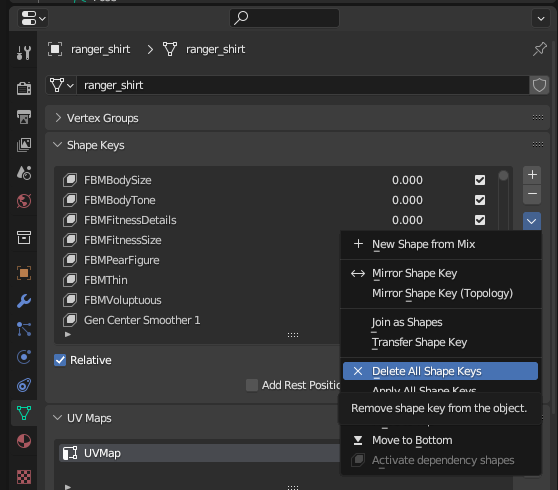
Start by selecting your outfit mesh, and going to the mesh tab. Under Shape Keys, click the down arrow on the right and select Delete All Shape Keys.
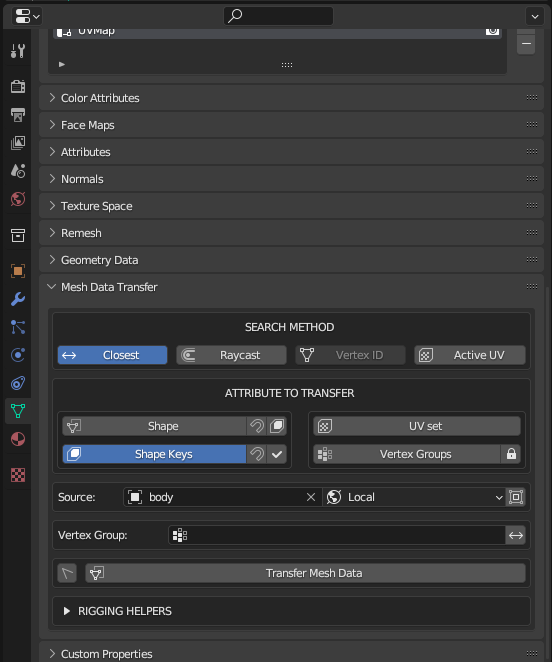
Next, scroll down to the Mesh Data Transfer section. This is part of the Mesh Data Transfer Add-on, so make sure you installed that. Select Shape Keys to enable it. Set the Source to your body mesh, then click Transfer Mesh Data. Now all shape keys from your body will be cloned onto your outfit.
Optional Steps
These are a couple optional steps you may need.
If your outfit mesh doesn’t fit your body mesh well, then you may want to Sculpt it in Sculpt mode. I like to do so using the Grab tool with symmetry enabled.
Another issue you may run into is if your clothes are transparent on one side, which is caused by backface culling. To fix this, add a Solidify modifier to your clothing mesh. This will add geometry to the other side of the mesh so that there are no back faces showing.
Export as FBX
Before exporting, make sure to hide any elements you don’t want added. In my case, I hid the body because I only wanted the clothes. File > Export > FBX. Check Visible Only, then under the Armature section, uncheck Add Leaf Bones.
Import into Unity
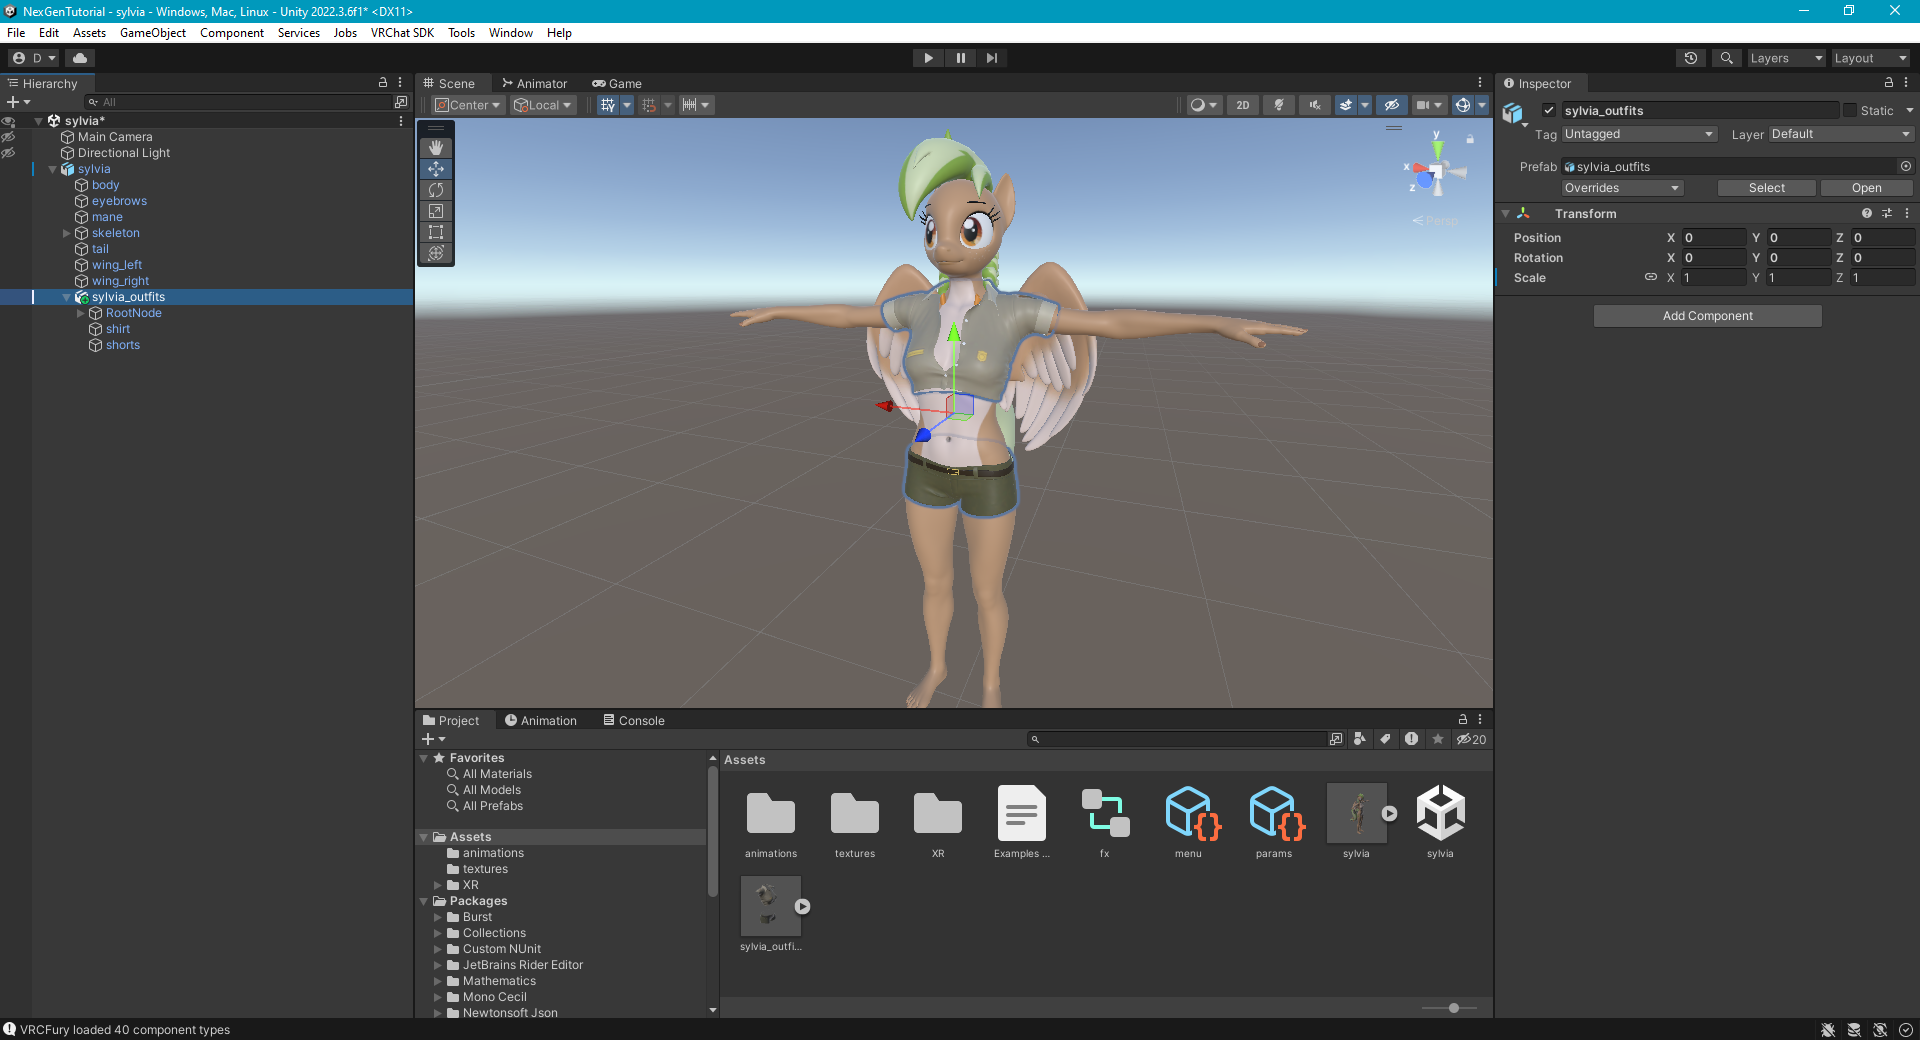
Drag the outfit FBX file into your Unity Assets folder, then drag that into your hierarchy, underneath your avatar. Also drag your texture files into your Assets folder. Select the added outfit prefab, then change its scale to 1. Verify your outfit now shows up in the editor on top of your body. Click on your meshes, and check Update When Offscreen in their Skinned Mesh Renderer components.
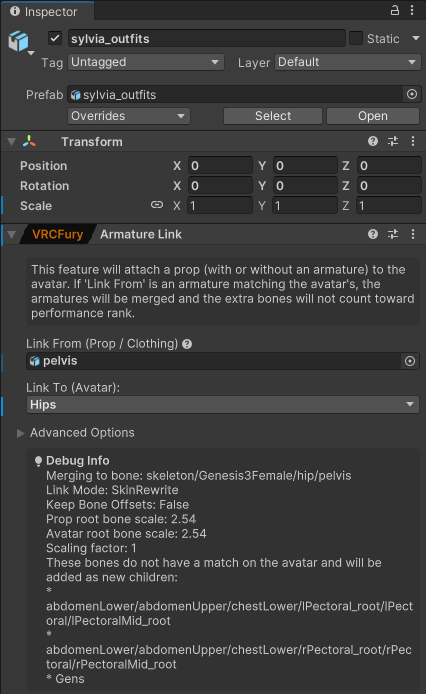
Add VRCFury Armature Link
An Armature Link will synchronize all our clothing bones to your body’s skeleton bones. Select your outfit prefab. Add the component “VRCFury | Armature Link”. Select your outfit’s armature’s pelvis bone to use as the Link From option, and leave the Link To option as Hips.
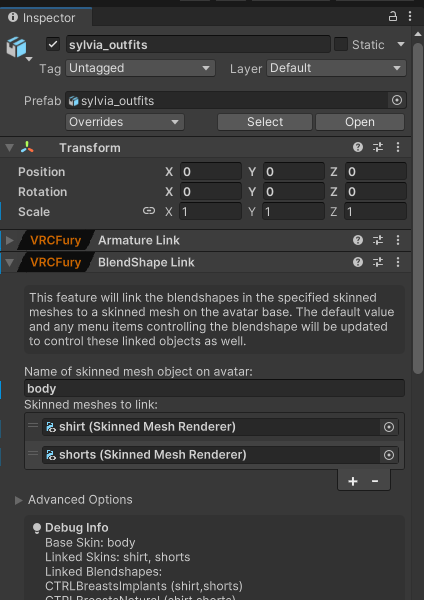
Add VRCFury BlendShape Link
A BlendShape link will synchronize all your body’s blend shapes to your outfits. Select your outfit prefab. Add the component “VRCFury | BlendShape Link”.
Set the skinned mesh name to the name of your body mesh. Click the plus to add a new skinned mesh, then drag your clothing mesh into the box. If you have more than one outfit mesh, then click the plus again to add more.
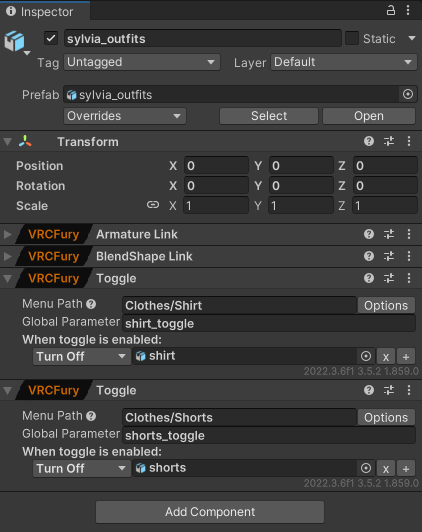
Add VRCFury Toggles
A toggle will let you turn on and off your clothing pieces from within your in-game expressions menu. Select your outfit prefab. Add the component “VRCFury | Toggle”
Set Menu Path to where you want the toggle to show up in your expressions menu, with slash “/” characters indicating sub-menus. Click Add Action > Object Toggle. For “When toggle is enabled”, select Turn Off, then set the object to your clothing mesh. Next, click Options > Use a Global Parameter, and give the parameter a name. Repeat this with a new Toggle component for each additional outfit mesh.
Setting this to Turn Off is important, so that the default state of your avatar is clothed. Toggles uses animations to turn on/off the clothing, and animations may not play for others for certain avatar-safety reasons. Ensuring the default state is clothed means that other people with safety settings enabled will not always see you as naked! If you have multiple outfits, then you can use Turn On for those.
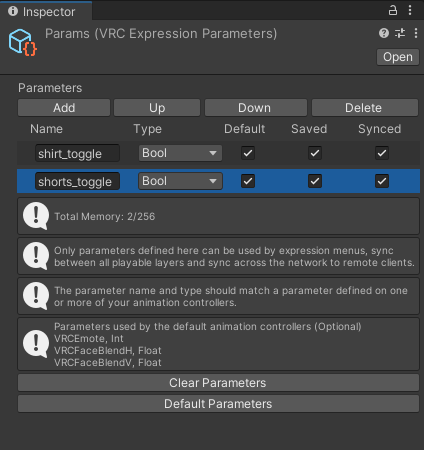
Now, go to your Expressions Parameters, and Add a new Bool parameter with the same name as the Toggle. Enable Saved and Synced. This way, others can see your outfit toggles and the outfit configuration will be saved between sessions. Repeat this for each additional outfit toggle.
Result
Your outfits should now be ready to test in VRChat! When testing, ensure the blend shapes and posing matches between your outfit and body, and that minimal clipping occurs as you move around. Also check that the toggles are working in your expressions menu.
Publishing your Avatar
When you are ready to use your avatar in-game with others, you will need to publish it first.
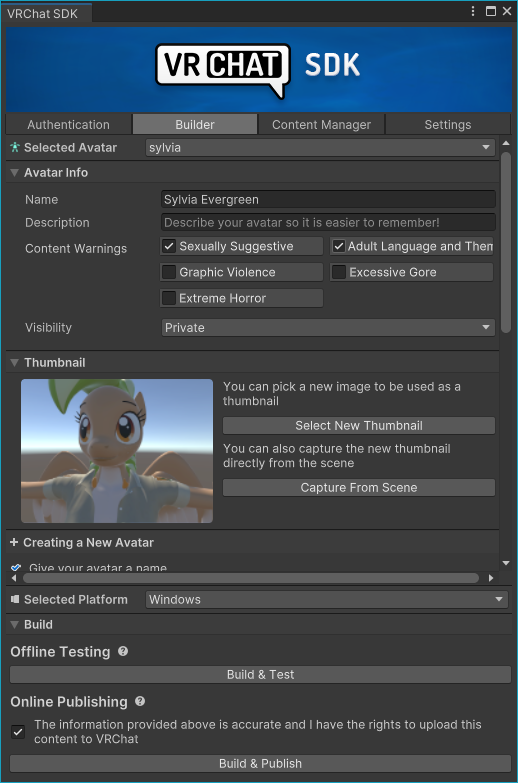
Open the VRChat SDK. Give your avatar a name and an optional description. You can also specify a thumbnail, either with an image upload or by taking a picture of the scene. You should check Suxually Suggestive and Adult Language and Themes if your avatar has NSFW bits (which NexGen models do by default). Scroll down to the Online Publishing section, then check the box and click Build & Publish.
Use your avatar responsibly. Do not use it in public servers if it is NSFW, you will get banned. I reccomend only using your avatar with close friends until you can make it safe.
Sharing your Avatar
There are a couple ways to share your avatar with someone. If you want to keep your avatar private while still sharing it with another user, then you will need to send the unity project (as a unitypackage) to that user and they will have to publish it themselves. The other (and easiest option) is to make it public so anyone could use it, but that’s not always desireable.
Conclusion
And that’s it for the tutorial! You should now have a working VRChat avatar made from a NexGen model. There’s much more advanced topics out there that you can look into, but I hope this helped cover the basics. Please let me know if you have any feedback about this tutorial, I would appreciate it.
Here are some ideas for additional customization you could try.
- Add Eye movement. This would require adding eye bones tied to pupil meshes. I have tried this with mixed success. My main issues were the eyes/pupils clipping through the face.
- Use Vizemes for lip sync. This would give you more accurate lip syncing. The NexGen head model doesn’t include vizeme blend shapes, so this may be tricky to do.
- Add animations like dances.
- Use custom shaders. The lilToon shader is a popular one for a more cartoon-like style.
- Create a second version of your avatar that can be exported as a VRM file. VRMs can be used as VTuber models or in games like Lethal Company (with the VRM mod).
Credits
- Sylvia Evergreen character designed and owned by DandyBouquet
- Sylvia Evergreen NexGen model made by Acey
- Special thanks to IceAspect and Tatemil for helping me through the process
- Thanks to my brother trigger_segfault for helping set up this webpage
- VRChat World shown in title image is called Cabin in the Woods, by Enverex